Devices
Devices
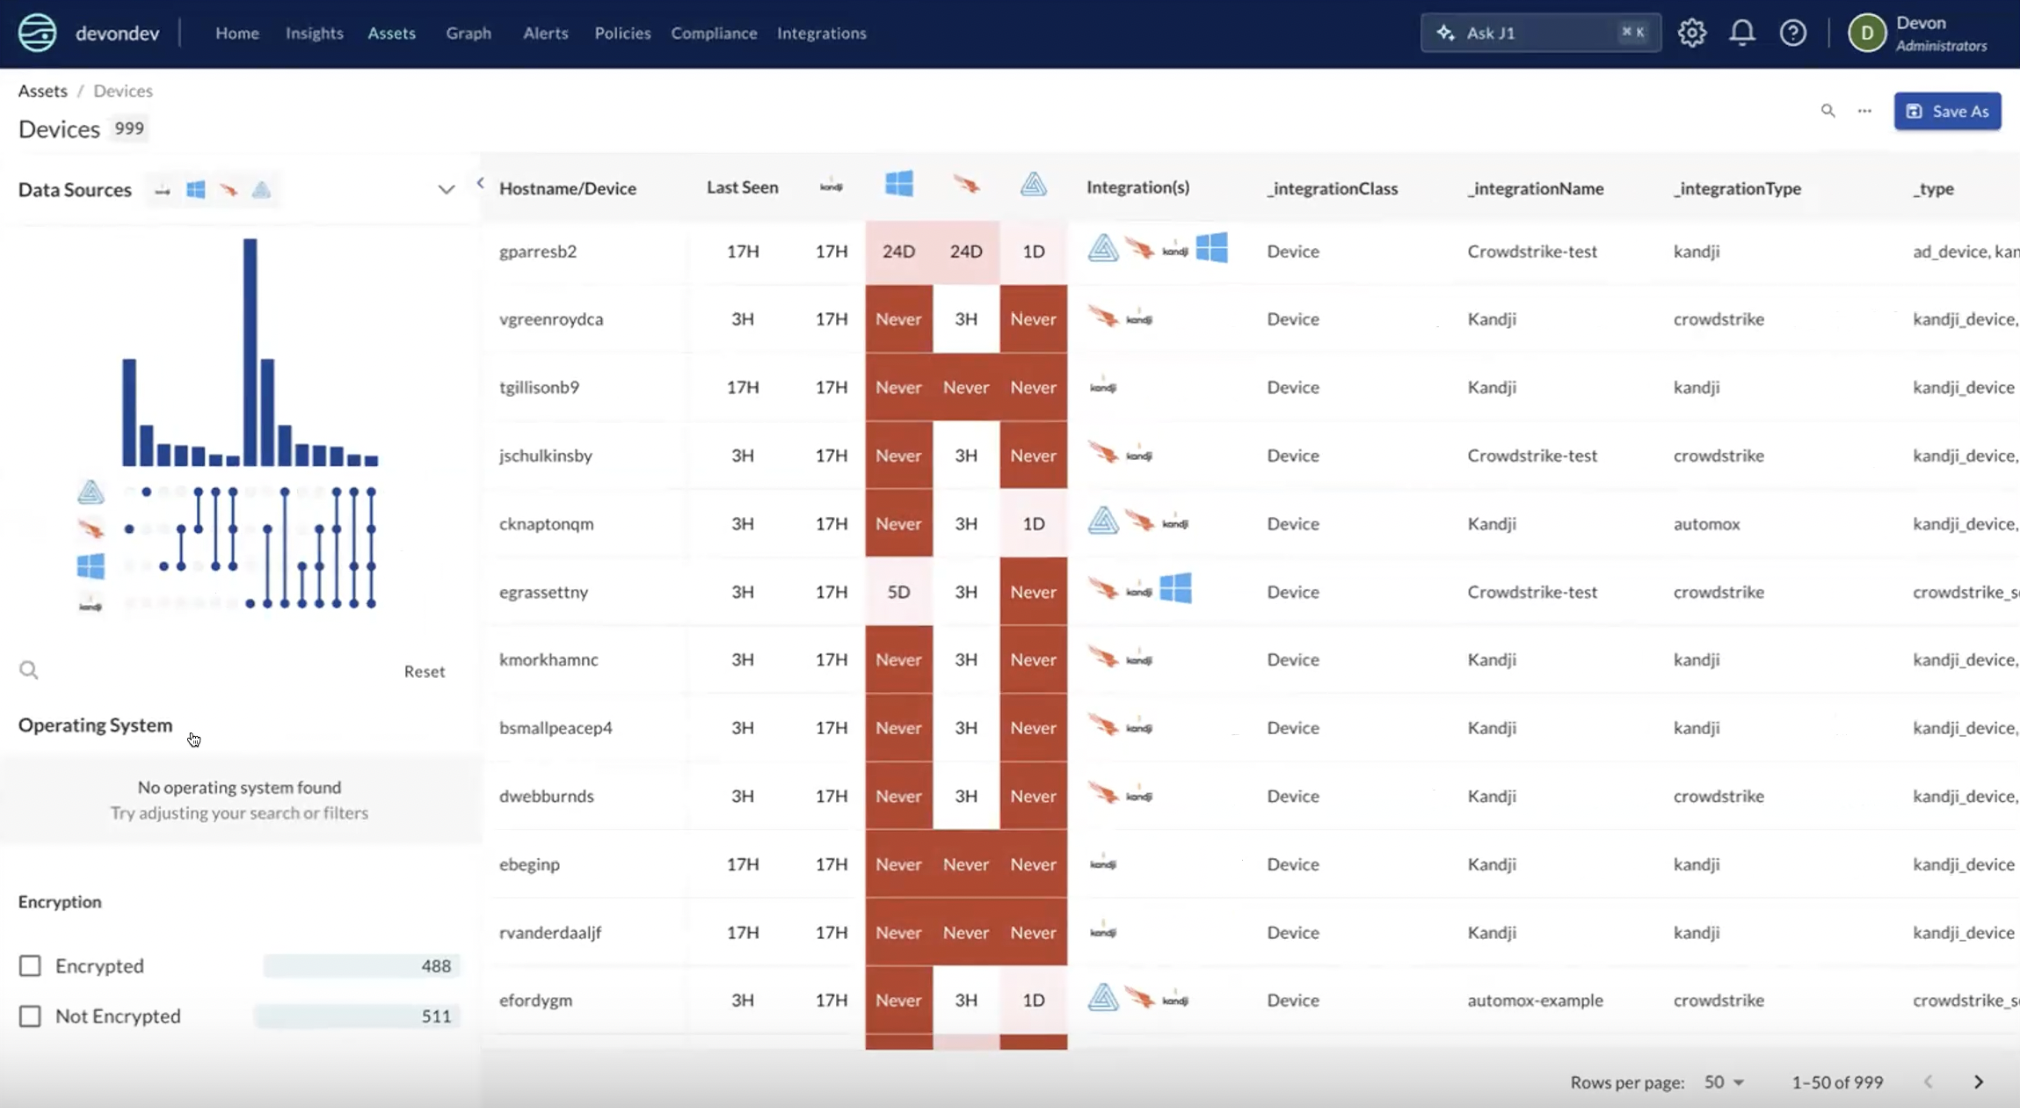
JupiterOne normalizes ingested asset data for devices and represents them as a single device within the Device view. To access the Device view, navigate to the Assets tab in JupiterOne and select the device icon in the top right of the asset table.

Currently, JupiterOne ingests and normalizes data for the following device types:
- Servers
- Laptops
- Workstations
- Mobile devices
Device data normalization and consolidation
With the introduction of Devices, we now normalize data relating to devices. These changes apply to all entities from any _type in the _class=Device:
- Mac address normalization: Converts and collects MAC addresses of various formats to uppercase, colon delineated, into an array of MAC addresses associated with the device (
macAddress) - Vendor/make/manufacturer normalization: Pulls various fields to a single field and normalizes values (
make)- MAC Address to vendor OUI Normalization: Converts MAC addresses to vendor where the MAC address of a devices matches an IEEE registered OUI
- Operating system name/family/type: Normalizes operating systems from various formats and properties (
osType) - Operating system version: Normalizes OS version numbers from various formats and properties (
osVersion) - Encryption status: Normalizes the encryption status (boolean) of a consolidated device (
encryptionStatus) - Serials: Normalizes and collects serial numbers into an array of serials associated with the device (
serials)
In addition to the normalization of data, the Device Matrix introduces the consolidation of devices from source integrations. Today the consolidation logic will consolidate on the below Device properties if they match between devices:
- MAC Address
macAddress - Serial
serials - Azure AD Device ID (O365, AzureAD, and MS Defender specific)
You may see a preview of these normalizations in new, temporary properties with a j1_ prefix. These will be removed and the normalized values will be available in the base field. Some saved queries or rules may be affected. Our goal is to make your queries simpler and more accurate.
For more information see Entity Property Normalization
Data sources table
The data sources section showcases the integrations configured within your devices view for which data is being populated within the devices table. By toggling a data source, you can remove or populate that integration's device data within the table view. Each data source is represented as its own column within the table. By enabling a data source, you will append that data source's column on the table, and disabling a data source will remove that source's column from the table.
For example, if you have Automox and Microsoft integrations ingesting device assets, your device table would include devices associated to Automox, Microsoft, and both. To only view devices related to Automox, you could deselect Microsoft within the Data Sources panel, leaving only devices relating to Automox.
Device management
Much like our assets view, the device table supports a variety of actions that enable you to adjust the table and results to make meaningful discoveries. Most actions are found under the three dot icon found at the top right of the devices table.
Device properties panel
Selecting a device from within the table will bring up the device's property panel. This panel showcases all the different devices and their associated properties that make up the consolidated device. From here, you can also view the graph of the device, where you'll find each of the properties that it is comprised of, allowing you to explore the blast radius of each property.
Filter panel
You can filter the results within your device view a variety of ways, and the filtering panel on the left of the table provides a quick way to sort your data based on a variety of pre-configured filters:
- Operating system type
- Operating system version
- Last seen date
- Tags
- Device Encryption
Full text search
From within the devices view, you are able to query the table via the search bar in order to filter down results to desired information. For example, you could search for a particular device, MAC address, or
At this point, querying your devices is limited to the full-text search. Querying your devices with J1QL is not supported.
Column selection
In addition to the table columns populated by each data source, you can add and remove additional columns in the table by accessing the three dots in the top right corner of the table and selecting Column selector
Heat map
The heat map allows you to visually assess the severity rankings of the duration of a particular device being last seen by a data source. The heat map is displayed within the Last seen column of the devices table.

Modify heat map
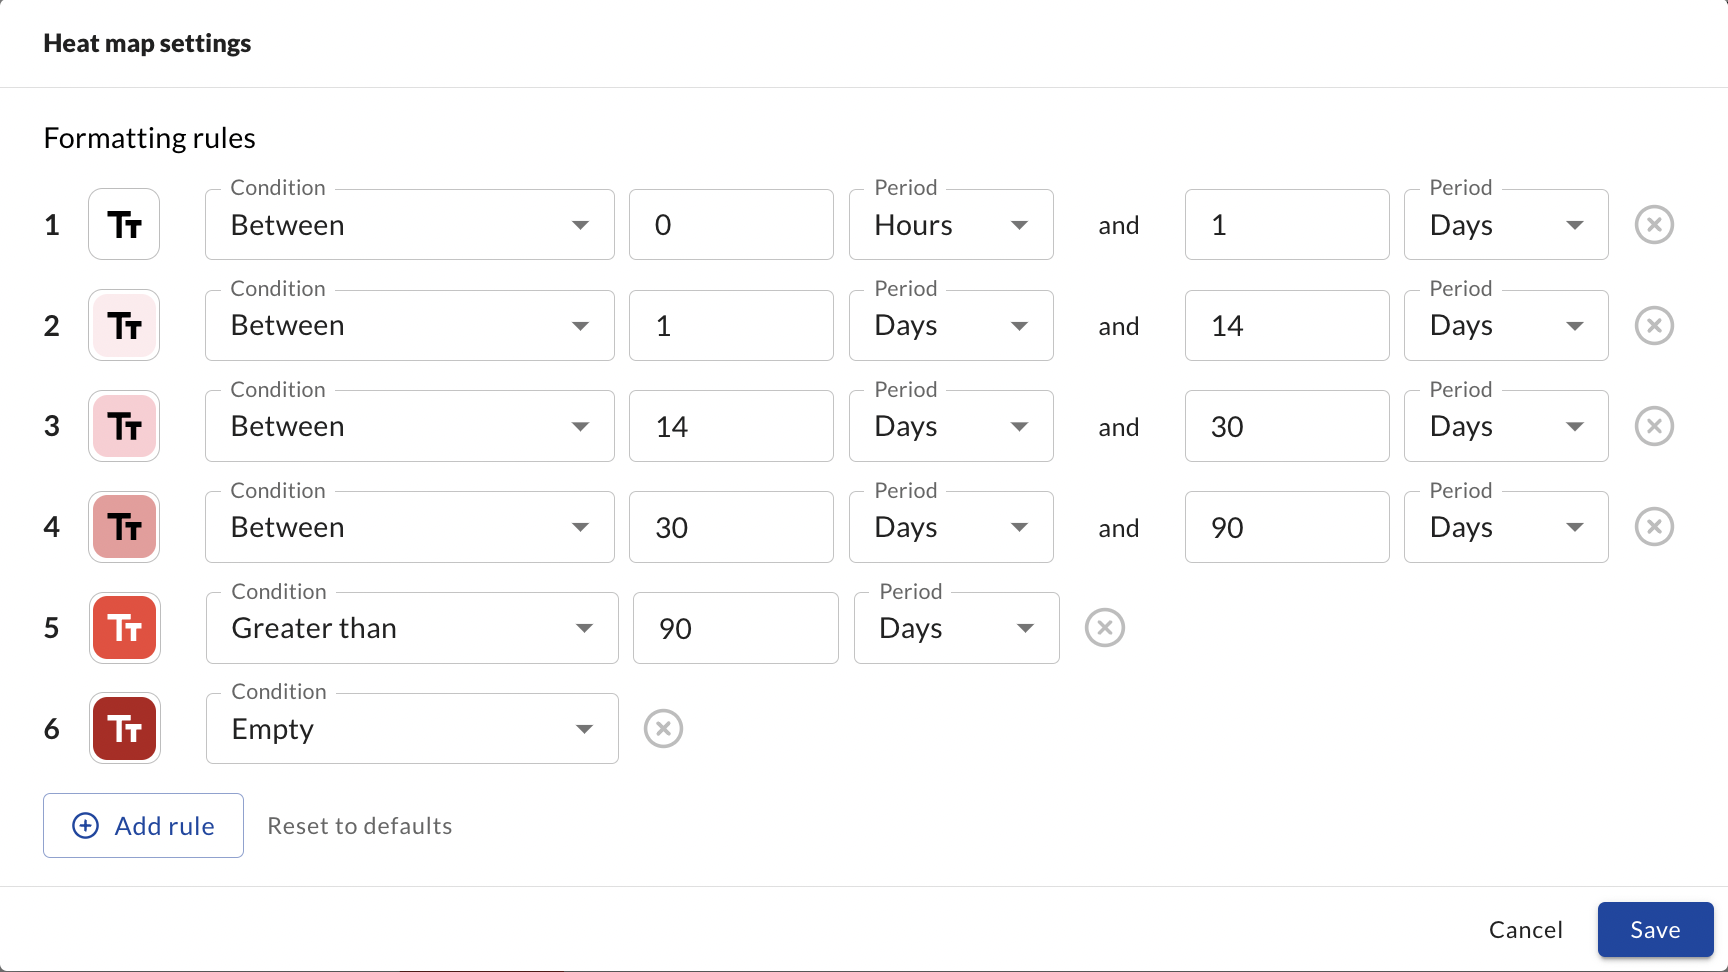
The heat map can be adjusted to suit your particular SLA, and is completely customizable. By clicking the three dots in the upper right of the table view and selecting Heat map settings, you are able to change and update the default heat map values. You can specify durations, their corresponding color on the table, and even add additional rules to expand the amount of heat map classifications on the device table.
Data Source Authority
With any device value that may show up as an array with multiple different values across integrations (such as a device display name), you are able to designate a specific integration as the highest authority to inform JupiterOne that the values for the designated data source authority should override other integration values and be displayed. You can access Data Source Authority configuration by selecting the three dots in the upper right-hand corner of the devices table.
This is configured in a ranking order, giving highest precedent to the primary designated data source. For example, if you want to utilize the Automox device property values, you would provide Automox the Highest authority value. Any data source ranked below Highest would only be populated should the ranking source above it in priority not provide that particular value.
Save as CSV
You are able to export your device list/table as a CSV be selecting the Save as button in the top-right of the device table. From there, you will be prompted to download the file.
Unified Device in the J1 Graph
Data Model and Property Schema
The unified_device is a new added type of the class Device. This new entity is created as a bridge entity of all the HostAgent, Device, and Record entities that follow the consolidation schema described here. It is important to note that if you are running Device class queries regularly you will be seeing more Device entities that will be attributed to the unified_device.
It is important to note that you are able to control the naming convention and properties shown on the unified_device by establishing a data source authority in the Unified Device Matrix - more here
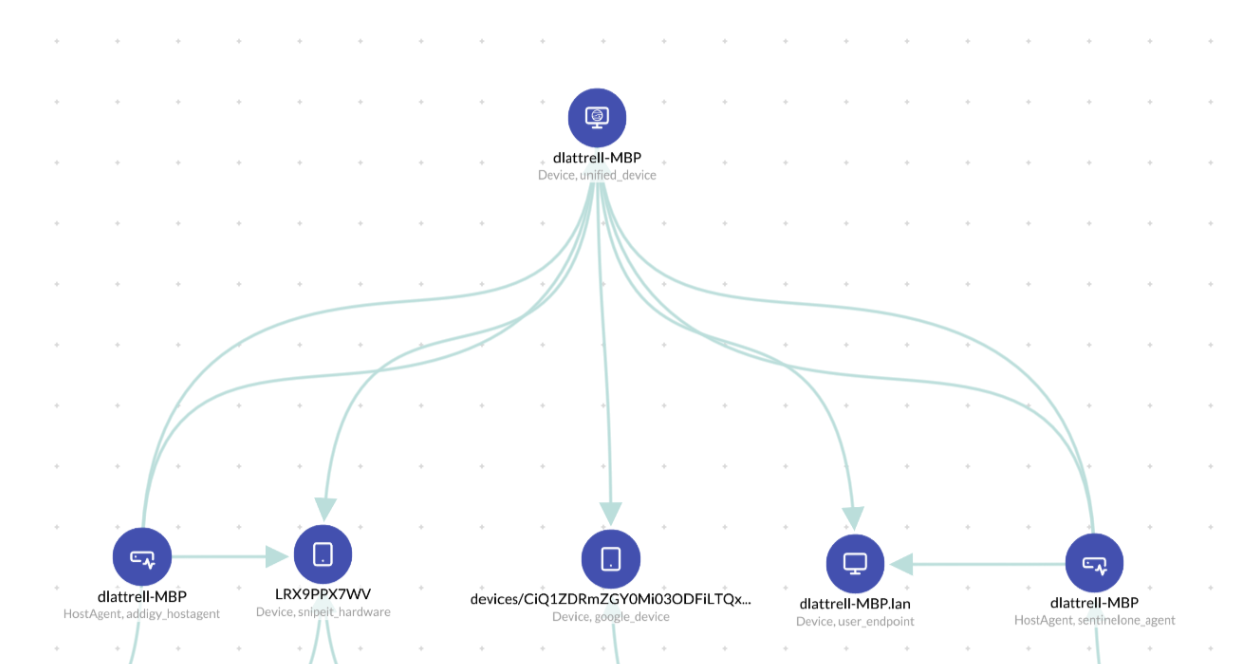
Below is the data-model for how these entities are connected in the J1 Graph. Using the data model you can start to build Device queries across all of your Device inventory:
HostAgentPROTECTSunified_deviceDeviceISunified_deviceRecordISunified_device
Here is an Image to represent what these Devices look like in the J1 Graph:

Currently the consolidation to generate the unified_device is run daily.
Query Examples
The purpose of the unified_device is build a connective bridge to help you answer all of your device configuration across all of your security tools on your devices. See below for just a few ways you can query your device inventory outside of the Unified Device Matrix
Agent Coverage:
Find addigy_hostagent that PROTECTS unified_device that !PROTECTS sentinelone_agent
Find automox_device that IS unified_device that !PROTECTS crowdstrike_sensor

MDM Coverage:
FIND google_device THAT IS unified_device THAT !PROTECTS addigy_hostagent

Vuln Scanning Coverage:
Find user_endpoint THAT IS unified_device THAT !IS tenable_record

Host Agents Not Operating Correctly:
FIND sentinelone_agent WITH lastSeenOn < date.now-30days AS a THAT PROTECTS unified_device WITH lastSeenOn > date.now-7days

Unknown AD managed Device:
Find user_endpoint THAT IS unified_device THAT !IS azure_device