How to Configure SAML SSO Integration with JupiterOne
Single sign-on is supported using a custom authentication client configured within a J1 account. This feature is available to all Enterprise customers.
Supported Features
-
SP-initiated SSO
Service Provider-Initiated (SP-initiated) SSO means when the service provider (SP) initiates SAML authentication. SP-initiated SSO is triggered when you try to access a resource in J1.
-
JIT (Just In Time) Provisioning
Users are created and updated instantly using the SAML attributes sent as part of the SAML response coming from the Identity Provider (IdP). The user is created during the initial sign-in to J1 and updated during subsequent sign-ins.
IdP-initiated SSO is currently unsupported due to a limitation of Amazon Cognito.
Configuring SSO
You must be a member of the Administrators group to perform configurations.
-
In your JupiterOne workspace, navigate to Settings > Security & Access.
-
Enable the Single Sign On (SSO) toggle.
-
You will be provided the
SSO URLandAudience URI(SP Entity ID) for you to provide your IdP SSO application. -
Copy the SSO URL and Audience URI and enter them where necessary for your IdP SSO application. In your IdP account, add a new SAML application and name it JupiterOne.
- Copy the SSO URL and Audience URI values in the SAML settings.
- Use the same JupiterOne single sign-on URL string value for Recipient URL and Destination URL.
- Leave the Default Relay State field empty.
- Select EmailAddress for the name ID format.
- Select Email or Username for the application username.
- See the next section for details on attribute mappings.
-
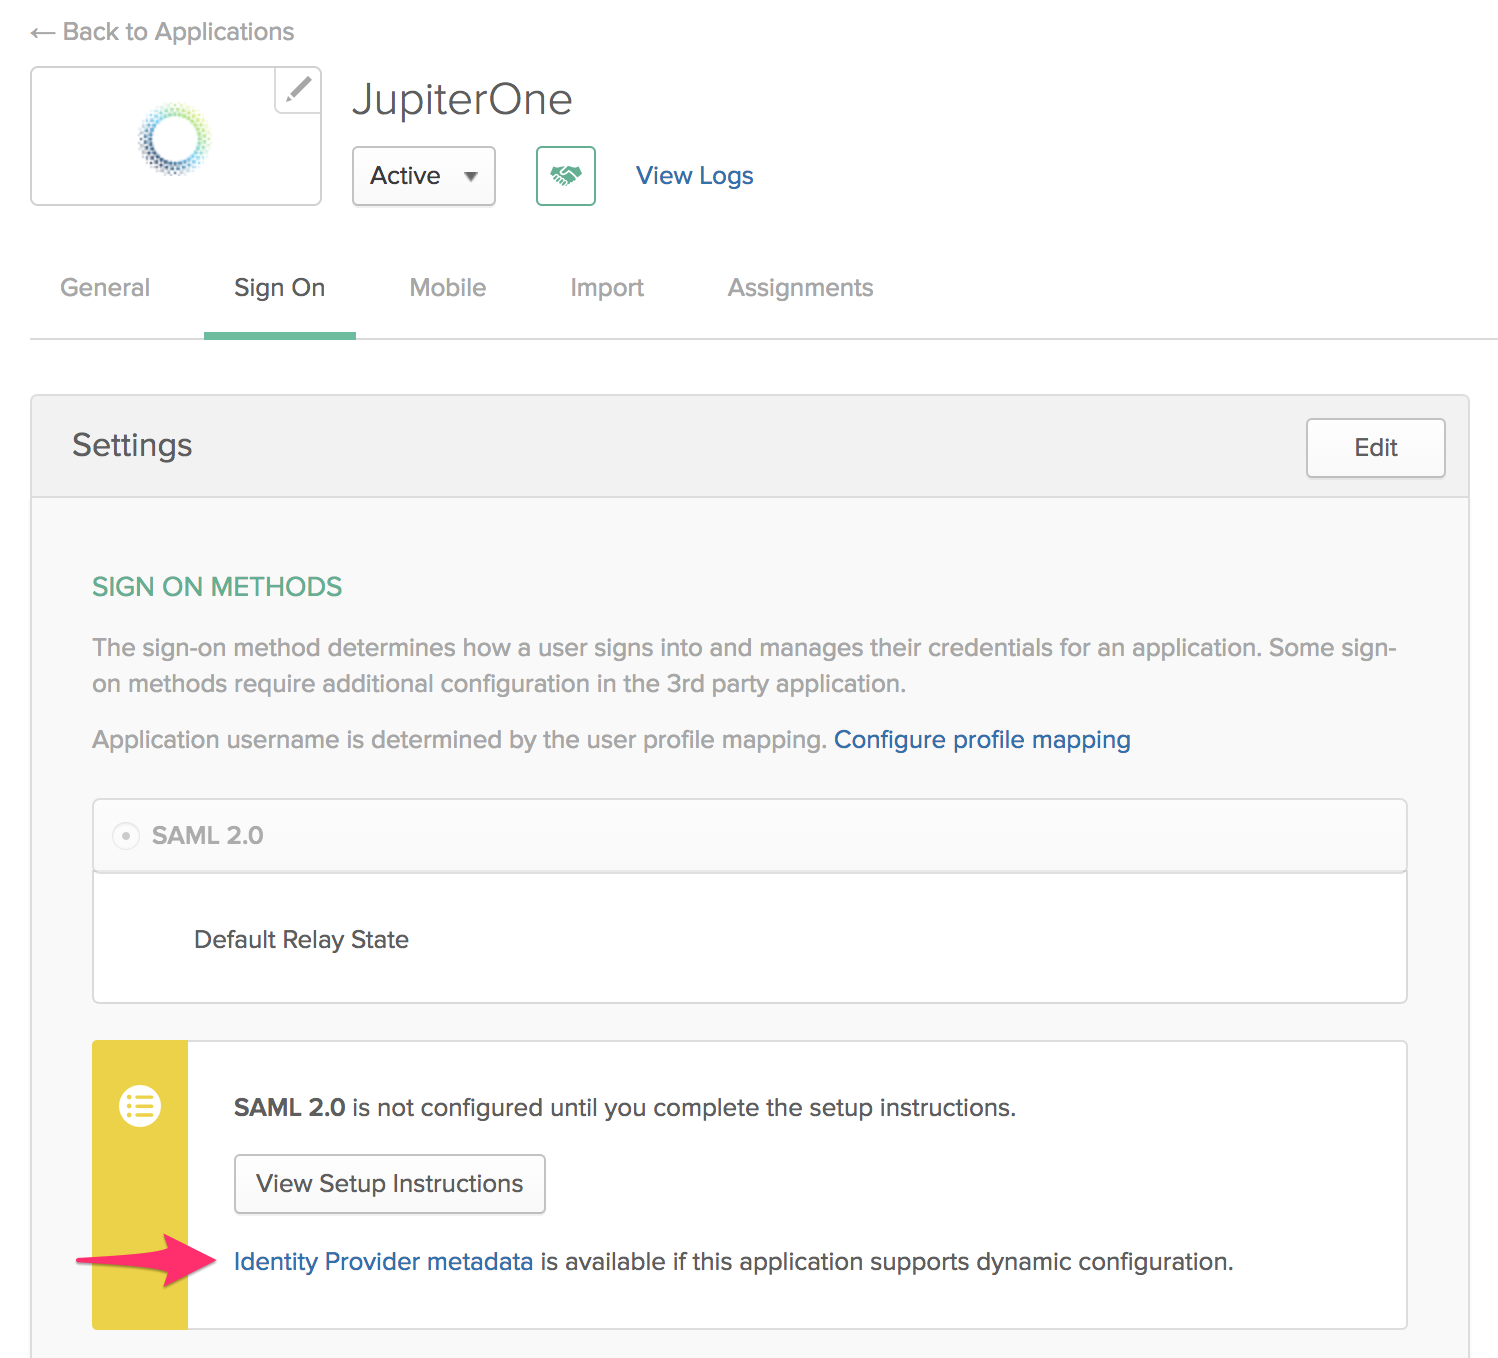
Complete the configuration of the SAML application in your IdP account, and copy the identity provider metadata link. For example, in Okta, you can find this link on the Sign On tab of the application, under View Setup Instructions.
-
Go back to the JupiterOne single sign-on settings, and paste the identity provider metadata link in the SAML Metadata File field. Alternatively, you can enter the SAML Metadata manually if you so choose. Simply select Type the SAML Metadata file manually and enter the metadata into the provided text field.
-
Save your settings to complete the configuration. Next time you access your JupiterOne account using your organization custom URL (for example,
https://your_company.apps.us.jupiterone.io), you are redirected to your SAML IdP for authentication.
Attribute Mappings
JupiterOne supports the following SAML attribute mappings:
email: User email address (required)family_name: User last namegiven_name: User first namename: User display namegroup_names: Dynamically assigns the user to the specified groups within JupiterOne.
J1 highly recommends that if you are a large organization, you should use the JupiterOne1 API to create group names and then use the group_names attribute to more easily synchronize all username data with J1 on a regular basis. You can use the group_names attribute to equate to a filtered list of groups that match the names of the J1 groups (case-sensitive). For example, create a group name to contain all the users who have administrative privileges in J1.
Users without group_names mapping are assigned to the Users group within your J1 account, by default.
Okta Configuration
To configure SSO for Okta, you must have administrator access. In addition, ensure you can access the SSO URL and your Audience URI before proceeding.
-
From the Okta Applications menu, select Create App Integration.
-
Select SAML 2.0 and click Next.
-
Enter a name in the App Name field. The name JupiterOne is used in the example below, and click Next.
-
In the SAML Settings sections:
- In the Single sign on URL field, enter your
SSO URL. - In the Audience URI (SP Entity ID) field, enter your
Audience URI. - In the Name ID format field, select
EmailAddress. - In the Application username field, select
Email.
- In the Single sign on URL field, enter your
-
Configure the attribute mappings in the Attribute Statements section. Only the email attribute is mandatory.
-
email>user.email -
family_name>user.lastName -
given_name>user.firstName -
name>user.displayName -
group_names>appuser.jupiterone_groupswherejupiterone_groupsis optional naming. You must configure the group attribute in the Profile Editor in the Directory menu, and then assign it after completing the configuration.
-
-
After mapping the attributes, click Next.
-
In the Feedback menu, select I'm an Okta Customer adding an internal app, and click Finish.
-
In the Settings section of the Sign On menu, right-click the IdP link and select Copy Link Address.
-
Paste the link into the SAML Metadata Document URL field.
-
Click Save in the top right of the window to save your configuration. A green confirmation message displays in the lower-left corner of the screen.
Okta Group Attribute Configuration
JupiterOne recommends adding a custom group attribute to the JupiterOne profile in your IdP account (such as Okta). You can add the attribute with the Profile Editor for the app. Provide a name for the custom group attribute, such as jupiterone_groups.
An example in Okta:
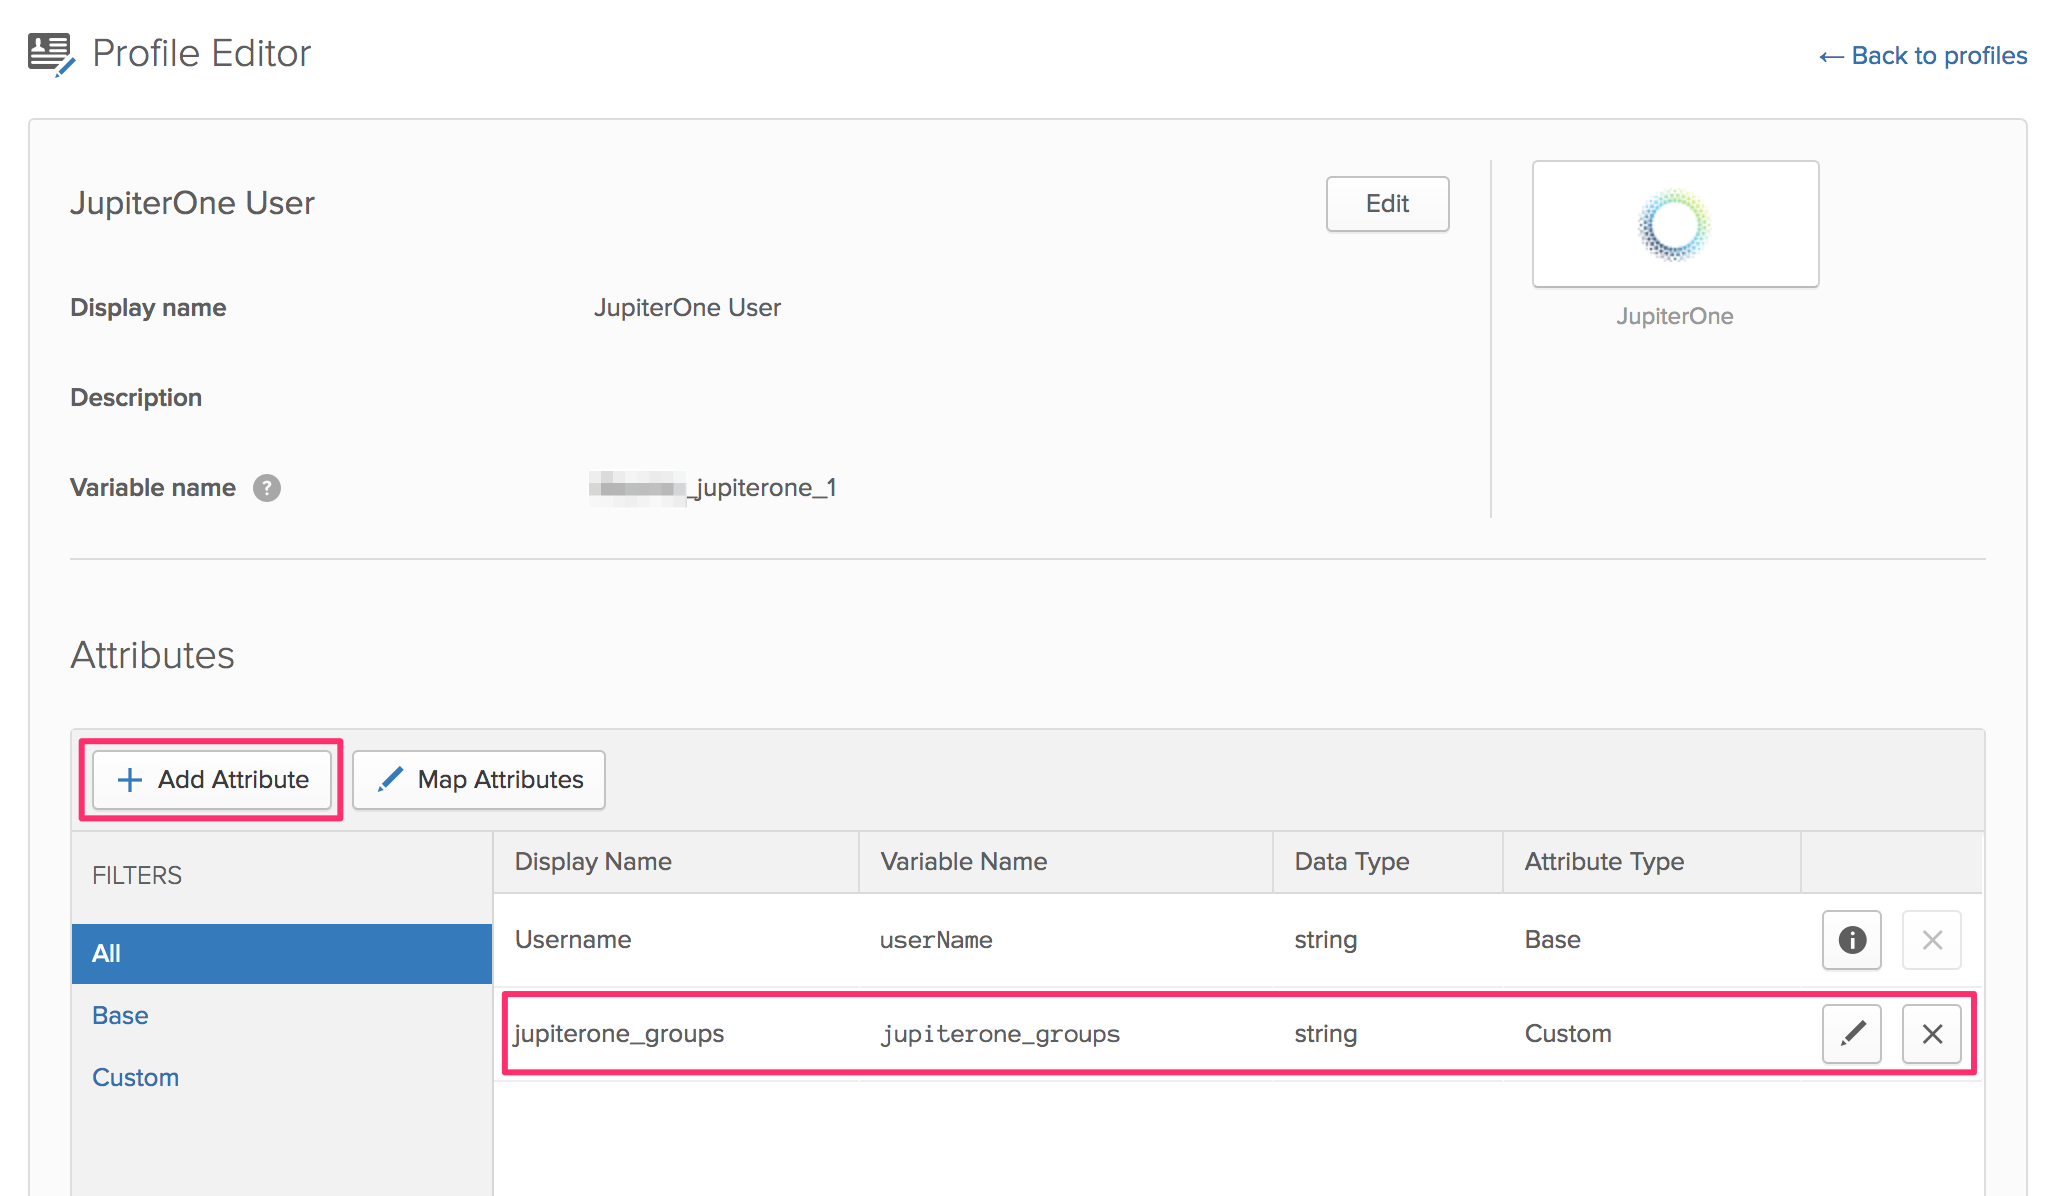
You can then use this custom app attribute to assign group memberships to your users based on their IdP group assignments. The actual value for the attribute is typically configured on the groups assigned to the app.
An example in Okta:

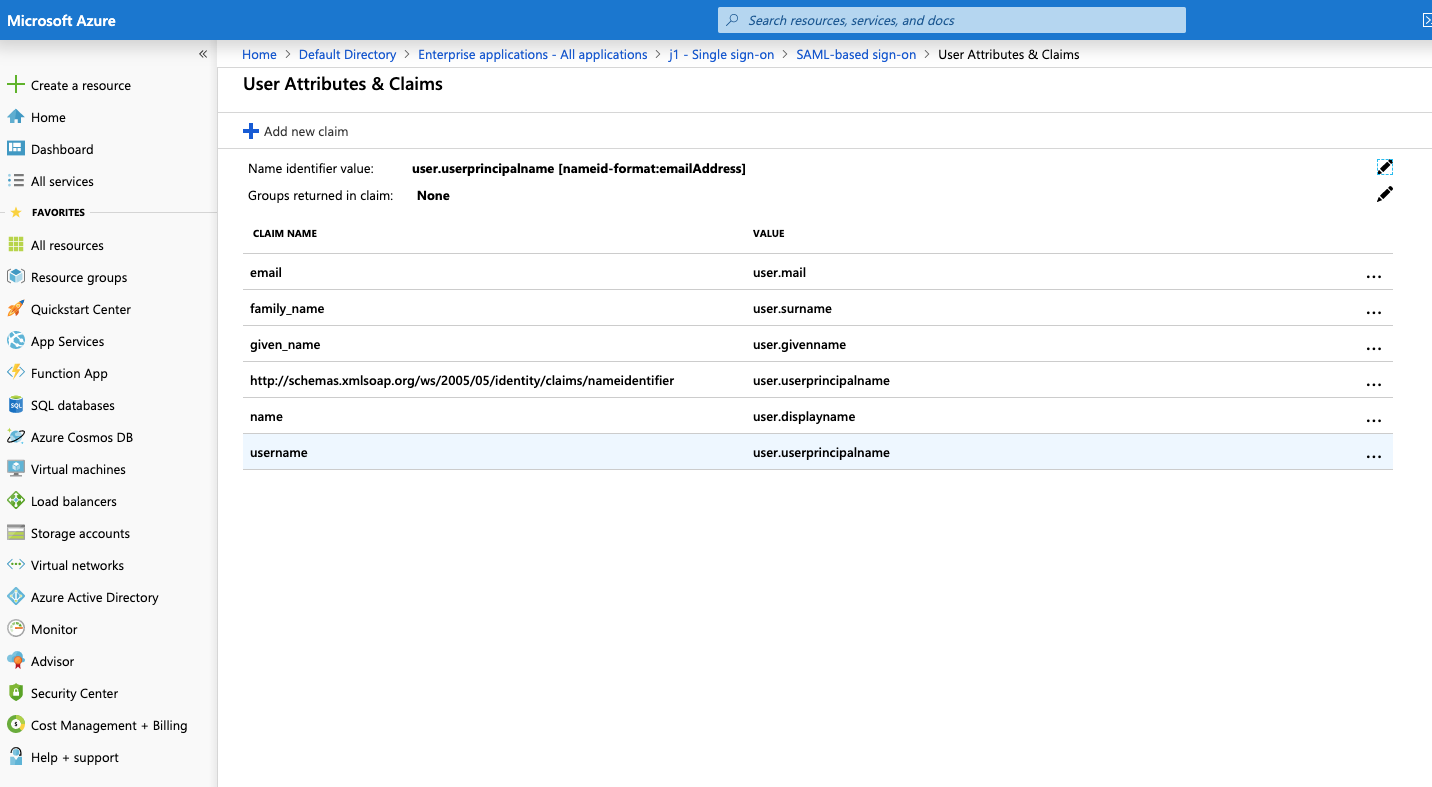
Azure AD Example
An example of an attribute mapping configuration in Azure AD:
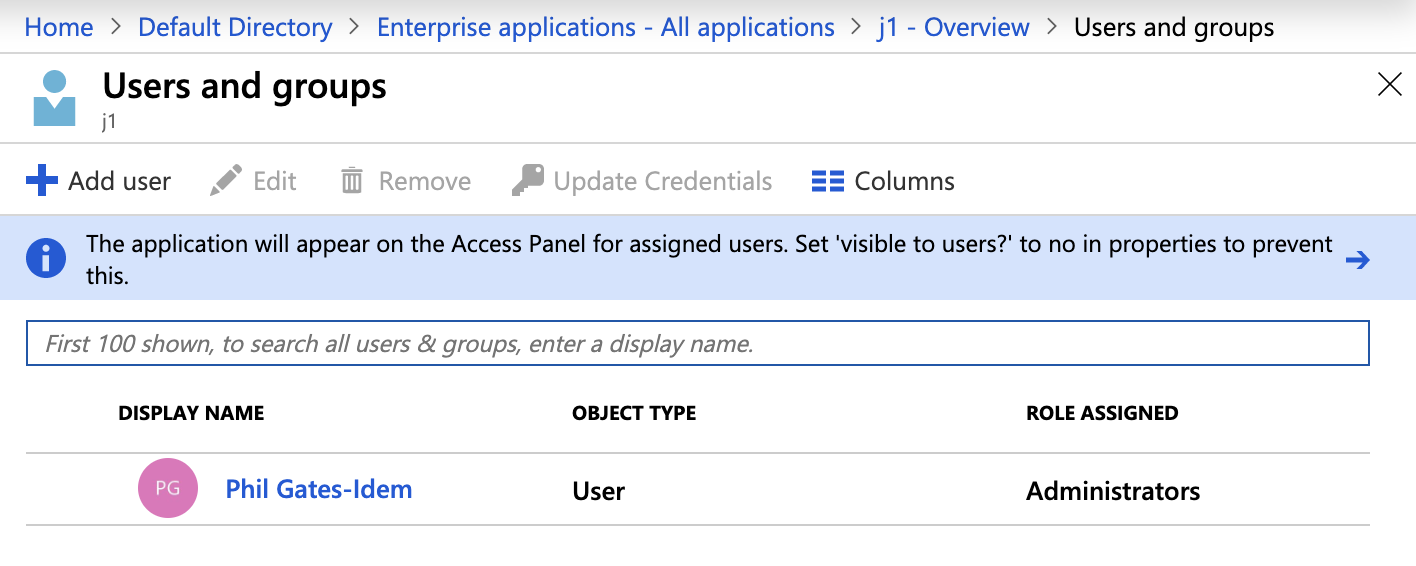
An example of group assignment in Azure AD:
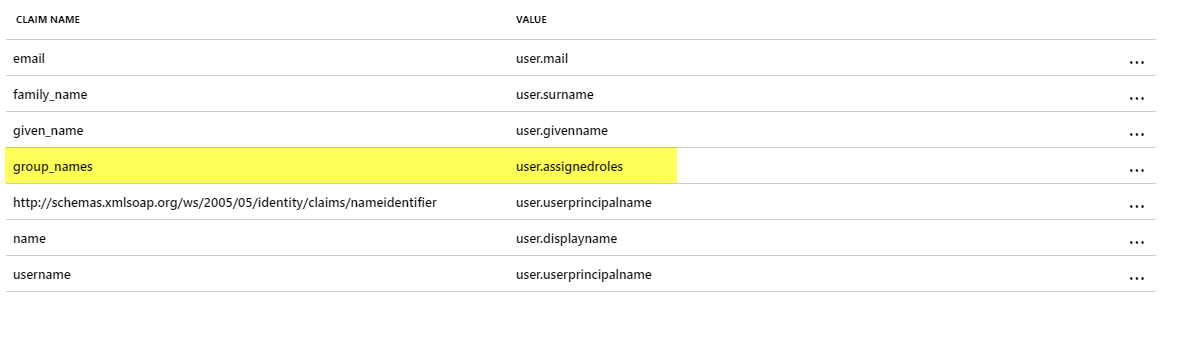
By adding the user.assignedroles -> group_names mapping to Azure AD, the app roles assigned to the user are mapped to the groups in JupiterOne that have the same name as the group/role.
Read Azure's documentation for more information on adding app roles and assigning them to users and groups.
In Azure AD, go to https://portal.azure.com/#blade/Microsoft_AAD_IAM/ActiveDirectoryMenuBlade/RegisteredApps, click JupiterOne, and then click Manifest.
Add an entry to appRoles that is similar to:
{
  "allowedMemberTypes": [
    "User"
  ],
  "description": "Administrators",
  "displayName": "Administrators",
  "id": "e6421657-3af5-4488-831f-7989175e3e35",
  "isEnabled": true,
  "lang": null,
  "origin": "Application",
  "value": "Administrators"
}
Assigning an app role to a user in Azure AD:
Google Workspace Configuration
Before beginning a configuration through Google Workspace, ensure you have access to the SSO URL and your audience URI. Go to the Google Admin Console.
- From the Add App dropdown menu, select Add custom SAML app.
- In the App name field, enter JupiterOne.
- Click DOWNLOAD METADATA to download an XML metadata file to use later.
- Paste your
SSO URLin the ACS URL field. - In the Entity ID field, paste your
Audience URI. In the Name ID format field, select EMAIL, and select Primary email in the Name ID field. - When mapping directory attributes, ensure you use the following names in the App attributes fields. group_names is optional.
- Primary email >
email - Last name >
family_name - First name >
given_name
- Paste the downloaded XML metadata file contents into the SAML Metadata File field.
Current Limitations
IdP-initiated sign-on flow is not supported
JupiterOne uses Amazon Cognito service to manage authentication, including SSO. Cognito currently does not support IdP-initiated sign-on. This means you can not click on the app icon in your IdP account (such as JumpCloud, Okta, OneLogin). Instead, you must initiate single sign-on by going to your JupiterOne vanity (custom) URL or your account sign-in URL:
JupiterOne vanity URL:
https://<your_j1_subdomain>.apps.us.jupiterone.io
JupiterOne account login URL:
https://login.us.jupiterone.io/account/<your_j1_account_id>
These URLs redirect to your configured SSO provider for authentication.
You can find your J1 account ID by running the following query:
Find jupiterone_account as a return a.accountId
Workaround
If your SSO provider supports configuring a bookmark or secure web authentication (SWA) app, you can work around this limitation by doing the following:
- Hide the app icon to users for the configured JupiterOne SAML SSO app.
- Configure a Bookmark/SWA app with your JupiterOne account URL and assign it to the same users and groups that are assigned the JupiterOne SAML app.
Troubleshooting
Different SSO providers have varying UIs and nomenclature, therefore, ultimately the SAML response and attribute statement should look similar.
Common Problems
Infinite Redirect Loop
An infinite redirect loop can occur if the SAML subject is incorrect or missing or if the required SAML attribute email (case-sensitive) is not present.
SAML Subject
A common problem during SSO configuration is an incorrect SAML subject. Here is an example of a correct subject:
<saml2:Subject>
    <saml2:NameID Format="urn:oasis:names:tc:SAML:1.1:nameid-format:emailAddress">john.smith@example.com</saml2:NameID>
    ...
</saml2:Subject>
SAML Attribute Statement
Another common problem during SSO configuration is an incorrect SAML attribute statement. An example of a correct attribute statement is:
<saml2:AttributeStatement>
    <saml2:Attribute Name="email">
        <saml2:AttributeValue xmlns:xs="http://www.w3.org/2001/XMLSchema" xmlns:xsi="http://www.w3.org/2001/XMLSchema-instance" xsi:type="xs:anyType">john.smith@example.com</saml2:AttributeValue>
    </saml2:Attribute>
    <saml2:Attribute Name="family_name">
        <saml2:AttributeValue xmlns:xs="http://www.w3.org/2001/XMLSchema" xmlns:xsi="http://www.w3.org/2001/XMLSchema-instance" xsi:type="xs:anyType">Smith</saml2:AttributeValue>
    </saml2:Attribute>
    <saml2:Attribute Name="given_name">
        <saml2:AttributeValue xmlns:xs="http://www.w3.org/2001/XMLSchema" xmlns:xsi="http://www.w3.org/2001/XMLSchema-instance" xsi:type="xs:anyType">John</saml2:AttributeValue>
    </saml2:Attribute>
    <saml2:Attribute Name="group_names">
        <saml2:AttributeValue xmlns:xs="http://www.w3.org/2001/XMLSchema" xmlns:xsi="http://www.w3.org/2001/XMLSchema-instance" xsi:type="xs:anyType">Administrators,Users</saml2:AttributeValue>
    </saml2:Attribute>
</saml2:AttributeStatement>
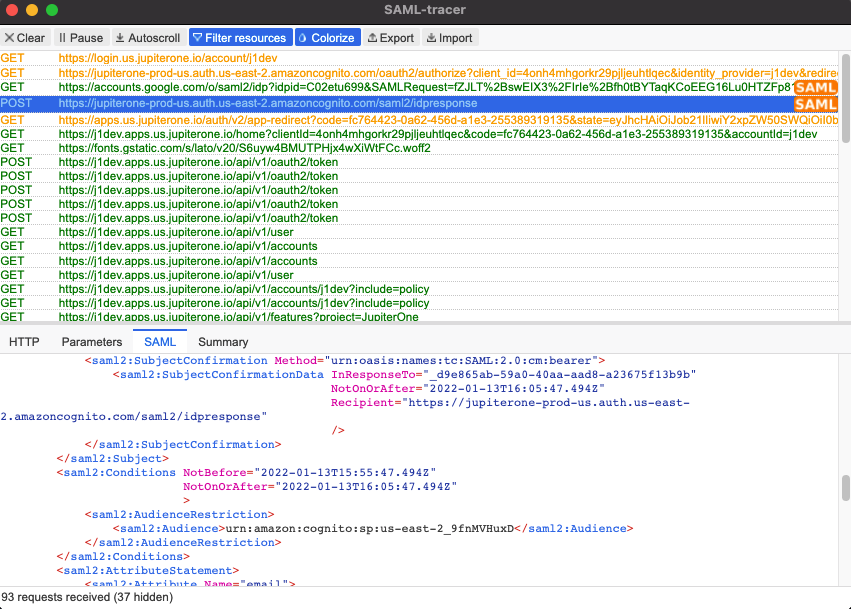
Viewing the SAML Response
To view the SAML response, you can use browser plugins to capture the POST to /saml2/idpresponse. For example, in the Chrome browser the plugin, you can use SAML-tracer to decode and view the SAML response and, therefore, the SAML attribute statement.
The following is an example of what SAML-tracer looks like after logging in by SSO. The SAML tab is active to view the XML. Calls that have SAML are also flagged with a yellow SAML tag on the right of the HTTP request.