Getting started with Unified Vulnerability Management
This guide walks you through setting up Unified Vulnerability Management (UVM), from confirming your scanner data to creating your first tickets. For an explanation of how UVM works, see Unified Vulnerability Management.
You can ask the AI assistant for help as you go. It answers setup questions from this documentation, such as "How do I set up organizational units?", and can take you to the page you need, such as "Open the integrations page."
Prerequisites
Before you begin, make sure the following are in place:
- Permissions: You need the permissions described in Permissions to open UVM. Configuring Data Out requires full admin access.
- A Data in Jira or ServiceNow integration: At least one Jira or ServiceNow integration must be configured. It doesn't have to be the same Jira workspace or ServiceNow instance you'll send tickets to.
- Organizational units (OUs): If you plan to use UVM's ticketing, set up organizational units first. Case routing assigns tickets to teams by OU.
- A Data Out ticketing workflow: To route cases to Jira or ServiceNow, create a Data Out instance for Jira or ServiceNow that each OU can use as its ticketing workflow.
Supported scanners
UVM doesn't require a specific scanner. It works with any integration that sends vulnerability data to JupiterOne in this shape:
- Each finding is its own entity. The integration records each finding as a
VulnerabilityorFindingentity in JupiterOne. - Each finding is linked to the affected host or device. UVM tracks vulnerabilities on devices such as servers, laptops, and cloud instances.
- Each finding includes a CVE ID. The ID must be in the standard format, for example
CVE-2021-44228. UVM uses it to deduplicate the same vulnerability reported by more than one scanner.
These scanners are confirmed to work with UVM:
If your scanner isn't listed, you can bring its findings into JupiterOne with custom data ingestion, as long as they meet the three requirements above.
Step 1: Confirm your scanner integrations are configured
UVM aggregates findings from your configured integrations. From Integrations, confirm that at least one supported scanner is configured and syncing.
You can see how many findings each scanner is contributing by hovering over any source node in the Sankey diagram on the UVM landing page.
Step 2: Set up asset criticality
Asset criticality is a major lever in the risk score. To make sure your most important assets surface near the top of the Prioritized view:
- Navigate to Assets > Asset criticality
- Select Set up for me to have the agent propose criticality levels and the queries that fill them, or Start from our policy to build them from your classification policy
- Review the proposal, then click Preview changes and Apply setup
Your levels apply on the next hourly run. See Asset criticality for the full setup and review flow.
Step 3: Set your scoring model and prioritization threshold
-
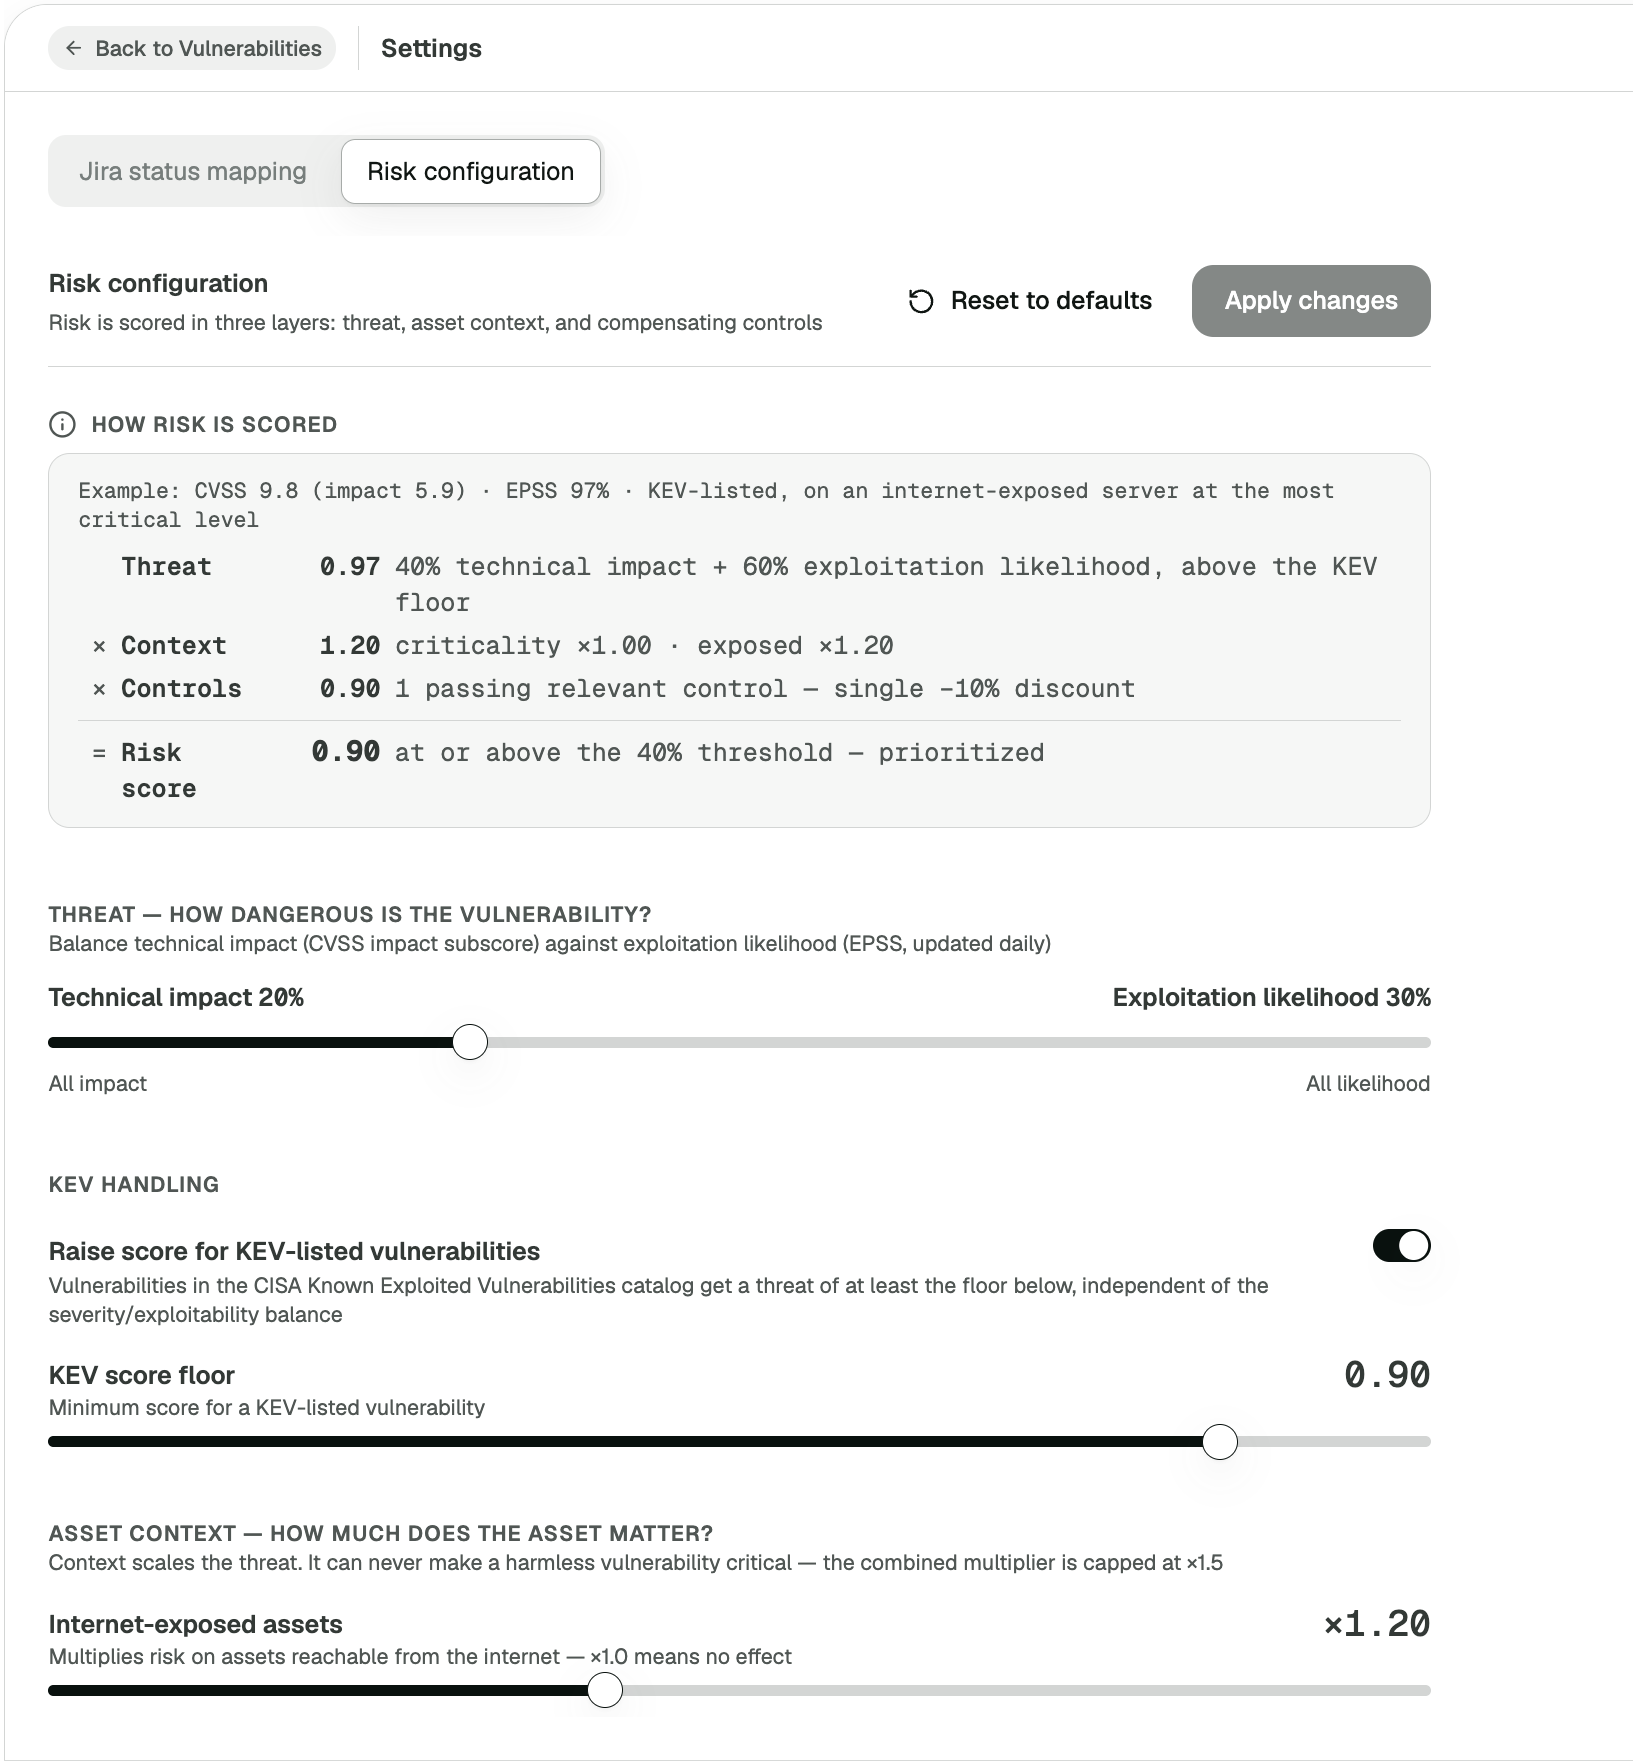
From Vulnerabilities, open Settings, or select the edit (pencil) icon on the Overall risk score card. Then select the Risk configuration tab. The How risk is scored example at the top updates as you change settings, so you can see the effect of each change on a real score.
-
Under Threat, balance technical impact against exploitation likelihood, and decide whether KEV-listed vulnerabilities get a minimum score (KEV score floor)
-
Under Asset context, set the multipliers for internet-exposed assets and for each of your asset criticality levels. A multiplier of ×1.00 means no effect.
-
Under Compensating controls, choose whether passing CCM controls lower a finding's score. This applies once your controls carry MITRE ATT&CK technique mappings.
-
Set the Prioritization threshold. A lower threshold widens the Prioritized view; a higher threshold tightens it.
-
Review the Plan priority thresholds, which decide which plans are ranked Critical, High, and Medium
-
Click Apply changes
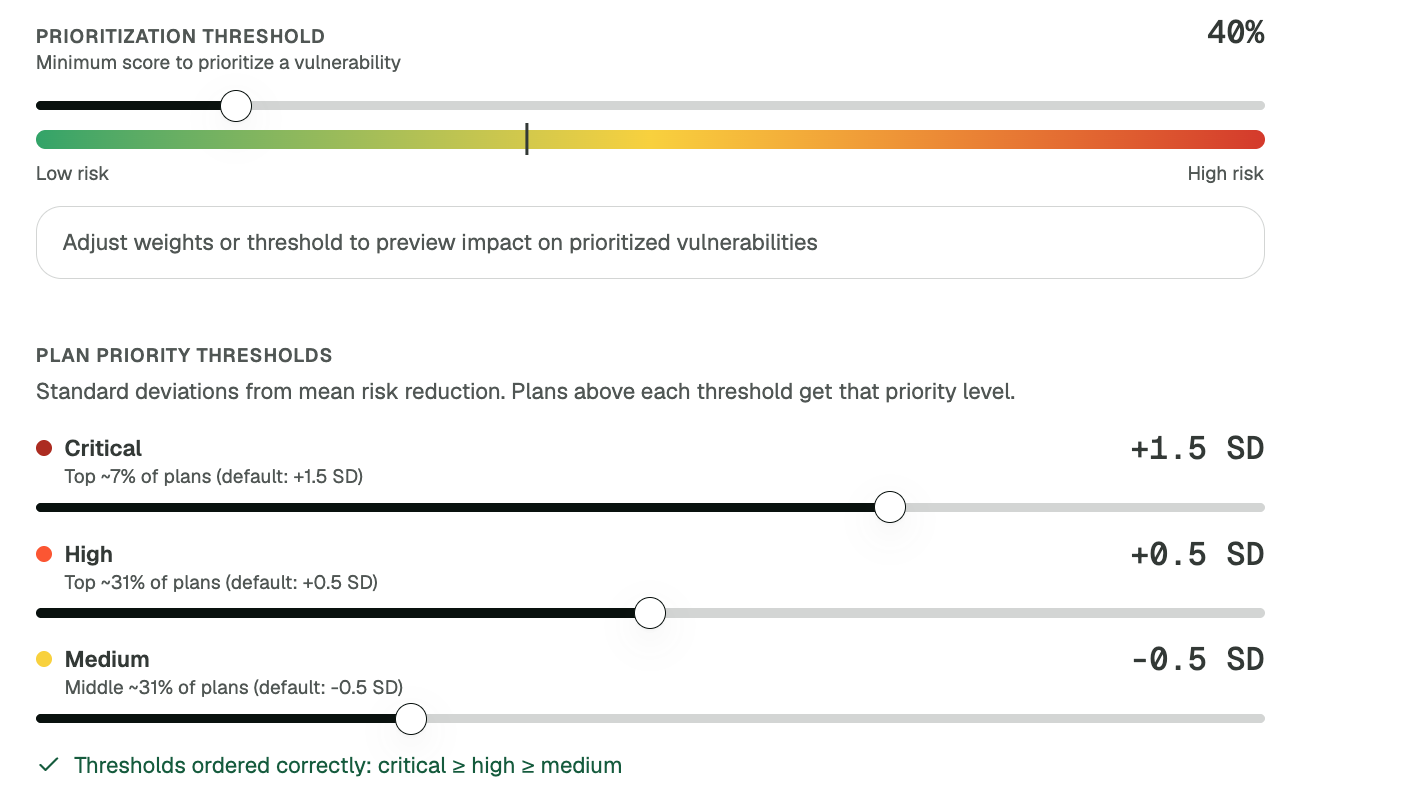
Changes apply to new plans and cases only. Existing plans keep the settings they were built with. To apply new settings everywhere, delete the existing plans and select Rebuild plans under Plan data at the bottom of the tab.
See Risk scoring for how each layer of the score works.
Step 4: Confirm case routing is configured
Case routing sends each remediation case to the team that owns the affected assets, using your organizational units.
-
On the Risk configuration tab, under Cases — Ownership assignment, select the grouping you use for team routing. When a case is created, it's assigned to the matching unit in that grouping, and the unit's owner is notified.

-
Go to Settings > Organizational Units, expand the same grouping, and select a unit
-
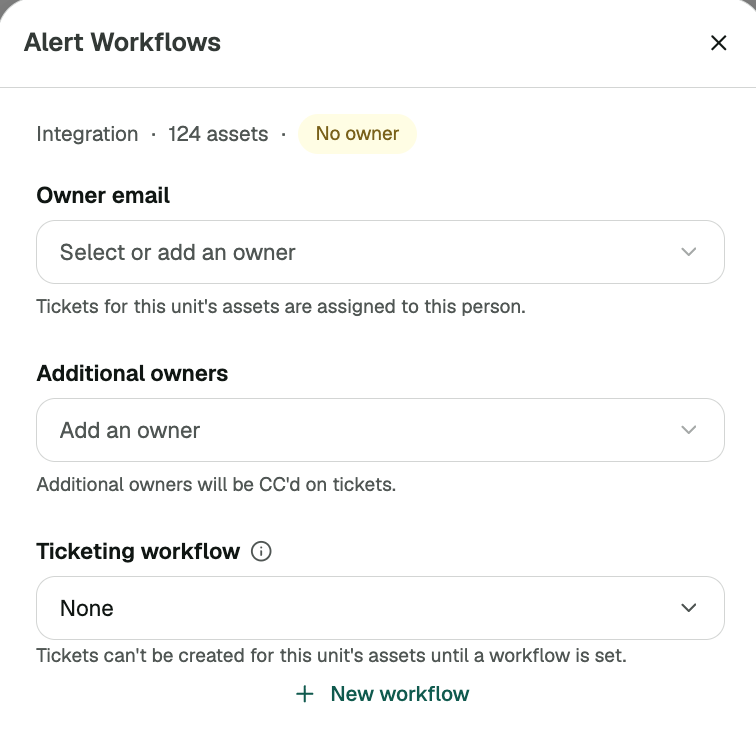
Set the Owner email. Tickets for the unit's assets are assigned to this person. Add Additional owners to CC them on tickets.
-
Select the unit's Ticketing workflow. Tickets can't be created for a unit's assets until it has a workflow. If you haven't created one yet, select New workflow.
-
Click Save, and repeat for each unit you plan to route tickets to
-
Back in Vulnerabilities, open the Remediation plans tab and confirm that plans show owner teams (rather than em dashes) on the cards you intend to route
Step 5: Configure the Jira status mapping
The status mapping keeps UVM and Jira in sync in both directions.
-
From Vulnerabilities, open Settings, or select the edit (pencil) icon on the Overall risk score card. Then select the Jira status mapping tab.
-
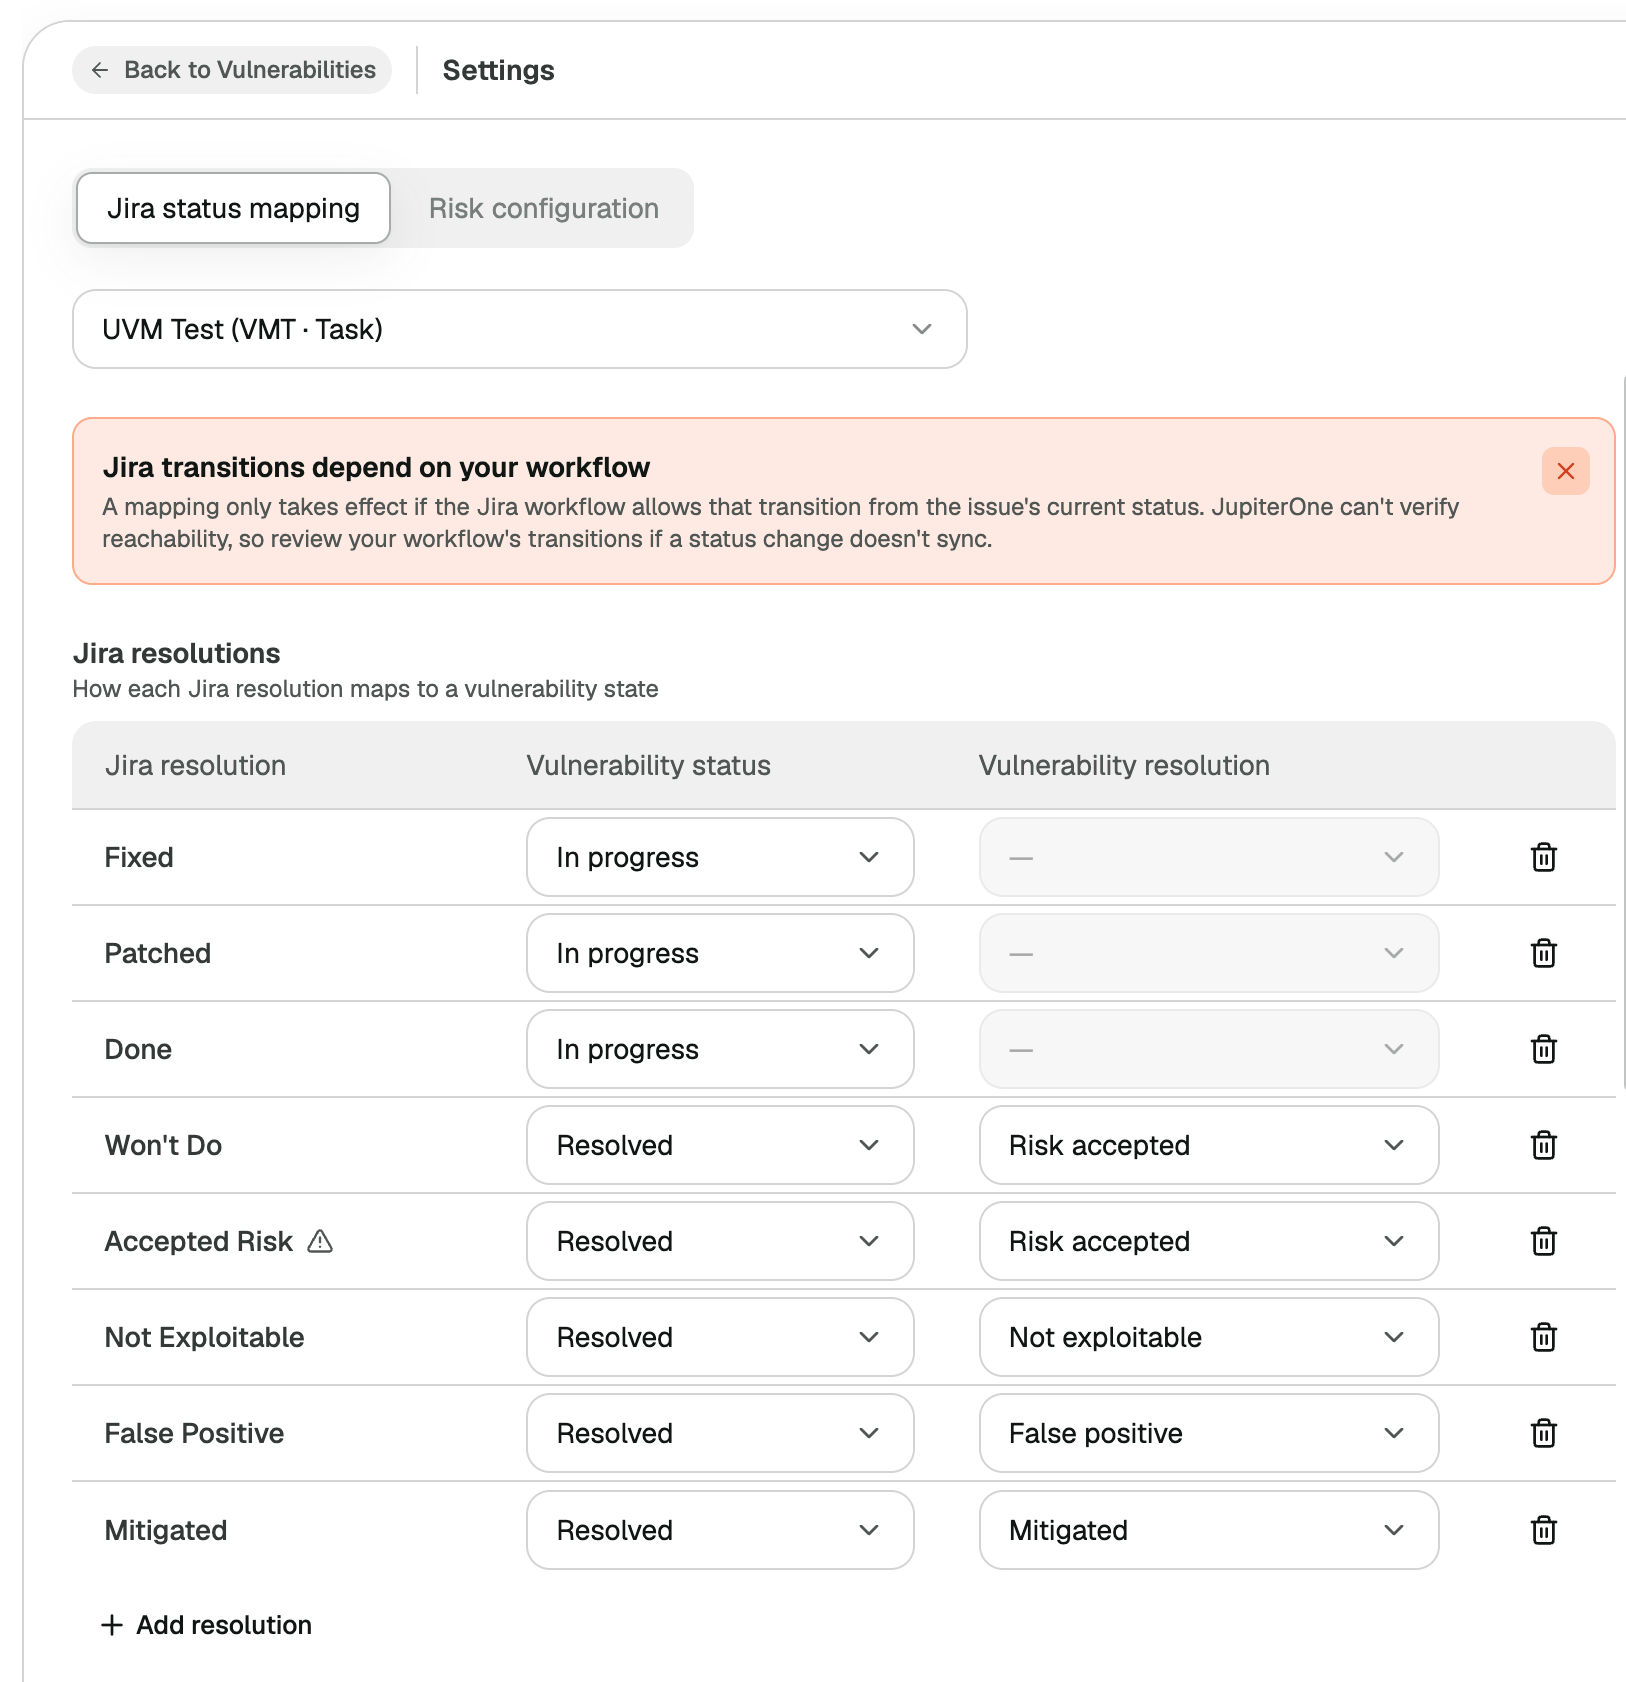
Select the Workflow to configure. Each workflow has its own mapping.
-
Under Jira resolutions, choose how each Jira resolution updates the vulnerability. In the example shown, Fixed, Patched, and Done set the vulnerability to In progress rather than resolved, so the fix waits for scanner verification. To map a resolution your Jira uses that isn't listed, select Add resolution.
-
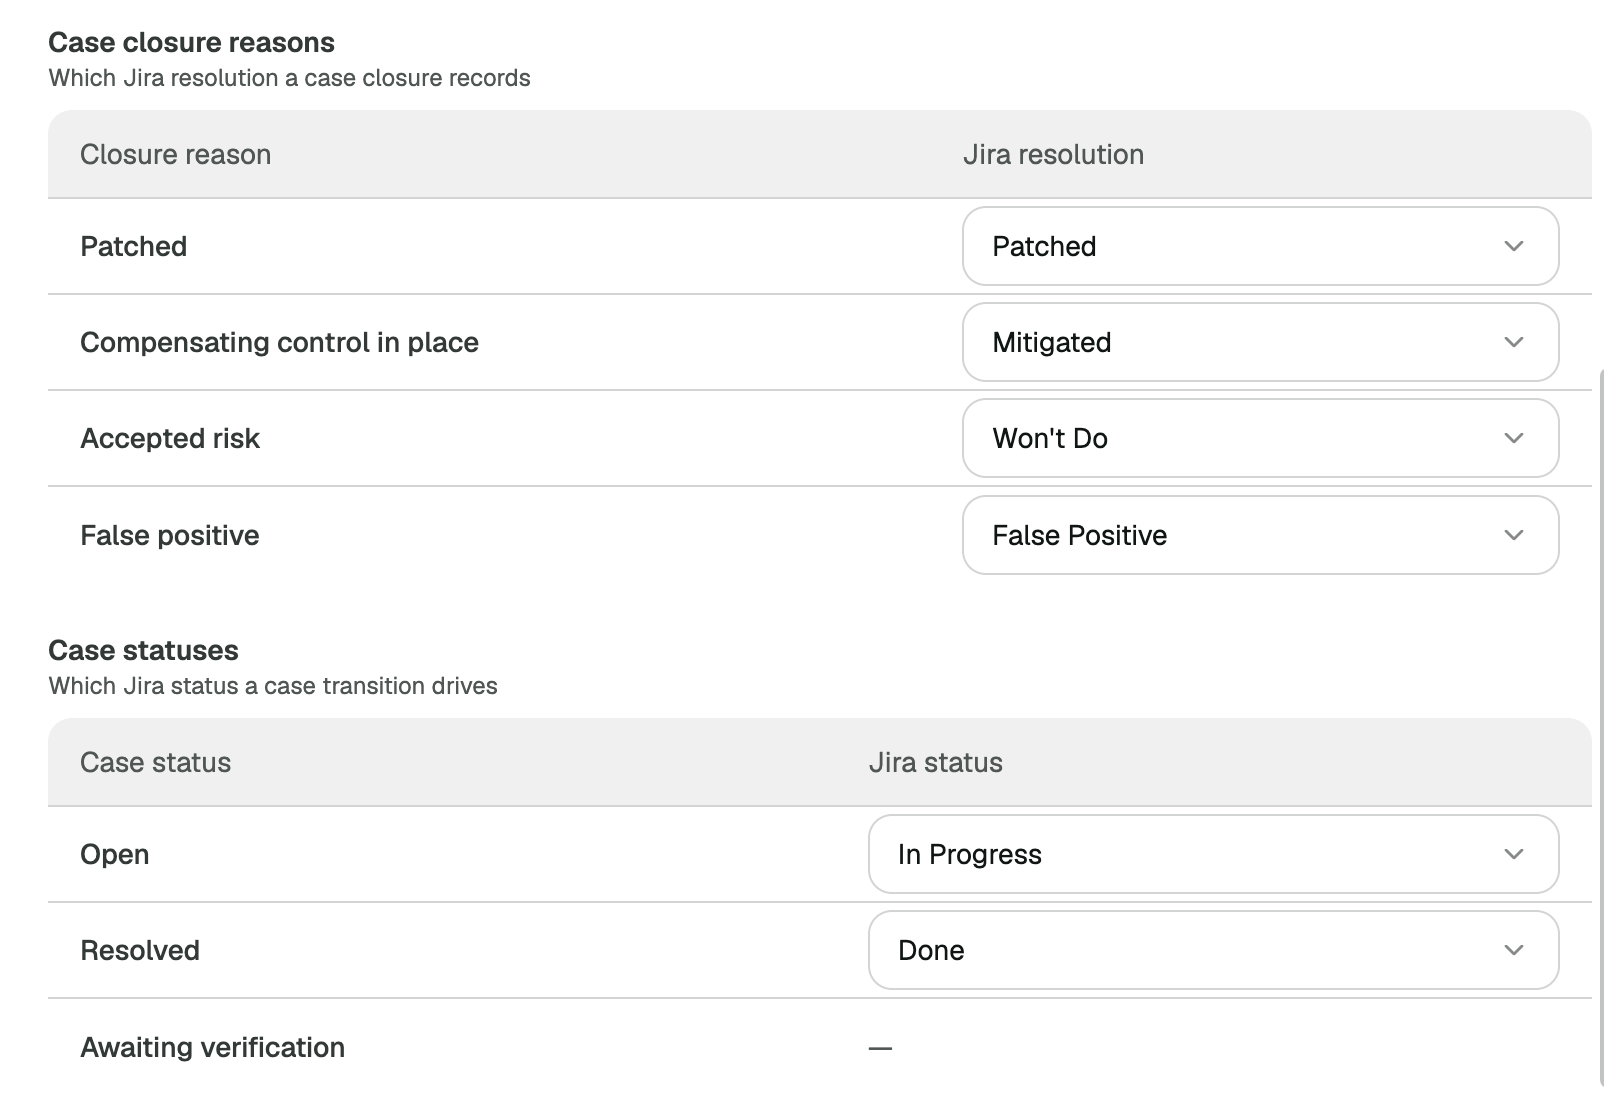
Under Case closure reasons, choose which Jira resolution is recorded when a case is closed for each reason
-
Under Case statuses, choose which Jira status each case status moves the ticket to. Awaiting verification has no Jira status: while a fix waits for scanner confirmation, UVM adds a comment to the ticket instead of moving it.
-
Click Save mapping
-
Verify each mapping with one test round trip. A mapping only takes effect if your Jira workflow allows that transition from the ticket's current status. See Configure the status mapping for why this step matters.
-
Confirm the analysts who will manage the lifecycle have graph-write permission. State transitions require it.
Step 6: Create your first tickets
-
Open the Remediation plans tab and sort by Highest CVSS or Risk reduction
-
Open the highest-priority plan, then review the AI-generated remediation summary and steps
-
Confirm the affected assets and the owning teams. UVM has already partitioned the assets by owning team, one case per team.
-
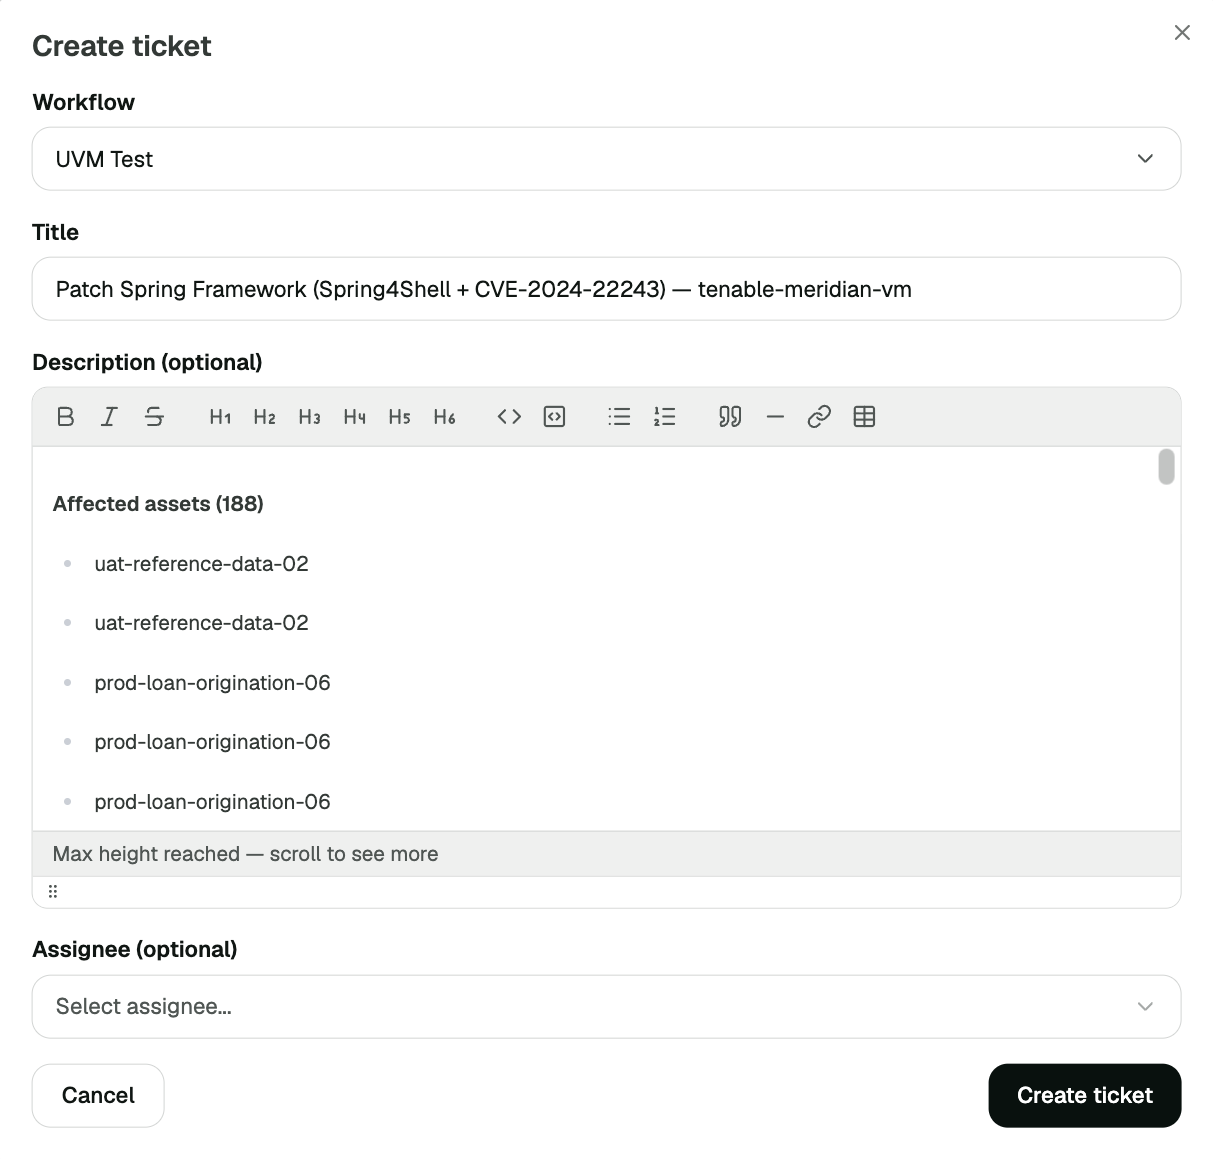
Open a team's case and select Create ticket
-
Select the Workflow. The Title and Description are filled in for you, including the CVEs and the list of affected assets.
-
Optionally, select an Assignee, then click Create ticket
-
Repeat for each case in the plan
Step 7: Adopt the lifecycle
- Have remediation owners select Mark remediated after applying a fix (or close the Jira ticket as Patched) so every fix goes through verification
- Record risk acceptances and false positives as lifecycle states with justifications, instead of closing tickets around them
- Make the Inbox part of your team's weekly routine. Verification confirmations, expiring exemptions, and ticket disagreements all wait there.
Step 8: Monitor progress
- The Active remediation cases count on the summary header tracks open cases
- The Critical findings card shows how many critical-severity vulnerabilities lack a plan
- Open the Plans tab regularly to review case coverage and apply new plans as new vulnerabilities surface
- Open the Executive dashboard to baseline time to remediate, reopens by fix confidence, and accepted risk once your first snapshots accrue
For tips on getting the most out of UVM once it's running, see Best practices.