Create an instance
An Instance (also called a Workflow) is the named delivery target that tells Data Out where to send a Jira ticket. Each instance ties together:
- A Connection (which Atlassian site + which credentials)
- A Data in Jira integration (optional - which Jira project the instance writes to)
- An Issue type (the Jira issue type new tickets are filed under)
You can create as many instances per connection as you need - one per Jira project / issue-type pair is a common pattern.
Prerequisites
- At least one Connected Jira connection. See Configure a Jira connection if you have not authorized one yet
- (Recommended) A Data in Jira integration that already ingests the target project. This lets the wizard scope the instance to the project URL rather than asking you to type it. If you skip this, the field defaults to
Noneand you can still create an instance
Open the Add Jira instance wizard
You can start the wizard from two places:
- Provider detail page - open Data out > Connections > Jira and click + Add instance on the connection card you want to attach to. This pre-selects the connection so the wizard skips Step 1
- Instances tab - open Data out > Instances, find the Jira section, and click + Add instance on the right of the section header. This opens the wizard at Step 1 so you can choose which connection to use
The Add Jira instance wizard is a three-step Stepper modal: Select Connection -> Configure -> Test.
Step 1 - Select Connection
Choose which Jira connection this instance should use. The step lists every Jira connection in your workspace with a green Connected badge.
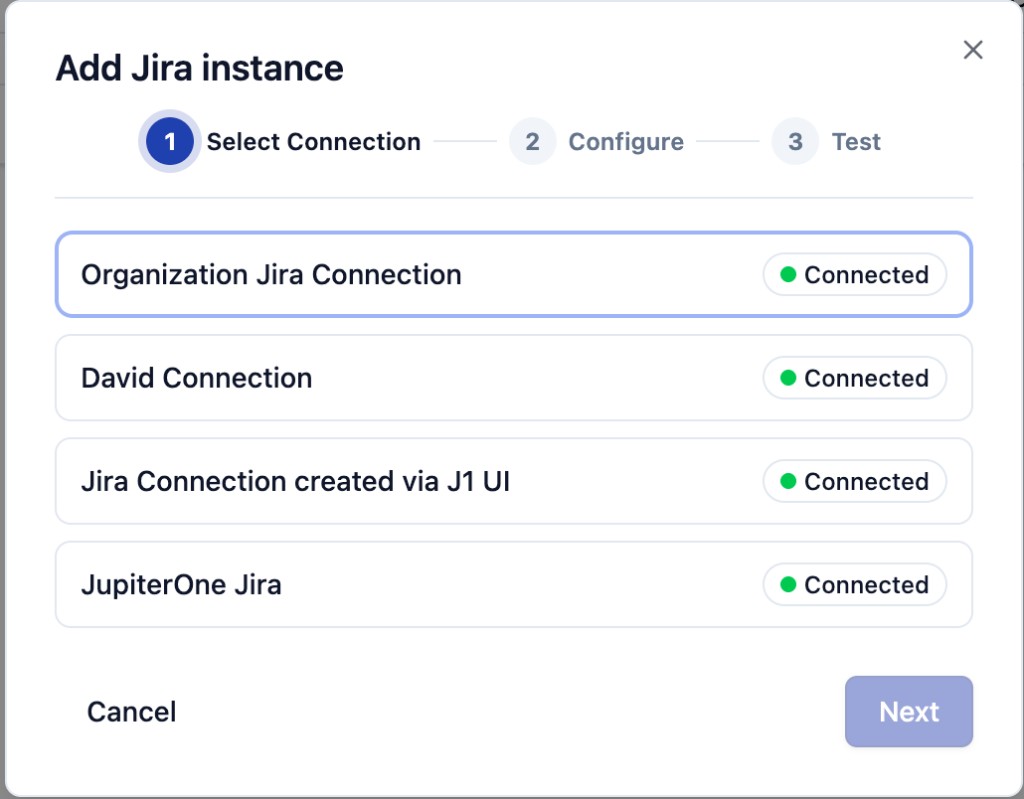
- Click a card to select it - the selected card gets a blue outline
- Click Next to advance
If you started the wizard from a connection card's + Add instance button (rather than from the global Instances tab), the wizard auto-selects that connection and starts at Step 2 instead. You can always go back to Step 1 from the Stepper if you change your mind.
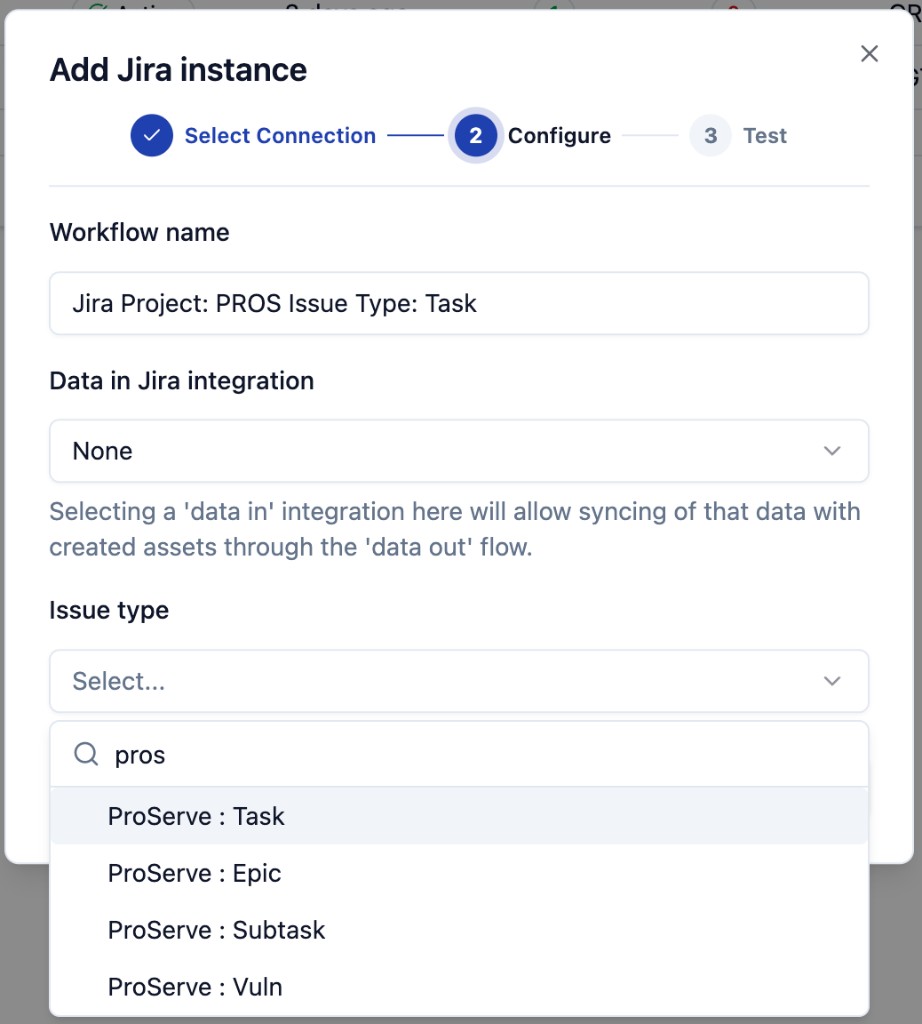
Step 2 - Configure
Configure tells the instance which Jira project to write to and what issue type to use.
| Field | What to enter |
|---|---|
| Workflow name | A friendly label for this instance, for example Jira Project: PROS Issue Type: Task. The name is what admins see in the Instances tab and what producers (like the CCM Create ticket modal) use to identify the routing target. Pick something descriptive - both the project key and the issue type are useful. |
| Data in Jira integration | Optional. Dropdown of existing Data in Jira integrations in this workspace. Selecting one scopes the instance to that integration's Jira project so the Issue type dropdown can be populated from the project's real metadata, and so created tickets can be linked back to the data J1 already knows about. Defaults to None. |
| Issue type | The Jira issue type that this instance files tickets under. The dropdown is searchable - start typing to filter (for example, pros filters to issue types whose project key starts with PROS). The format Project : Issue Type indicates which Jira project each issue type belongs to (for example, ProServe : Task). |
If you do not see the Jira project you expect in the Data in Jira integration dropdown, you have not yet ingested it via a Jira data in integration. See Add an integration for the steps to set one up. You can still create the instance without selecting a project here, but you will be choosing issue types from the union of all projects the Atlassian account can see.
When the three fields are filled in, click Next to continue to Test.
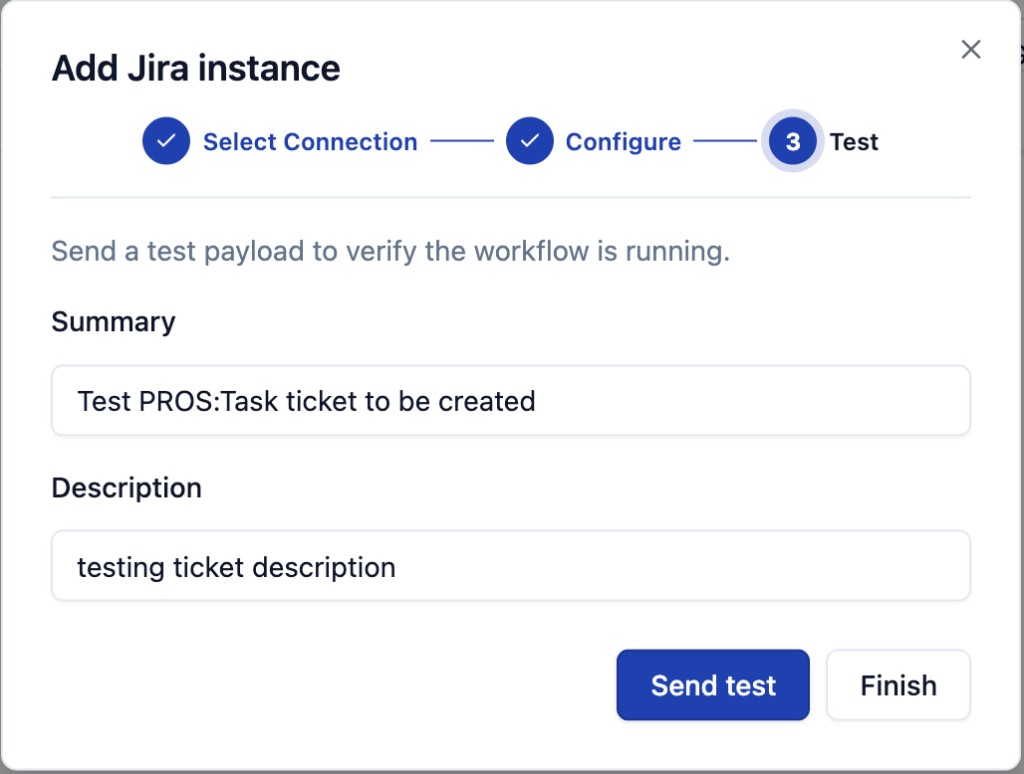
Step 3 - Test
The Test step lets you fire a real Jira ticket at the project + issue-type combination you just configured, so you can confirm the round-trip works before relying on the integration. The instance is already created at this point - the test step is purely a validation gate.
| Field | What to enter |
|---|---|
| Summary | The Jira issue Summary field. Defaults to a value like Test PROS:Task ticket to be created - safe to leave as-is for a smoke test, or edit to something distinctive so you can find it easily in Jira. |
| Description | The Jira issue Description field. Defaults to testing ticket description. |
You have two terminal actions:
- Send test posts the test payload to the connected Jira project. A new ticket appears in Jira under the configured project and issue type. Use this for the first instance you stand up so you have a known-good baseline. Remember to delete the test ticket from Jira afterward to keep the project clean
- Finish closes the wizard without sending a test payload. Use this if you have already validated this connection + project pair and just need a second instance pointing at the same place
Either way, the instance is now Active and visible on the Instances tab.
For a deeper walkthrough of how to interpret a successful or failing test, see Test your instance.
After Save: where to find the new instance
The new instance appears in three places:
-
Provider detail page (
Data out > Connections > Jira) - in the connection card's instance table, with columns Instance / Status / Last run / Successful / Failed jobs / Project issue type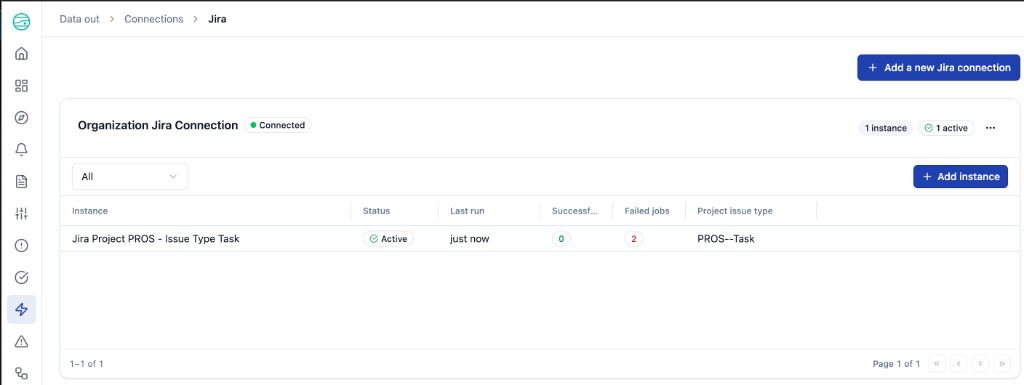
-
Instances tab (
Data out > Instances) - same table, grouped by provider withN instances / N activebadges -
Instance detail page - click the instance name in either of the above tables to open the per-instance detail view (Status, Last run, Lifetime tasks, Jobs succeeded, Jobs failed, plus the per-instance Jobs table). See Manage instances for what you can do from there
What is not configured on the instance in 1.0
In 1.0, the only fields stored on the instance itself are the three on the Configure step (Workflow name, Data in Jira integration, Issue type). Per-ticket fields like Title, Description, Assignee, and any custom Jira fields are entered at the moment a ticket is created - either by the producer (such as the CCM Create ticket modal) or by the test payload above. There is no per-field mapping editor or templated defaults configuration on the instance in this release.