Manage instances
Once you have one or more instances configured, the Instances tab is your day-to-day operations view. From there you can scan health across providers, change the configuration of an instance, stop an instance temporarily, or remove one entirely. Clicking an instance name opens a per-instance detail page with deeper status and a focused Jobs table.
The Instances tab
Open Data out > Instances. Instances are grouped by provider in collapsible sections. Each section header shows the provider's vendor brand and two badges: N instances (total in the group) and N active (currently running).
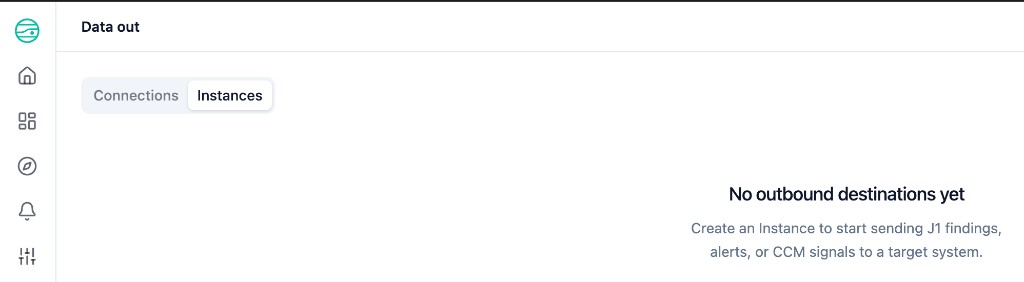
If you have not created any instances yet, the tab shows an empty state instead of provider groups:
Once at least one instance exists, the tab lists them under each provider:
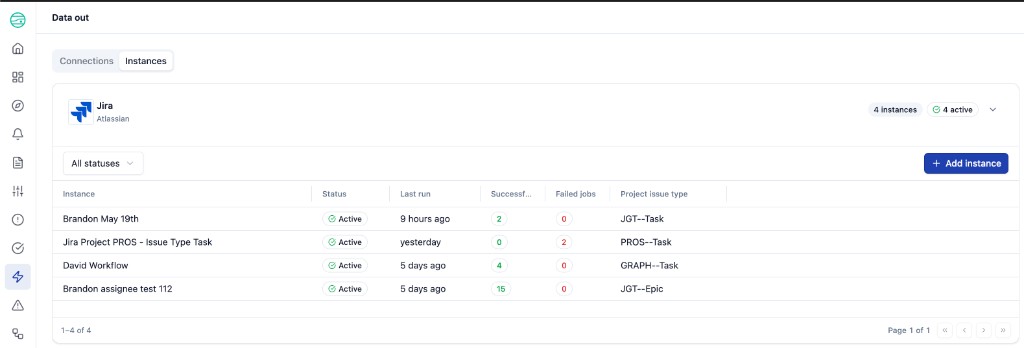
Within each group, a table lists every instance with:
| Column | What it shows |
|---|---|
| Instance | The Workflow name configured on the instance. Click to open the instance detail page. |
| Status | Active when the instance is enabled; greys out when stopped. |
| Last run | Relative timestamp of the most recent job, for example 8 minutes ago or 3 days ago. |
| Successful | Count of jobs in the Succeeded terminal state. Lifetime count, not a rolling window. |
| Failed jobs | Count of jobs in the Failed terminal state. A red value here is a triage signal. |
| Project issue type | Compact label of the configured Jira project + issue type, for example PROS--Task (project key PROS, issue type Task). |
A Status filter dropdown above the table lets you narrow the list to All, Active, or Stopped instances. The + Add instance button on the right of the section header opens the Add Jira instance wizard for that provider.
Row actions
Hover over a row to reveal three icons on the right edge: Stop, Edit, and Delete.
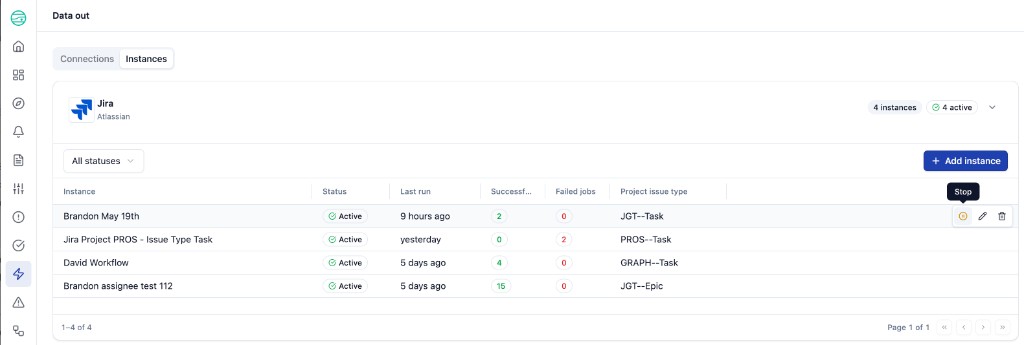
| Icon | Action | Effect |
|---|---|---|
| Stop (yellow octagon) | Pauses the instance. New CCM Create ticket calls and producer webhook events for this instance return immediately without creating a Jira ticket. The instance row Status flips to Stopped. | Reversible - hover again to see a Start action that re-enables it. |
| Edit (pencil) | Opens the Edit workflow modal | Reversible - changes apply on save. |
| Delete (trash) | Permanently removes the instance | Not reversible. Confirm in the dialog. Existing Jobs records are retained for audit but no new jobs can be created against this instance. |
Edit an instance
Clicking the Edit (pencil) icon on a row opens the Edit workflow modal.
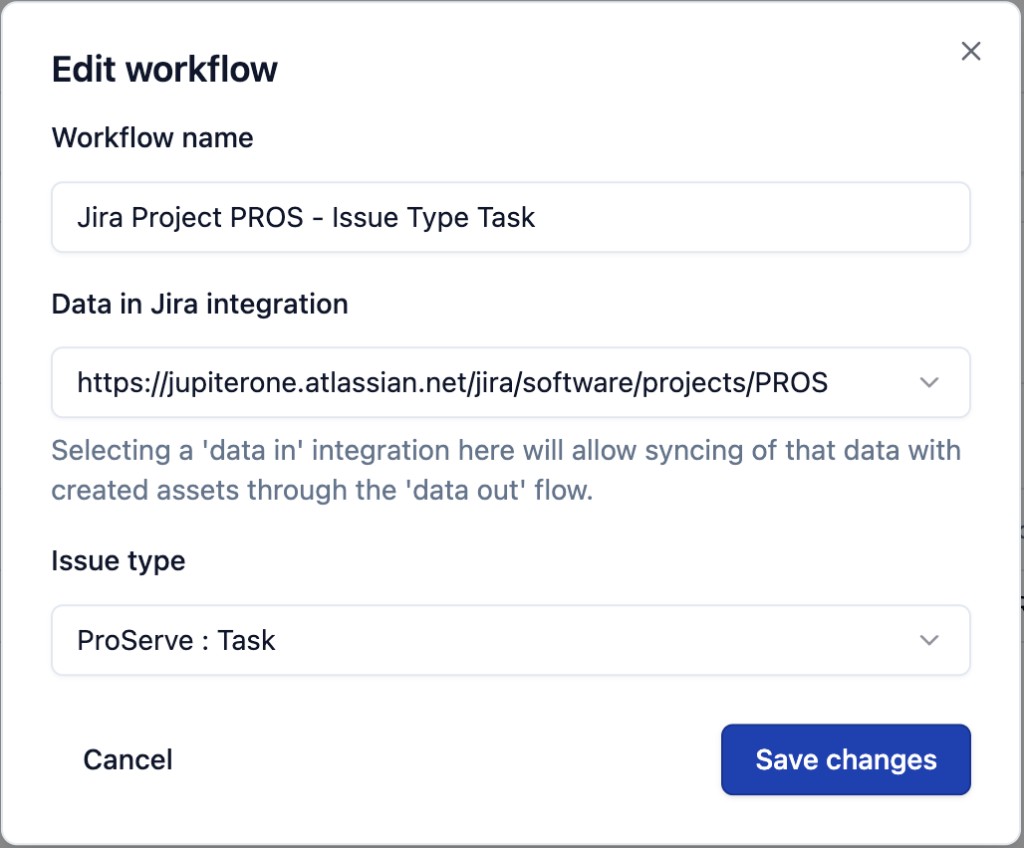
The fields match Step 2 of the Add Jira instance wizard:
| Field | What you can change |
|---|---|
| Workflow name | Update the friendly label. The new name appears immediately in the Instances tab and in the CCM Create ticket modal's Workflow dropdown. |
| Data in Jira integration | Re-target the instance to a different Jira project URL. Useful when a project key is renamed in Jira, or when you want to re-point an existing instance at a different project. |
| Issue type | Change the Jira issue type new tickets are filed under. The dropdown is searchable - start typing the project key (for example, pros) to narrow the list. |
Click Save changes to apply. The next CCM Create ticket call against this instance will use the new configuration.
Editing an instance does not change the underlying Connection. To rotate credentials or repoint an instance to a different Atlassian site, edit the Connection instead via Configure a Jira connection.
Stop versus Delete
Use Stop when you want to temporarily disable an instance - for example, while you investigate a string of failures, or when the target Jira project is undergoing maintenance. Stop is reversible and preserves the instance's history.
Use Delete only when the instance is no longer needed. Deletion is irreversible. If a producer (such as the CCM Create ticket modal) has been pointed at the deleted instance, the next call will fall back to the workflow picker - admins will need to choose a different instance.
Instance detail page
Click any instance name to open its detail page. The breadcrumb shows the path: Data out > Instances > {Workflow name}.
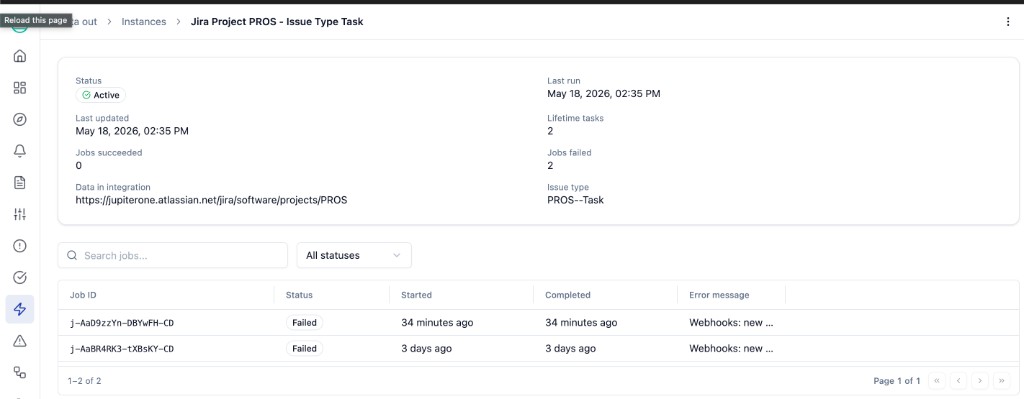
Summary header
The header surfaces eight metrics at a glance:
| Metric | What it means |
|---|---|
| Status | Active or Stopped. |
| Last run | Timestamp of the most recent job. |
| Last updated | When the instance configuration was last edited (Workflow name, project, issue type). |
| Lifetime tasks | Total number of jobs this instance has produced over its lifetime. |
| Jobs succeeded | Lifetime count of jobs in Succeeded state. |
| Jobs failed | Lifetime count of jobs in Failed state. |
| Data in integration | The Jira project URL the instance is scoped to (https://{site}/jira/software/projects/{KEY}). |
| Issue type | The compact Project--IssueType identifier the instance writes under. |
Per-instance Jobs table
Below the header is a Jobs table scoped to this instance only. Use it as the first stop when triaging a single instance's recent activity.
| Column | What it shows |
|---|---|
| Job ID | Unique identifier of the outbound delivery, for example j-AaD9zzYn-DBYwFH-CD. Useful for cross-referencing in support tickets. |
| Status | Terminal state: Succeeded or Failed. |
| Started | Relative timestamp when the job began. |
| Completed | Relative timestamp when the job reached its terminal state. |
| Error message | Short failure reason for jobs in the Failed state, for example Webhooks: new .... Empty for Succeeded jobs. |
A search box and an All statuses filter let you narrow the table when an instance has many jobs.
For triage tips on common error messages and stuck jobs, see Troubleshooting.
Top-right kebab menu
The kebab (three-dot) menu in the top right of the detail page offers the same actions as the row hover: Stop, Edit, Delete. Use this when you have already drilled into the instance and want to take an action without going back to the list.
Permission model
In 1.0, every action on the Instances tab and instance detail page (view, create, edit, stop, delete) requires the full admin role. Non-admins do not see the Data Out left-nav entry. See Configure a Jira connection for the upstream prerequisite.