Configure a Jira connection
A Connection is the credential set Data Out uses to talk to your Jira workspace. Before you can create instances or fire Create ticket from CCM, you need at least one Connected Jira connection.
In 1.0, Jira connections authenticate using an Atlassian API token. You will:
- Mint an API token in your Atlassian account
- Open the Data Out Connections tab and start a new Jira connection
- Walk through the Connect and Verify steps in the wizard
- (Create flow only) continue into Configure and Test to stand up your first instance
Prerequisite: mint an Atlassian API token
JupiterOne does not store your Atlassian password. Instead, you generate an API token scoped to the Atlassian account that owns the Jira projects you want to write to.
-
Sign in to id.atlassian.com with the Atlassian account you want JupiterOne to act as
-
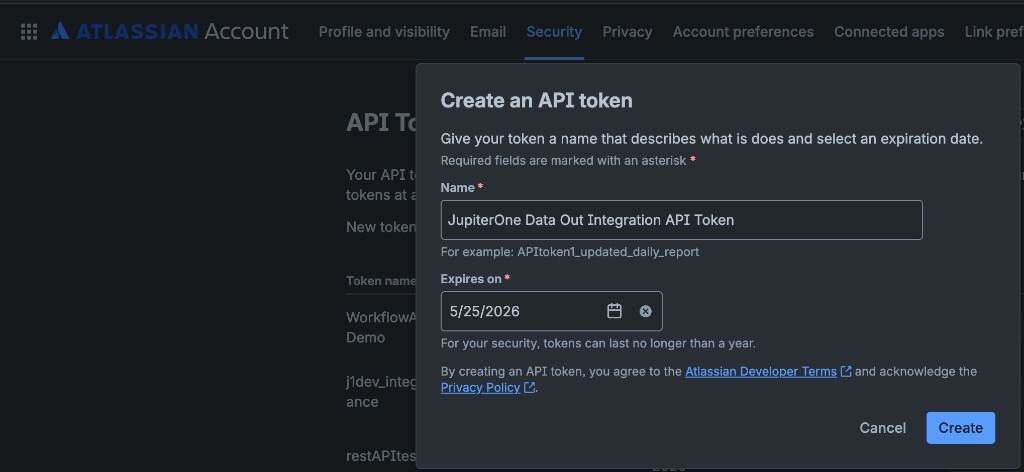
Click Create API token
-
Give the token a recognisable Name (we suggest
JupiterOne Data Out Integration API Token) -
Pick an Expires on date - Atlassian limits tokens to a maximum of one year
-
Click Create, then immediately copy the token value - Atlassian only shows it once
Set a calendar reminder one week before the Expires on date. When the token expires, Data Out will mark the connection as Needs reauthorization and instances backed by that connection will start failing. See Re-authorize a connection for the recovery flow.
Open the Connection wizard
-
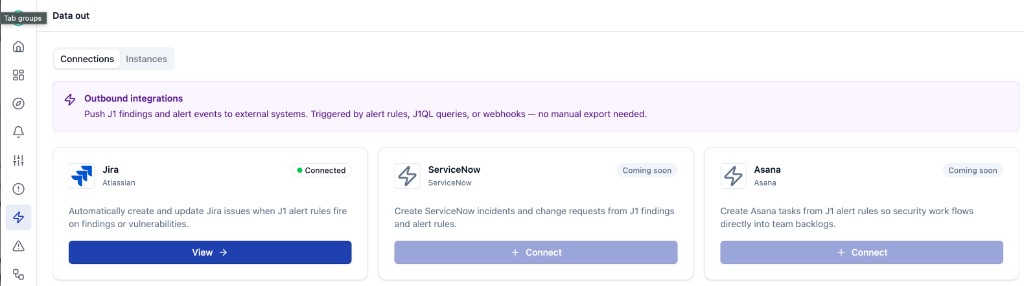
In the JupiterOne left navigation, open Integrations > Data out
-
The default tab is Connections
-
Find the Jira card and click Connect (or View -> if you already have at least one Jira connection)
-
The Jira provider page opens. Click + Add a new Jira connection (top-right) to open the wizard
Step 1 - Connect
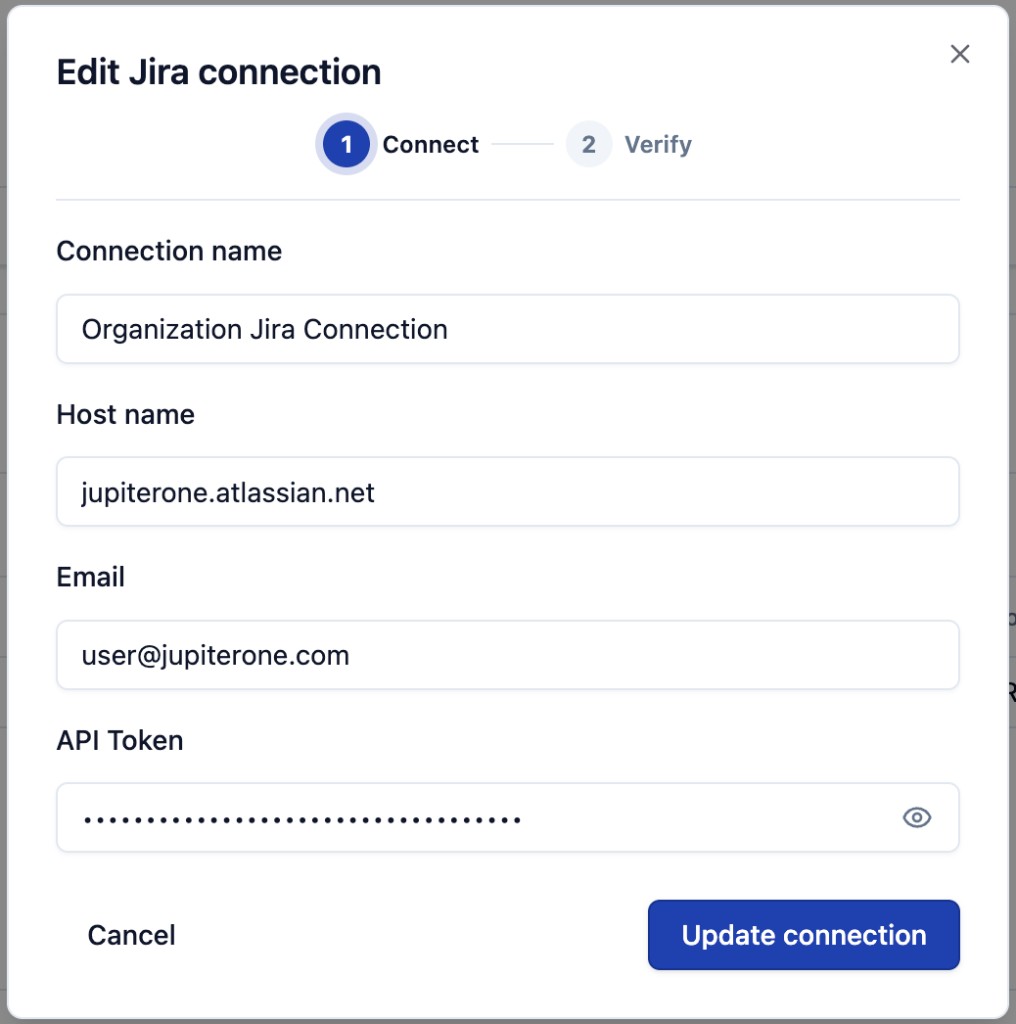
The Connect step captures four fields. You will paste the API token you minted above into the last one.
| Field | What to enter |
|---|---|
| Connection name | A friendly label that helps admins recognise this credential set, for example Organization Jira Connection or ACME Cloud Jira. The name appears wherever connections are referenced in Data Out. |
| Host name | Your Atlassian site URL without the https:// prefix, for example your-company.atlassian.net. |
| The email address of the Atlassian user who owns the API token. | |
| API Token | The token value you copied from id.atlassian.com. Click the eye icon on the right to reveal the value and confirm you pasted the full string. |
Click Next (in create mode) or Update connection (when editing an existing connection).
Step 2 - Verify
JupiterOne uses the credentials to confirm the API token is valid and to read a sample of Jira projects visible to that account. If you see "Your connection is working!" plus a list of project names, the token is good and the account has the read permissions Data Out needs.
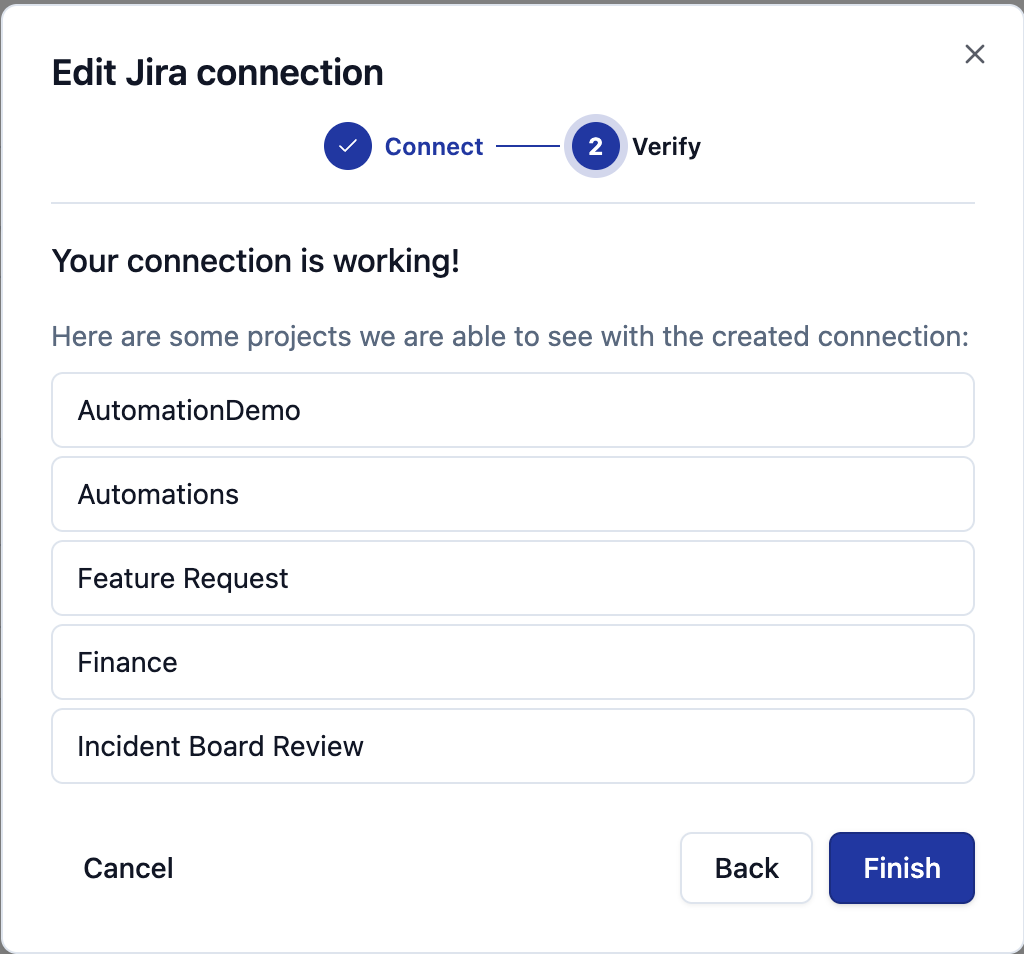
- If you are editing an existing connection, click Finish - your connection is saved
- If you are creating a new connection, click Next to continue into the instance setup steps below
If verification fails, head to Troubleshooting for common causes.
Steps 3 and 4 - Configure and Test (create flow only)
When you create a brand-new connection, the wizard continues directly into the same Configure and Test steps that the Add Jira instance wizard uses, so you finish with a working connection and a first running instance in one pass.
These steps are documented in detail on the Create an instance page. Briefly:
- Configure - name the workflow, optionally pick a Data in Jira integration to scope it to one project, and pick the Issue type to file under
- Test - send a test payload to confirm the round-trip works, or click Finish to skip the test
Click Finish at the end of the Test step. The new connection appears on the Jira provider detail page with a green Connected badge, and the first instance shows up in the connection's instance table.
Authorization status
Each connection carries an Authorization status badge that tells you whether the credentials are still good.
| Badge | What it means | What to do |
|---|---|---|
| Connected (green dot) | Credentials are valid; instances backed by this connection can run | Nothing - you are good |
| Needs reauthorization | The most recent run failed authentication (token revoked, expired, or the Atlassian account lost project access) | Mint a new API token and follow Re-authorize a connection |
| Failed | Persistent authentication failure | Same recovery as Needs reauthorization - the difference is just the count of consecutive failures |
The badge is visible on the provider catalog card (Connections tab) and on the per-provider detail page next to each connection name.
Edit an existing connection
- Open Data out > Connections > Jira
- Find the connection card and click the kebab menu (
...) on the right of the connection header - Click Edit
- The wizard opens directly on the Connect step with your existing values populated. The API Token field is masked - leave it as-is to keep the current token, or paste a fresh value to rotate it
- Step through Verify and click Finish
In edit mode, the wizard skips the Configure and Test steps because you are not creating a new instance - just updating credentials.
Re-authorize a connection
When the badge says Needs reauthorization, the most common cause is an expired or revoked Atlassian API token. To recover:
- Mint a fresh API token at id.atlassian.com using the same Atlassian account
- Open Data out > Connections > Jira
- Click the kebab menu next to the failing connection and choose Edit
- Paste the new token into the API Token field on the Connect step
- Click Next, confirm Verify is green, and click Finish
Existing instances backed by this connection will pick up the new credentials on their next run - you do not need to recreate them.
Delete a connection
Deleting a connection deletes any instances that depend on it.
- Open Data out > Connections > Jira
- Click the kebab menu next to the connection and choose Delete
- Confirm the action
If the connection has dependent instances, JupiterOne will surface them in the confirmation dialog so you can decide whether to proceed. Deletion is irreversible. To stop a single instance without removing its connection, use Stop on the instance row instead - see Manage instances.