CyberArk Idaptive
Visualize CyberArk Idaptive Devices, Users, Applications, Roles, Accounts and monitor changes through queries and alerts.
- Installation
- Authorization
- Data Model
- Types
- Release Notes
Development
This integration focuses on ingesting devices, users, accounts and applications from the CyberArk Idaptive REST API. There are two components of interest:
- The CyberArk Idaptive tenant (available at
https://<tenant-id>.id.cyberark.cloud). You will need a username and password to log in to the tenant. - The CyberArk Idaptive REST API reference
Installation
You will have to create a service user and a client application to generate access token and use this access token to make REST API calls to fetch data from CyberArk Idaptive. To do this:
-
Using a web browser, go to your CyberArk idaptive tenant (e.g.
https://my-tenant.id.cyberark.cloud/) and log in with your credentials. -
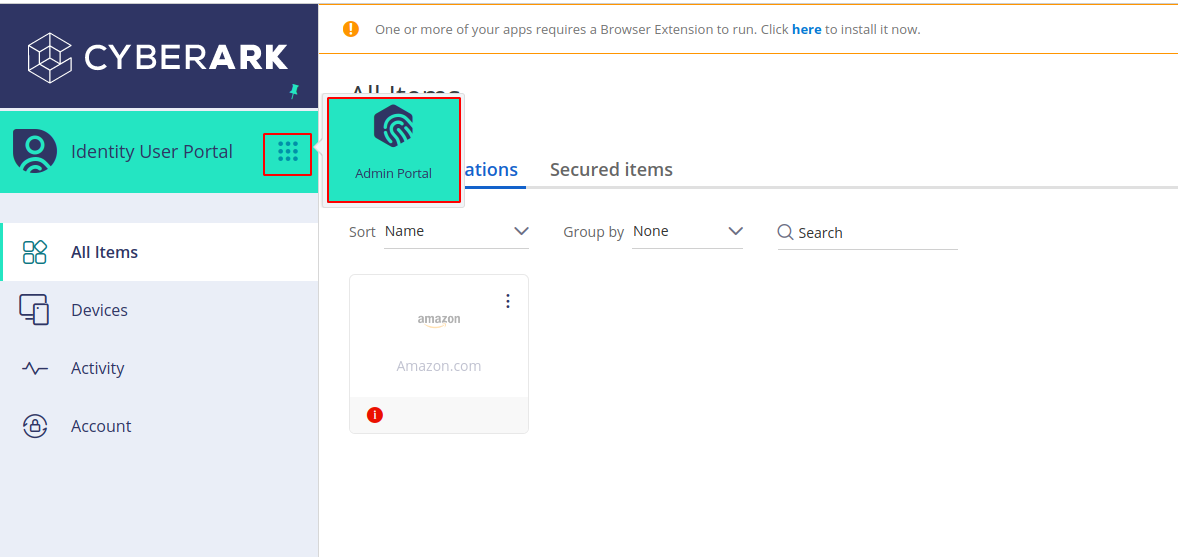
Go to the Admin portal
-
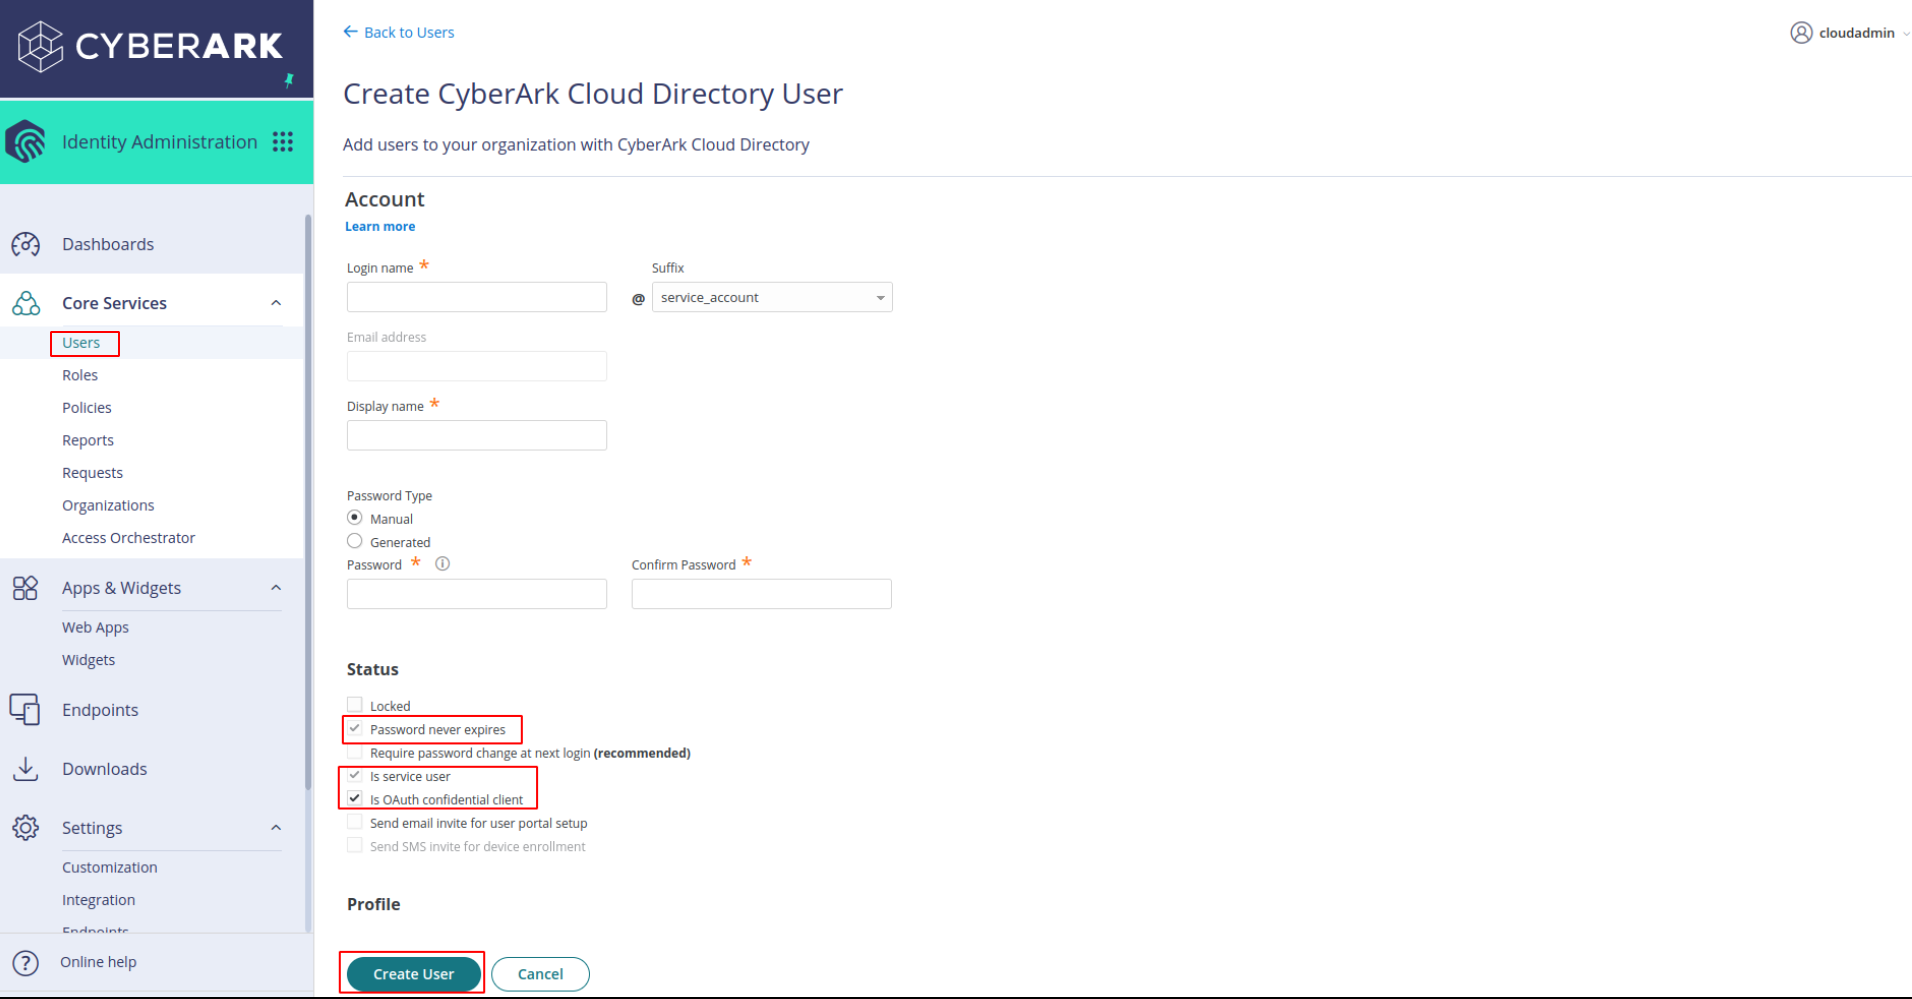
Go to Core Services -> Users. Fill in all required fields. Check password never expires, Is service user and Is OAuth Credential Client in status as show in the below image and click on create user
-
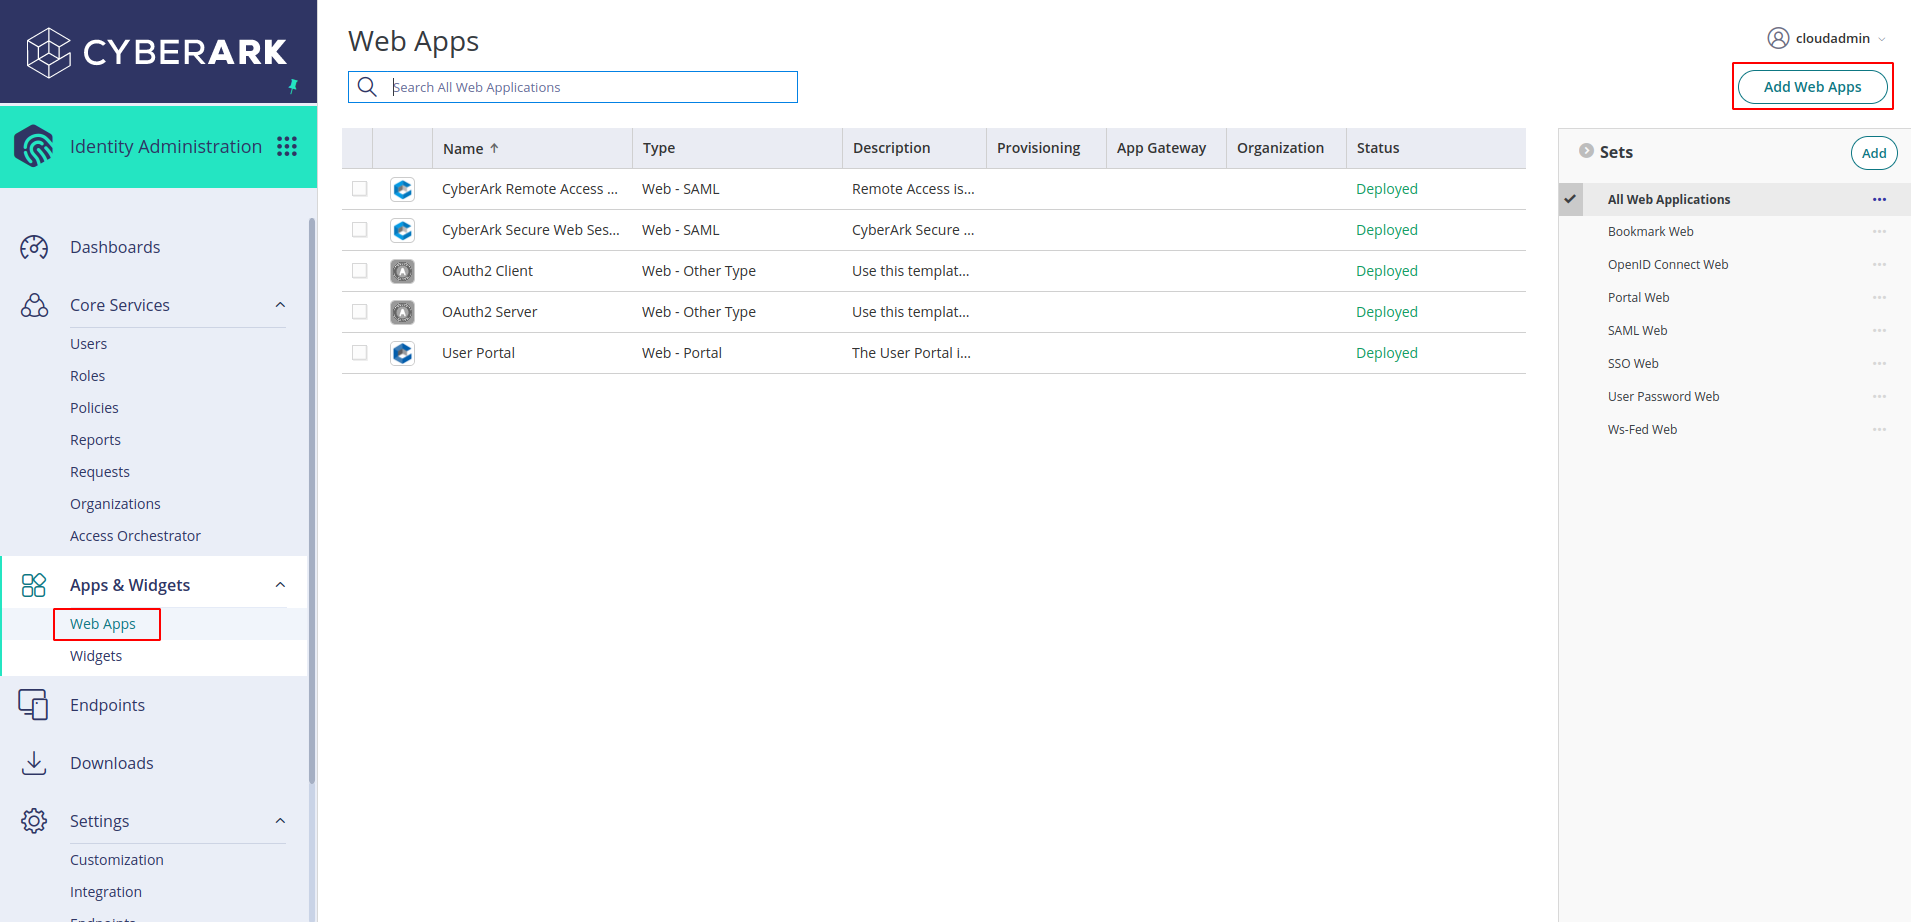
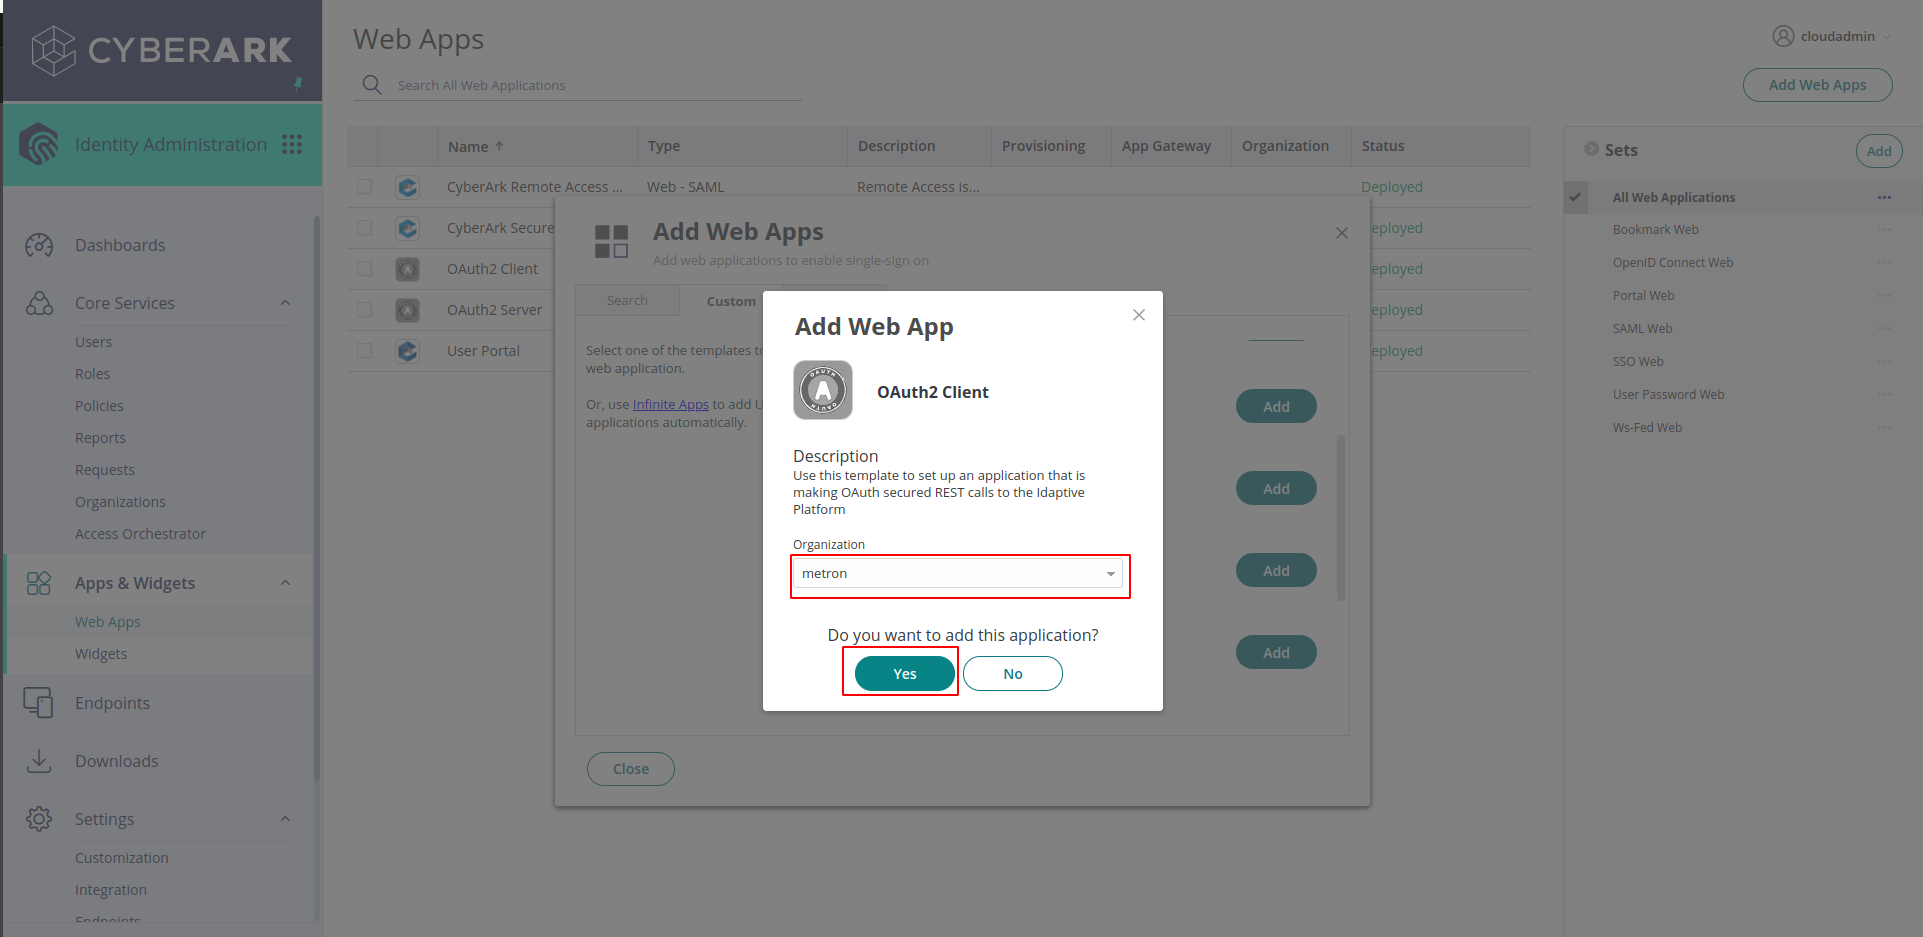
In Admin Portal, click on Apps & Widgets -> Web Apps. Select Add Web Apps on top right corner
-
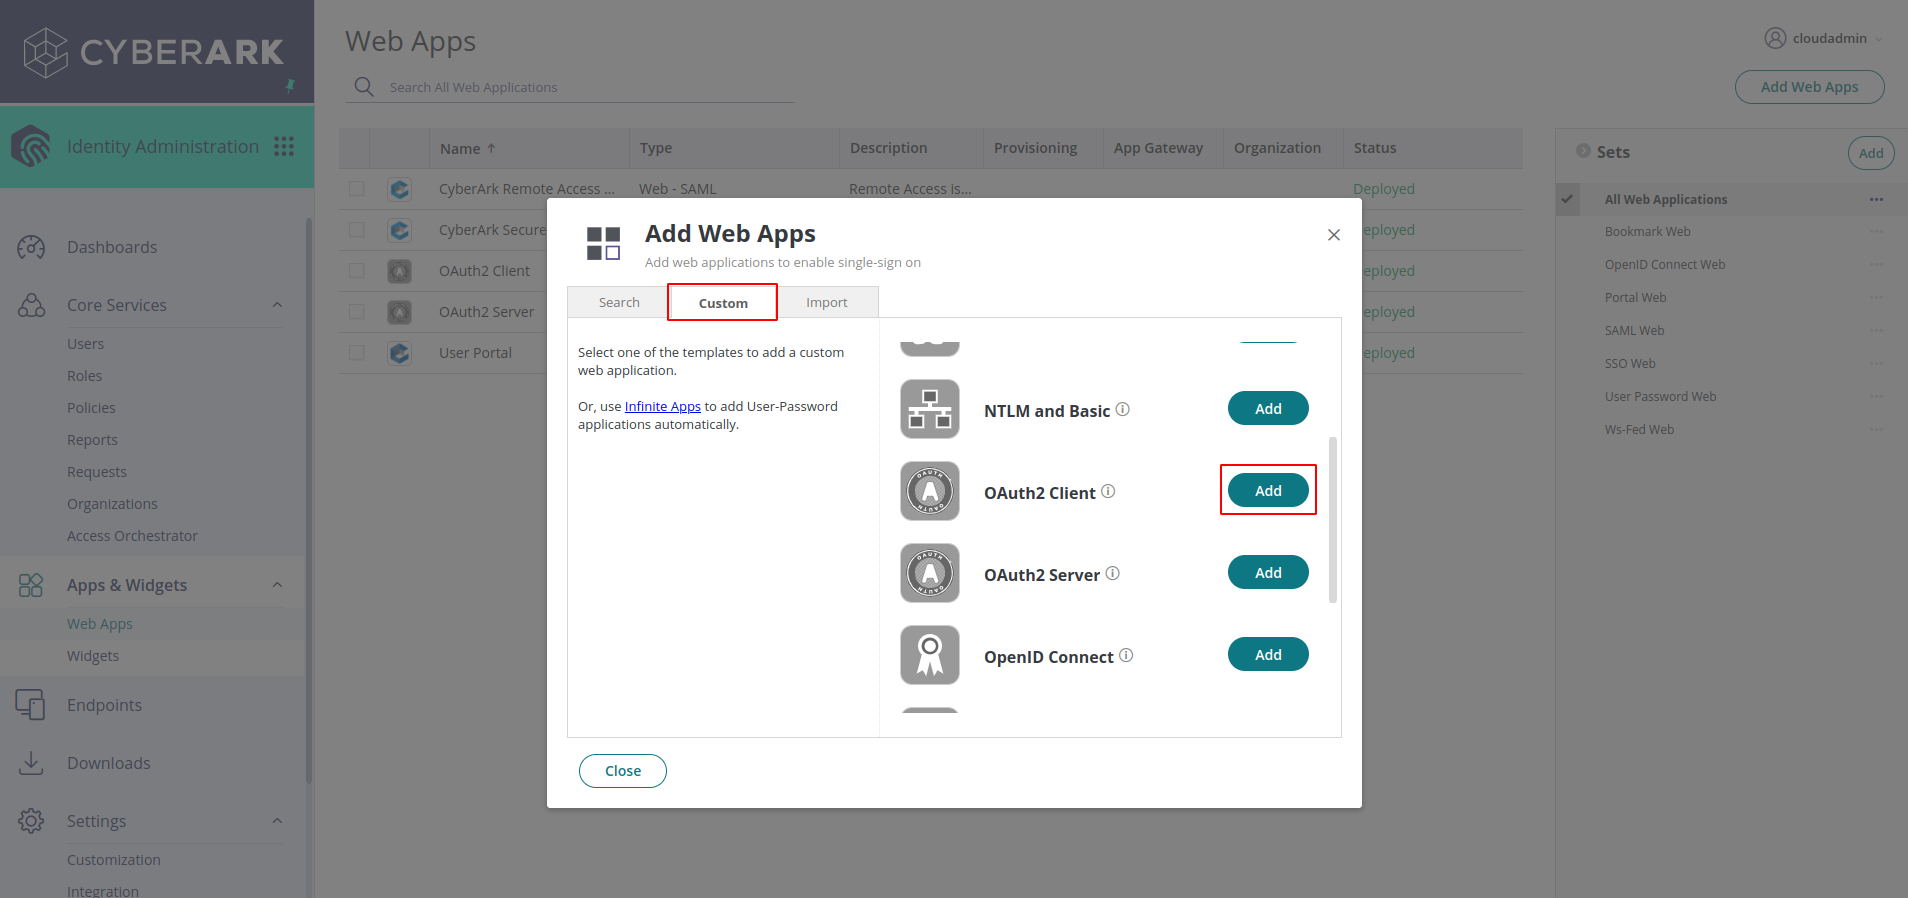
Click on custom and choose OAuth2 Client from the list as shown in the image
-
Select the Organization from the dropdown and click on Add (this prompt may not show up)
-
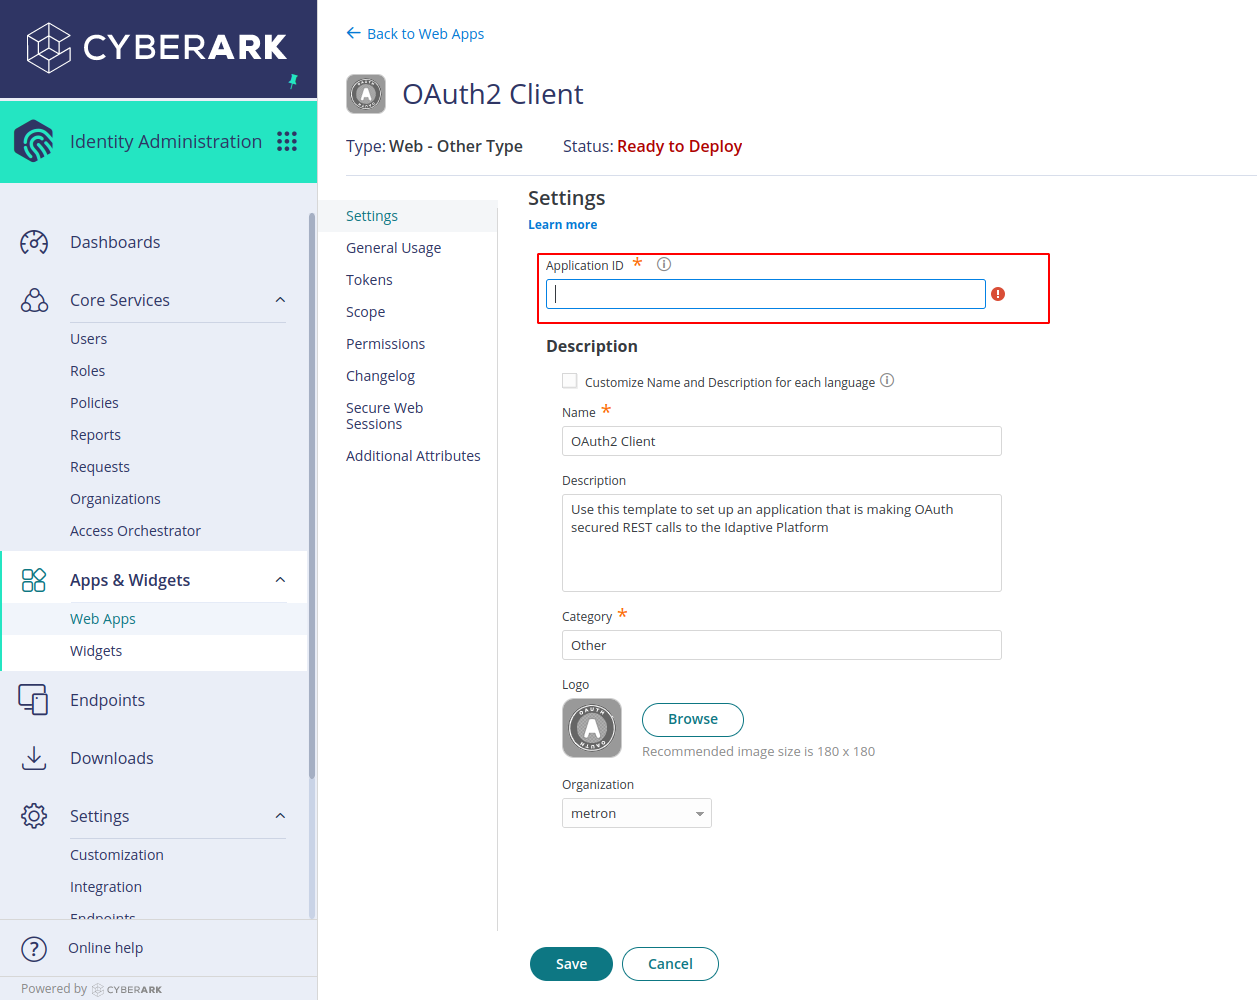
On the settings page, Give an ID for the application, It can be any name. Save it somewhere, It is required while configuring the integration in JupiterOne
-
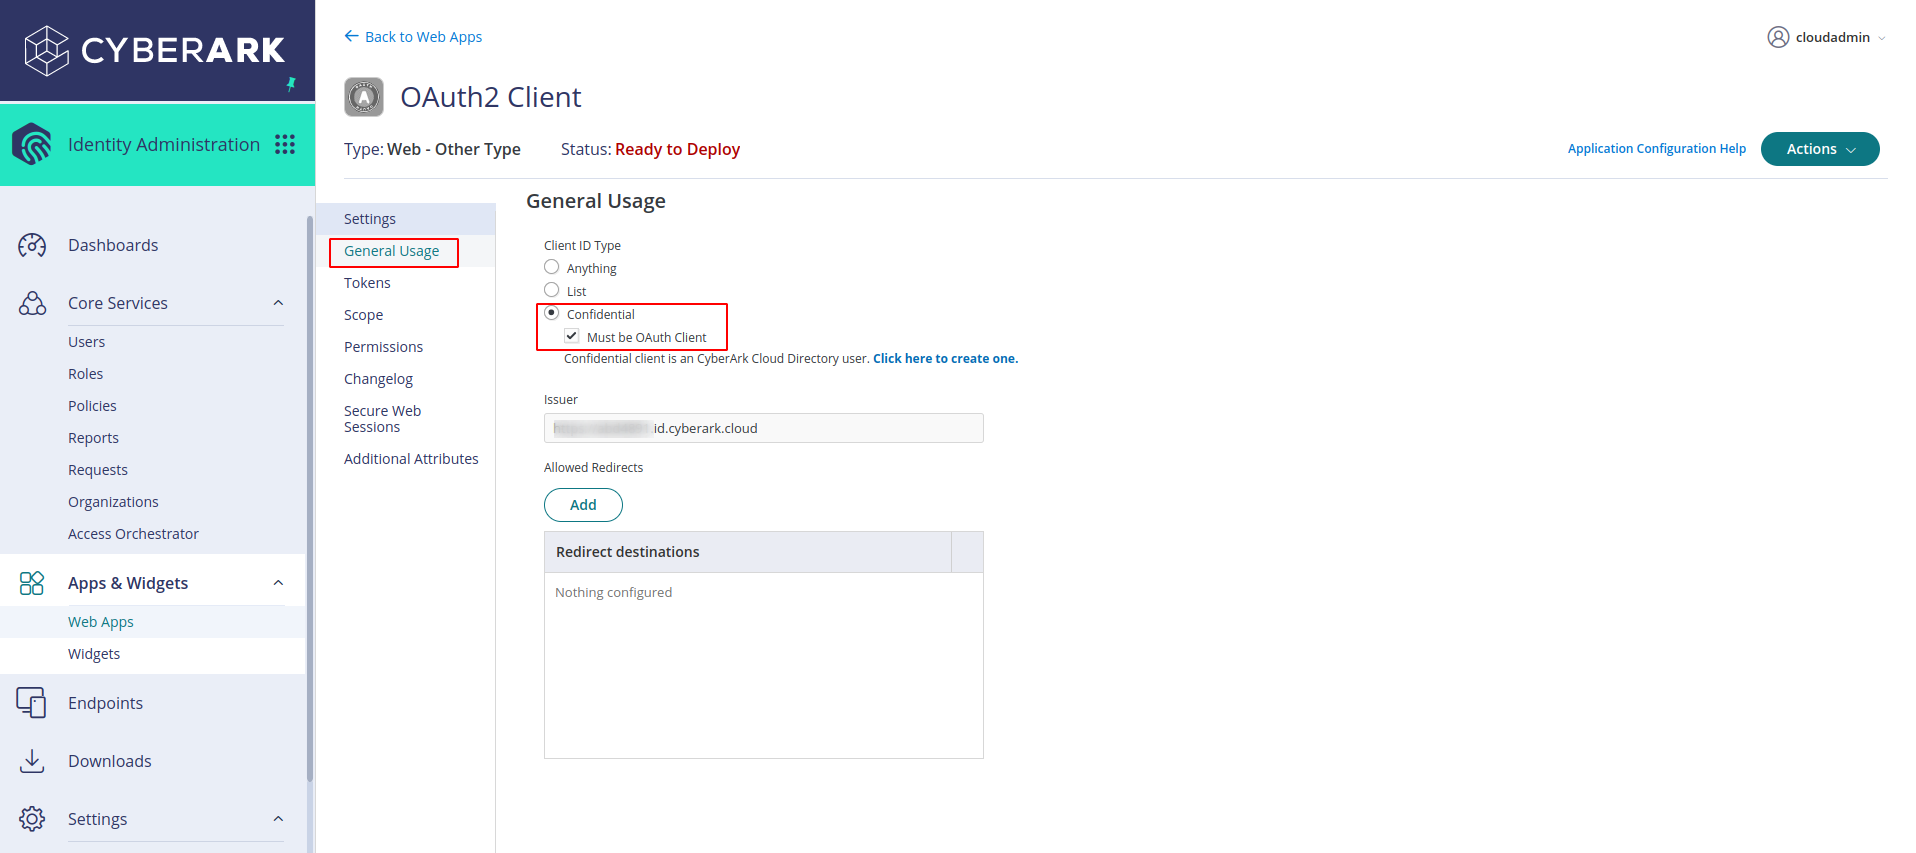
Click on General Usage in the sidebar and select Confidential and check Must be OAuth Client
-
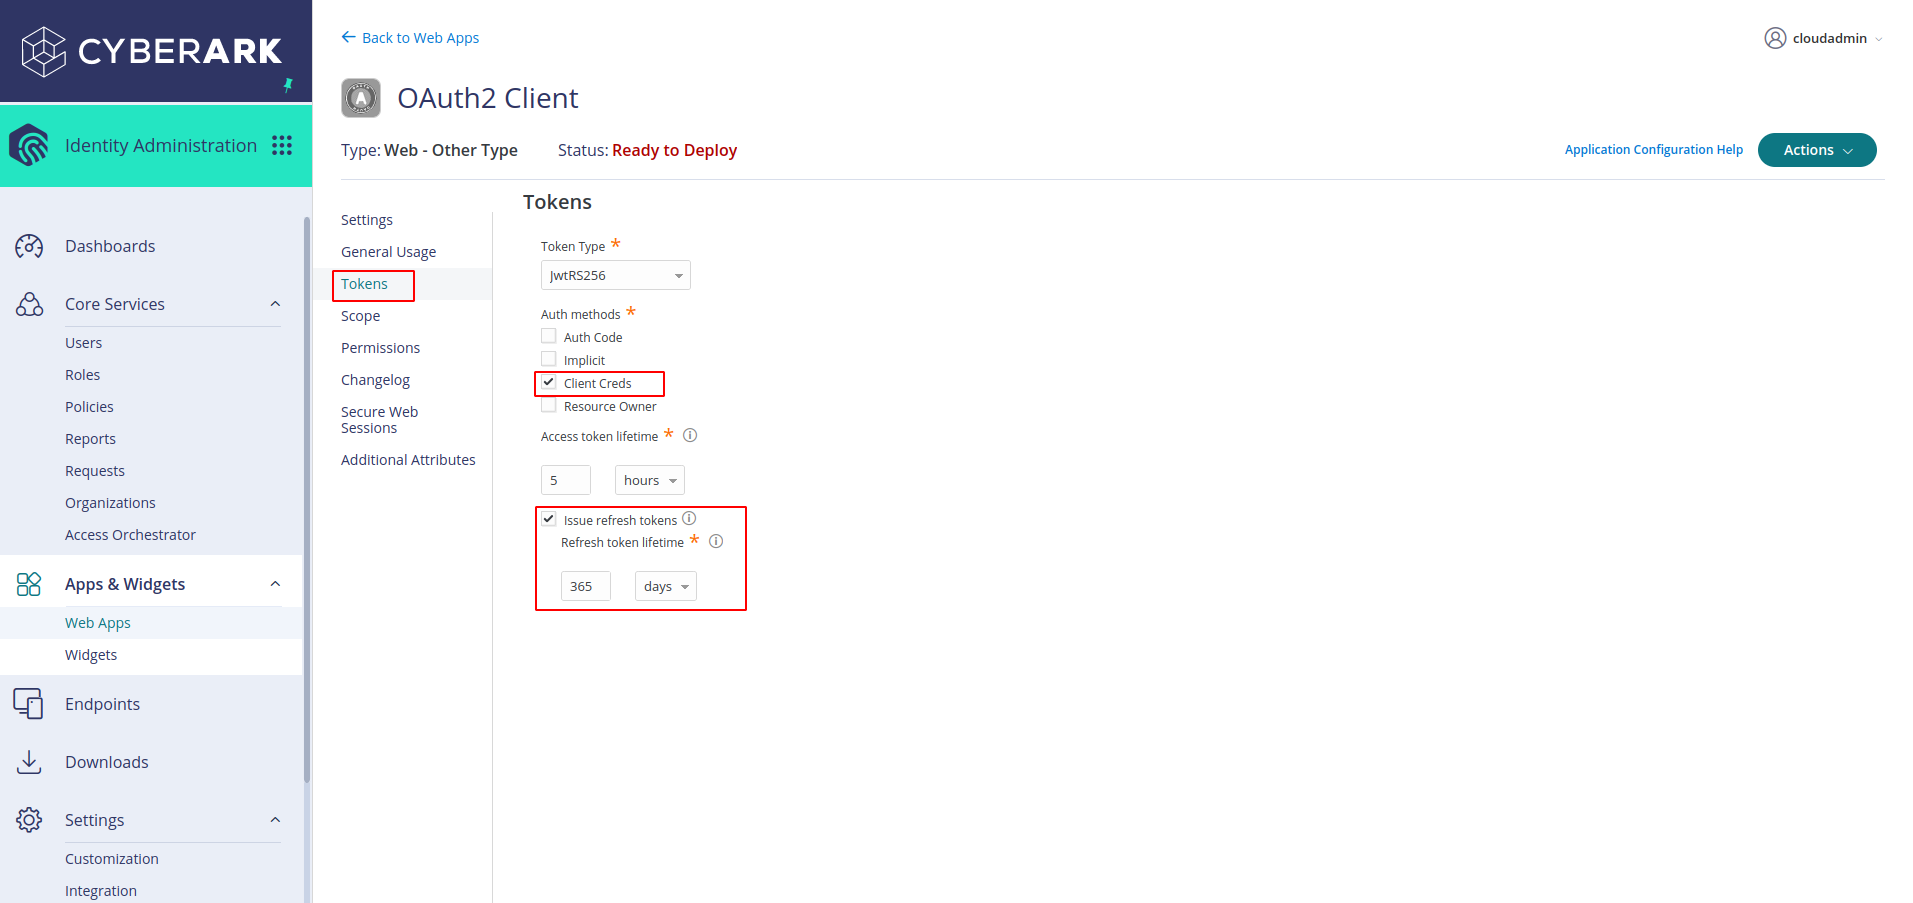
Go to Tokens in the side bar and select client credentials and choose validity of access token. Choose a period greater than 10 minutes as it was advised in the CyberArk Idaptive documentation and enable refresh tokens.
-
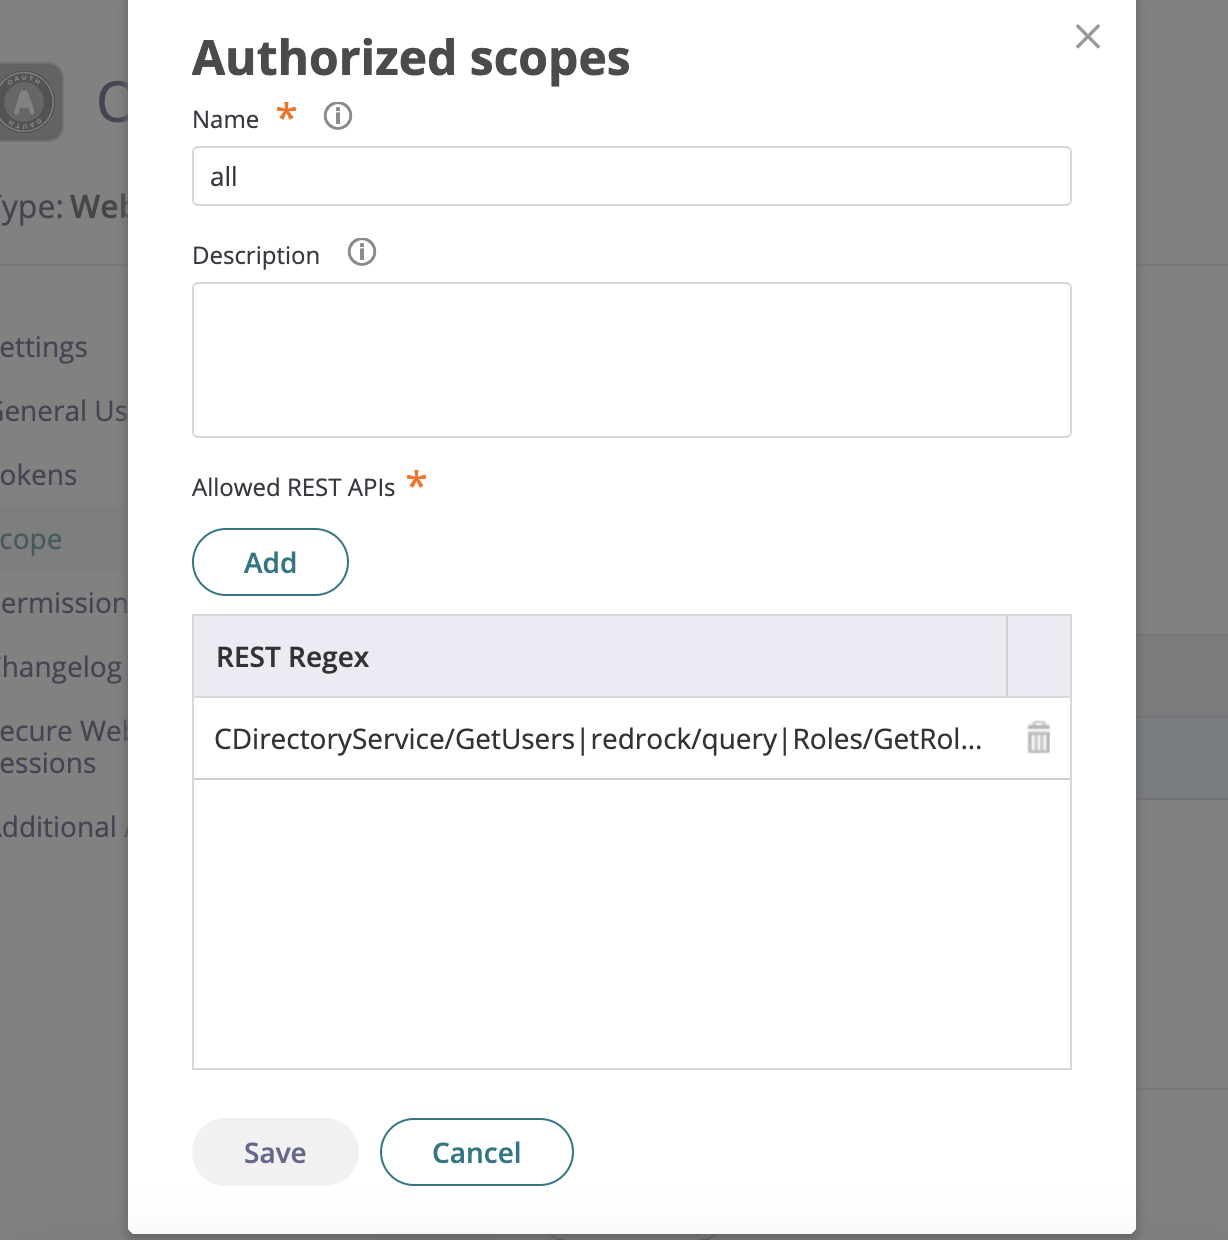
Select scope in the sidebar and click on Add, give it the name
alland in the regex addCDirectoryService/GetUsers|redrock/query|Roles/GetRoleMembers|SysInfo/About|UPRest/GetResultantAppsForUser|Acl/GetRowAces
- Select the permissions in the side bar, search for the service account you have created previously and click on add
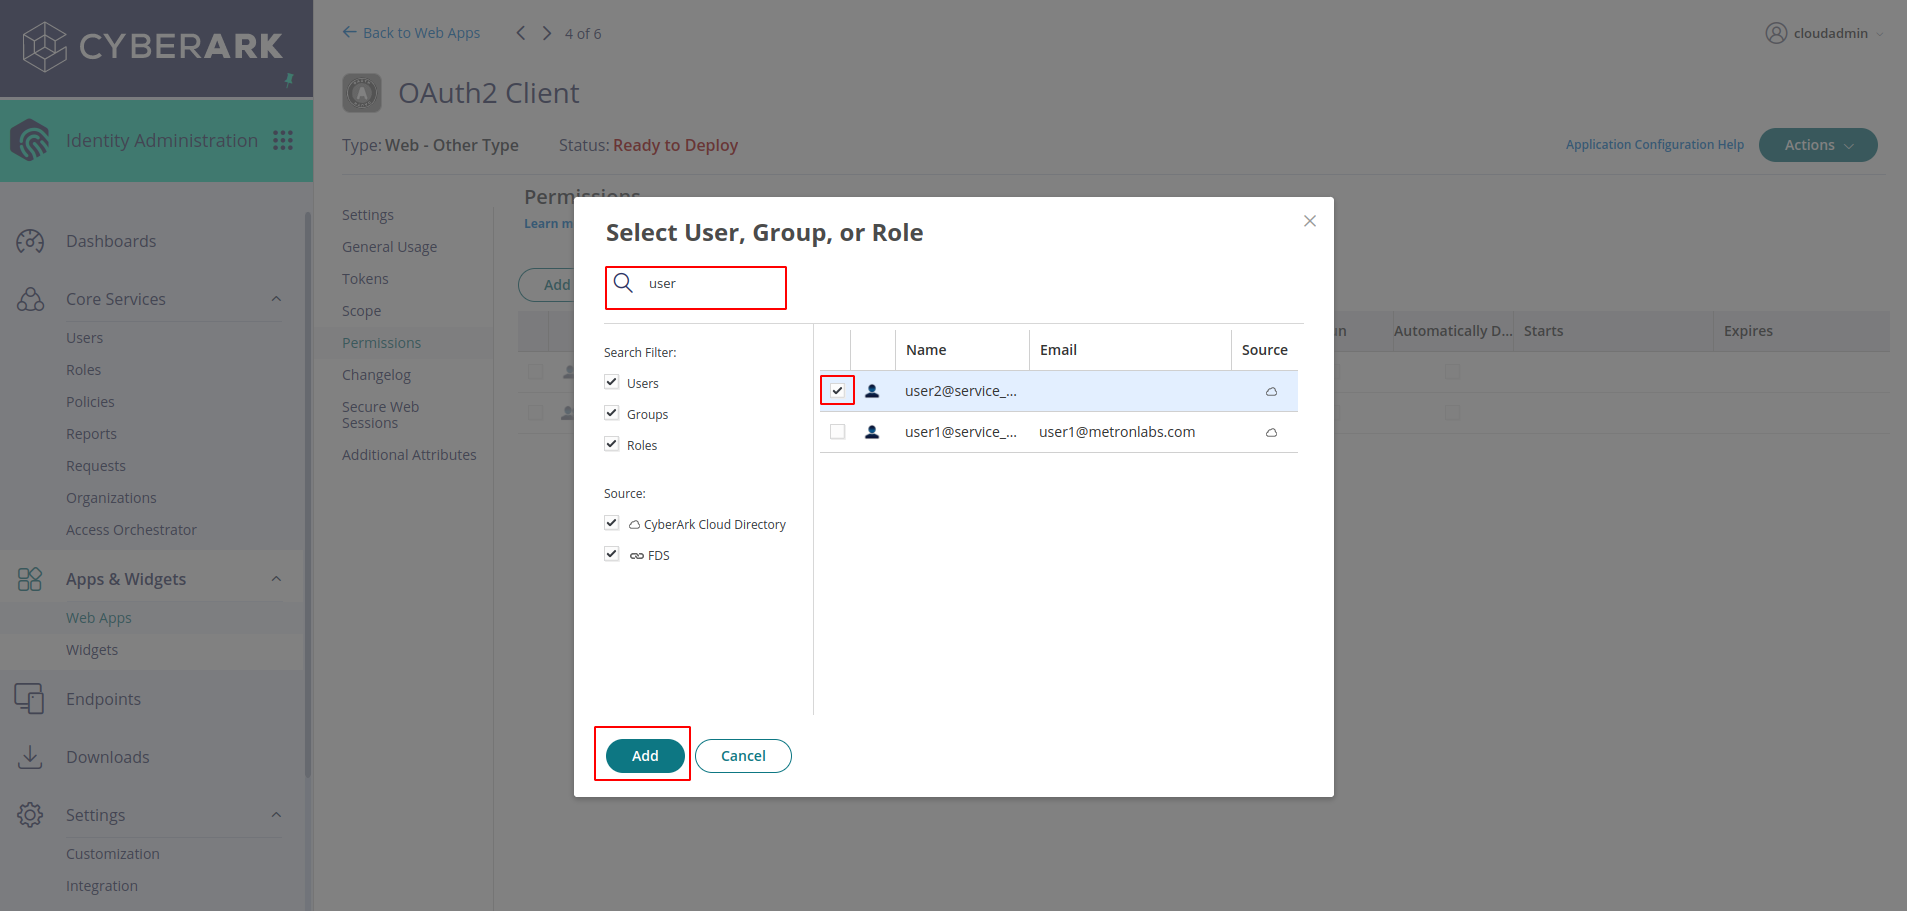
-
Grant the
Runpermission to the service account. Click Save -
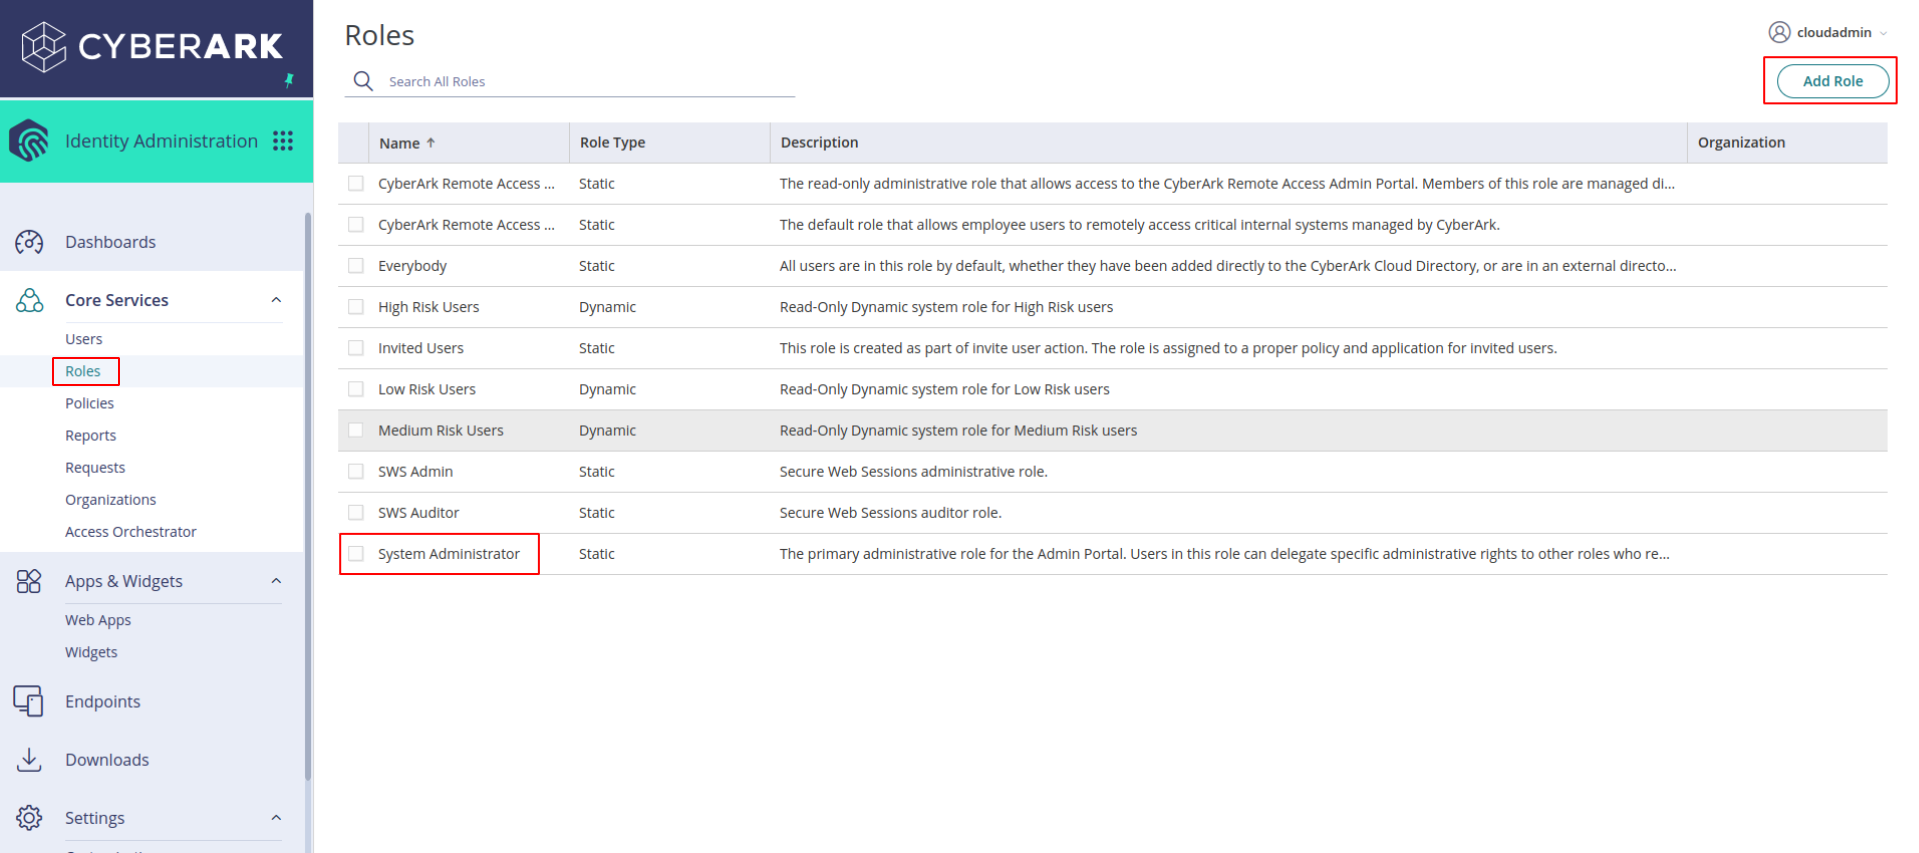
Go to Roles -> System Administrator
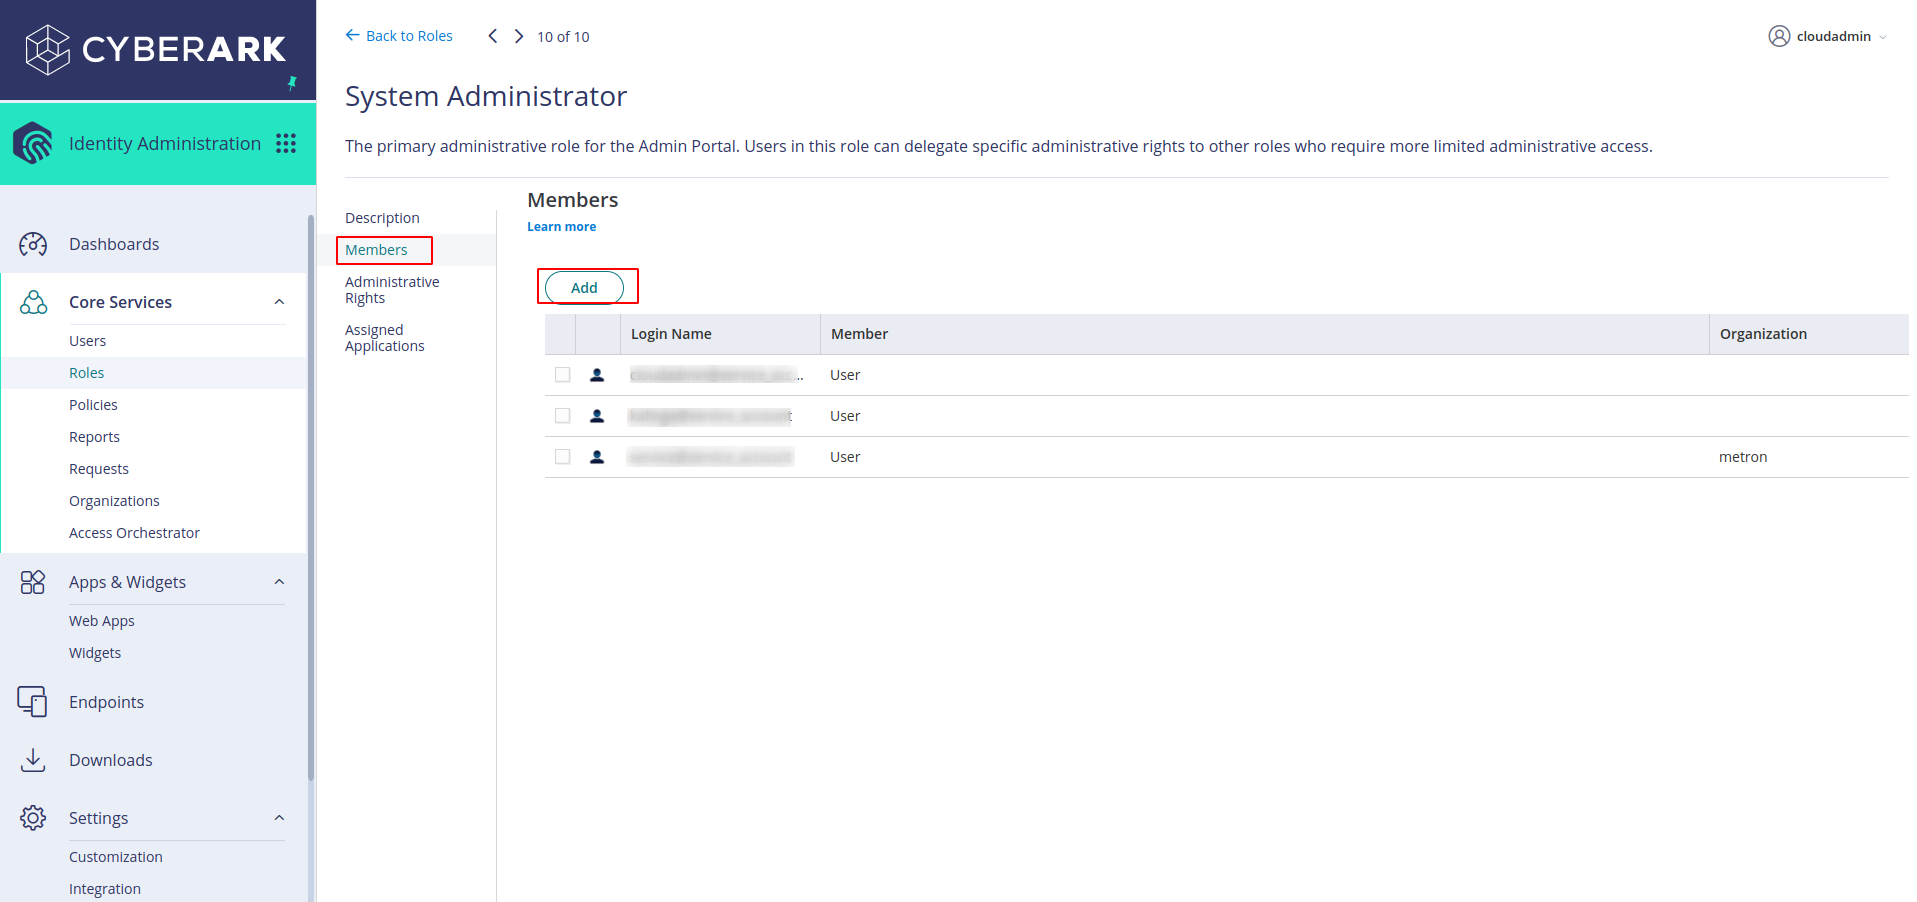
- Go to members and add Service account as the member
Configuration in JupiterOne
To install the CyberArk Idaptive integration in JupiterOne, navigate to the Integrations tab in JupiterOne and select CyberArk Idaptive. Click New Instance to begin configuring your integration.
Creating an instance requires the following:
-
The Account Name used to identify the CyberArk Idaptive account in JupiterOne. Ingested entities will have this value stored in
tag.AccountNamewhen theAccountNametoggle is enabled. -
Description to assist in identifying the integration instance, if desired.
-
Polling Interval that you feel is sufficient for your monitoring needs. You may leave this as
DISABLEDand manually execute the integration. -
Your CyberArk Idaptive Instance URL, Client Application Id, Service Account Username, Service Account Password.
Click Create once all values are provided to finalize the integration.
Next steps
Now that your integration instance has been configured, it will begin running on the polling interval you provided, populating data within JupiterOne. Continue on to our Instance management guide to learn more about working with and editing integration instances.
Entities
The following entities are created:
| Resources | Entity _type | Entity _class |
|---|---|---|
| Account | cyberark_idaptive_account | Account |
| Application | cyberark_idaptive_application | Application |
| Device | cyberark_idaptive_device | Device |
| Role | cyberark_idaptive_role | AccessRole |
| Service | cyberark_idaptive | Service |
| User | cyberark_idaptive_user | User |
Relationships
The following relationships are created:
Source Entity _type | Relationship _class | Target Entity _type |
|---|---|---|
cyberark_idaptive_account | HAS | cyberark_idaptive_user |
cyberark_idaptive_account | HAS | cyberark_idaptive_application |
cyberark_idaptive_account | PROVIDES | cyberark_idaptive |
cyberark_idaptive_role | ASSIGNED | cyberark_idaptive_application |
cyberark_idaptive_user | OWNS | cyberark_idaptive_device |
cyberark_idaptive_user | ASSIGNED | cyberark_idaptive_role |
cyberark_idaptive_user | ASSIGNED | cyberark_idaptive_application |
Mapped Relationships
The following mapped relationships are created:
Source Entity _type | Relationship _class | Target Entity _type | Direction |
|---|---|---|---|
cyberark_idaptive_user | IS | Person | FORWARD |
Cyberark Idaptive
cyberark_idaptive inherits from Service
Cyberark Idaptive Account
cyberark_idaptive_account inherits from Account
| Property | Type | Description | Specifications |
|---|---|---|---|
accessURL | string | ||
podFqdn | string | ||
podName | string | ||
podRegion | string | ||
version | string |
Cyberark Idaptive Application
cyberark_idaptive_application inherits from Application
| Property | Type | Description | Specifications |
|---|---|---|---|
adminTag | string | ||
appType | string | ||
appTypeDisplayName | string | ||
authChallengeDefinitionFlowId | string | ||
authChallengeDefinitionId | string | ||
brand | string | ||
bypassLoginMFA | boolean | ||
catalogVisibility | string | ||
category | string | ||
certBasedAuthEnabled | boolean | ||
childLinkedApps | string | ||
corpIdentifier | string | ||
deepLinkUrl | string | ||
derivedCredsSupported | boolean | ||
directoryId | string | ||
entityKeys | array of strings | ||
featured | boolean | ||
generic | boolean | ||
handler | string | ||
icon | string | ||
id | string | ||
isGatewayed | boolean | ||
isMarketplaceApp | boolean | ||
isScaEnabled | boolean | ||
isSwsEnabled | boolean | ||
isTestApp | boolean | ||
isThirdPartyIdpEnabled | boolean | ||
lastUsedCentrifyUrl | string | ||
lastUsedPodUrl | string | ||
mobileAppSource | string | ||
mobileAppType | string | ||
munkiMetadata | string | ||
notSelfService | boolean | ||
onPrem | boolean | ||
orgId | string | ||
orgPath | string | ||
parentApp | string | ||
parentAppTemplateName | string | ||
policyScript | string | ||
popular | boolean | ||
portalApp | boolean | ||
provCapable | boolean | ||
provConfigured | boolean | ||
provSettingEnabled | boolean | ||
provSettingPreview | boolean | ||
provSettingsIsEnterpriseScimUser | string | ||
provSettingsValidateEmailAttribute | string | ||
serviceName | string | ||
shadowAppLink | string | ||
skipSwsForAwsCli | boolean | ||
state | string | ||
tableName | string | ||
templateName | string | ||
version | string | ||
versionName | string | ||
webAppLoginType | string | ||
webAppType | string | ||
webAppTypeDisplayName | string | ||
webUPAppType | string | ||
workflowEnabled | boolean |
Cyberark Idaptive Device
cyberark_idaptive_device inherits from Device
| Property | Type | Description | Specifications |
|---|---|---|---|
afwDeviceId | string | null | ||
agentAccount | string | null | ||
amsPolicyEnforced | boolean | null | ||
androidAppReleaseVersion | string | ||
apps | string | null | ||
availableDeviceCapacity | string | null | ||
availableDeviceCapacityDisplay | string | null | ||
batteryLevel | string | null | ||
bytesReceivedNetwork | string | null | ||
bytesReceivedWIFI | string | null | ||
bytesSentNetwork | string | null | ||
bytesSentWIFI | string | null | ||
capabilities | string | ||
carrier | string | null | ||
cellularTechnology | string | null | ||
clientPackageId | string | null | ||
commandCountThisWeek | number | ||
commandCountToday | number | ||
complianceState | string | null | ||
corporateOwned | boolean | ||
customerID | string | ||
deviceCapacity | string | null | ||
deviceCapacityDisplay | string | null | ||
deviceDetails | string | ||
displayModelName | string | null | ||
displayOsVersion | string | ||
displayOwner | string | ||
displayState | string | ||
displayStateString | string | ||
enrollmentType | string | ||
entityKeys | array of strings | ||
fileVaultStatus | string | null | ||
hasNonExportableKeychainData | boolean | ||
id | string | ||
imei | string | null | ||
internalDeviceType | string | ||
ipAddress | string | null | ||
isAdminLocationTrackingEnabled | boolean | null | ||
jailbroken | number | ||
knoxApiLevel | string | null | ||
knoxContainerStatus | string | null | ||
knoxLicenseActivated | boolean | null | ||
knoxSdkVersion | string | null | ||
knoxVersionDisplay | string | null | ||
lastAttestationState | string | null | ||
lastAttestationSucceeded | boolean | null | ||
lastDeviceOwnerLogin | string | null | ||
lastInfoReceived | string | ||
lastNotify | string | ||
lastUsedCentrifyUrl | string | null | ||
lastUsedPodUrl | string | null | ||
latitude | string | null | ||
latitudeDisplay | string | null | ||
locationAccuracy | string | null | ||
locationTime | string | null | ||
loggingCallInfo | string | null | ||
loggingCarrierDataUsage | boolean | null | ||
loggingSMS | boolean | null | ||
longitude | string | null | ||
longitudeDisplay | string | null | ||
missedCallsCount | string | null | ||
mobileManagerVersion | string | ||
modelName | string | null | ||
orgId | string | null | ||
osBuild | string | null | ||
osPlatform | string | null | ||
ownerID | string | ||
phoneNumber | string | null | ||
primaryEnrolledTenant | string | null | ||
primaryEnrolledUser | string | null | ||
product | string | null | ||
safeKeyVersion | string | null | ||
safeSdkVersion | string | null | ||
ssoEnabled | boolean | ||
state | number | ||
statusFlags | string | ||
successCallsCount | string | null | ||
tableName | string |
Cyberark Idaptive Role
cyberark_idaptive_role inherits from AccessRole
| Property | Type | Description | Specifications |
|---|---|---|---|
category | string | null | ||
directoryServiceUuid | string | ||
entityKeys | array of strings | ||
id | string | ||
isHidden | boolean | null | ||
orgId | string | ||
orgPath | string | null | ||
readOnly | boolean | null |
Cyberark Idaptive User
cyberark_idaptive_user inherits from User
| Property | Type | Description | Specifications |
|---|---|---|---|
endDate | string | null | ||
entityKeys | array of strings | ||
homeNumber | string | null | ||
id | string | ||
mail | string | null | ||
mobileNumber | string | null | ||
officeNumber | string | null | ||
pictureUri | string | null | ||
preferredCulture | string | null | ||
reportsTo | string | null | ||
startDate | string | null |
Release Notes
- 2026-04-08 — Improved OS name accuracy for CyberArk Idaptive device entities, using human-readable names for iOS, iPadOS, tvOS, macOS, Android, and Windows devices.