Create a Jira ticket from a failing CCM control test
The flagship Data Out 1.0 producer experience is the Create ticket action on every failing CCM control. From the control detail panel, you pick an active Jira workflow (instance), review and edit the prefilled Title and Description, optionally assign someone, and click Create ticket. The ticket lands in Jira immediately and is linked back from the control detail panel for easy follow-through.
This page walks the entire round-trip in five steps, then covers what to do when nothing happens (no admin set up a workflow yet, or your role does not allow you to create one).
The label you see in the modal is Workflow, and the label you see on the Instances tab is Instance. They refer to the same object - they are interchangeable in 1.0.
Prerequisites
- At least one Active Jira instance. If none exist, see Configure a Jira connection and Create an instance first
- You can be a regular user to see existing tickets and Linked Jira issues, but you must be a full admin to create the underlying instance. The Create ticket modal itself is available to any user who can open the control detail panel; if no instance is configured, the modal shows a role-aware empty state (see Empty states)
- A control test in the Failing state to act on
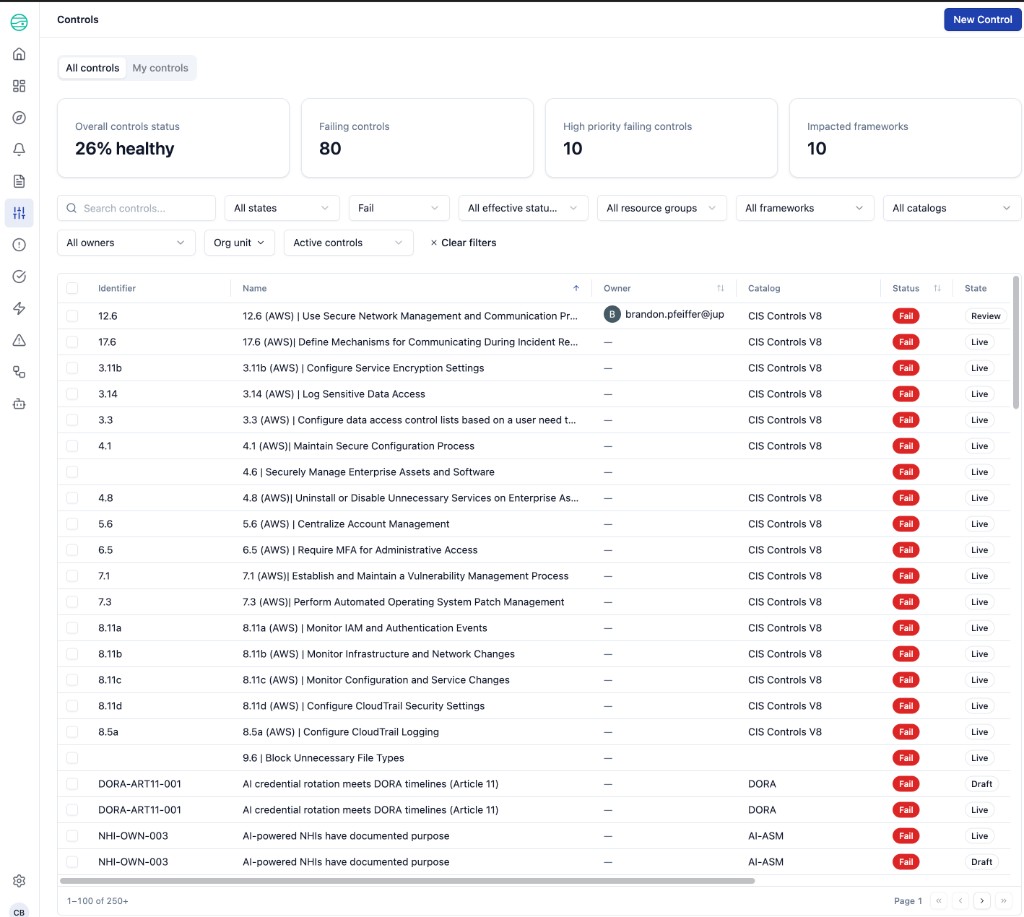
Step 1: Find a failing control
-
From the JupiterOne left navigation, open Compliance > Controls
-
The Controls view defaults to All controls. The header summary cards at the top show your overall health (
Overall controls status,Failing controls,High priority failing controls,Impacted frameworks) -
Use the second filter dropdown to filter to Fail
-
Click any row in the failing-controls table to open the control's detail panel on the right
Step 2: Review the control and open the modal
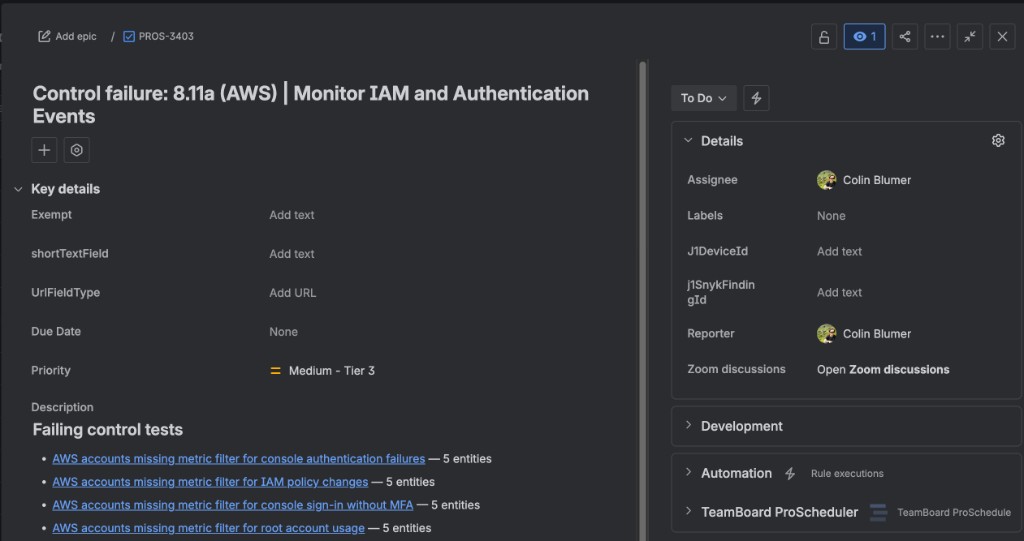
The detail panel shows the control's summary, last-test metadata, framework mappings, and the Linked Jira issues section listing every prior ticket created from this control (each with its own View in Jira link). At the bottom of the panel is a prominent full-width Create ticket button.
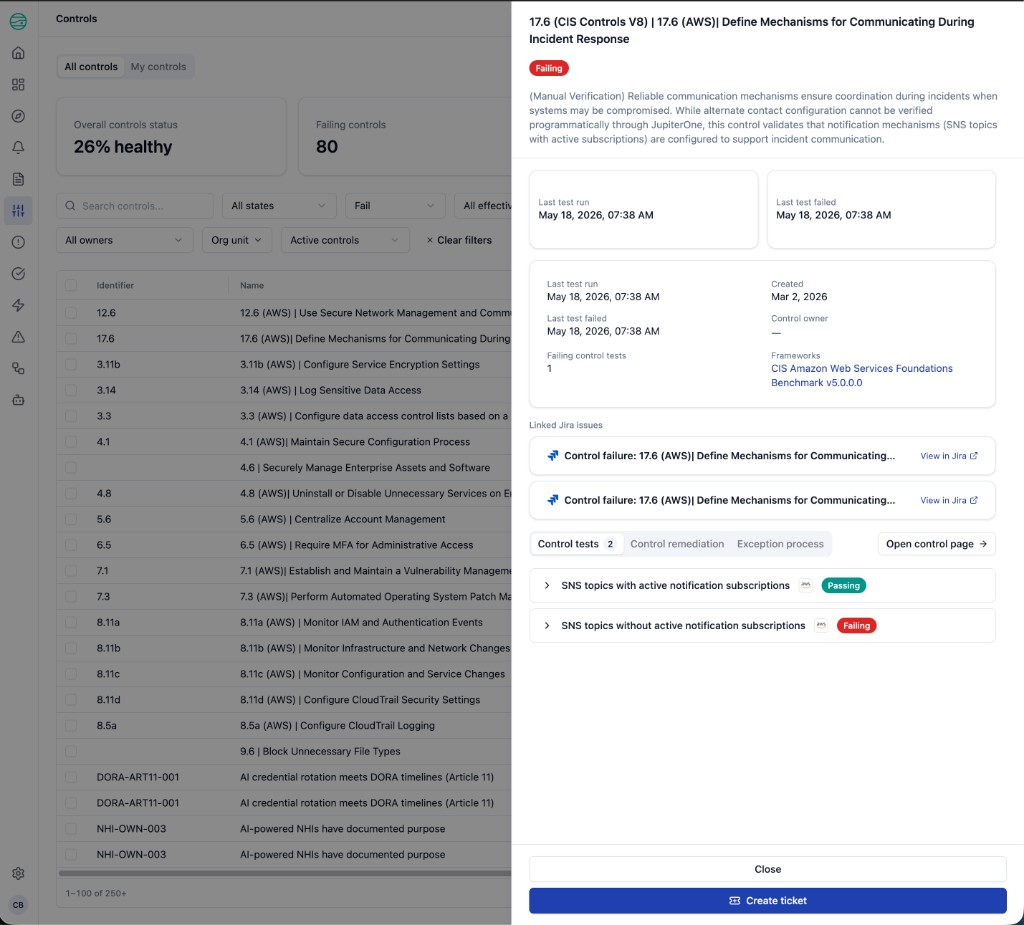
Click Create ticket. The Create ticket modal opens.
Existing Linked Jira issues rows do not block creating another ticket. Tickets stack chronologically and each one is independently created in Jira. Use the existing rows as context (a colleague may have already filed it) before deciding to file again.
Step 3: Fill the four fields
The Create ticket modal has exactly four fields in 1.0. Project, issue type, and any Jira-side custom fields are determined by the Workflow you select - they are not exposed in this modal in this release.
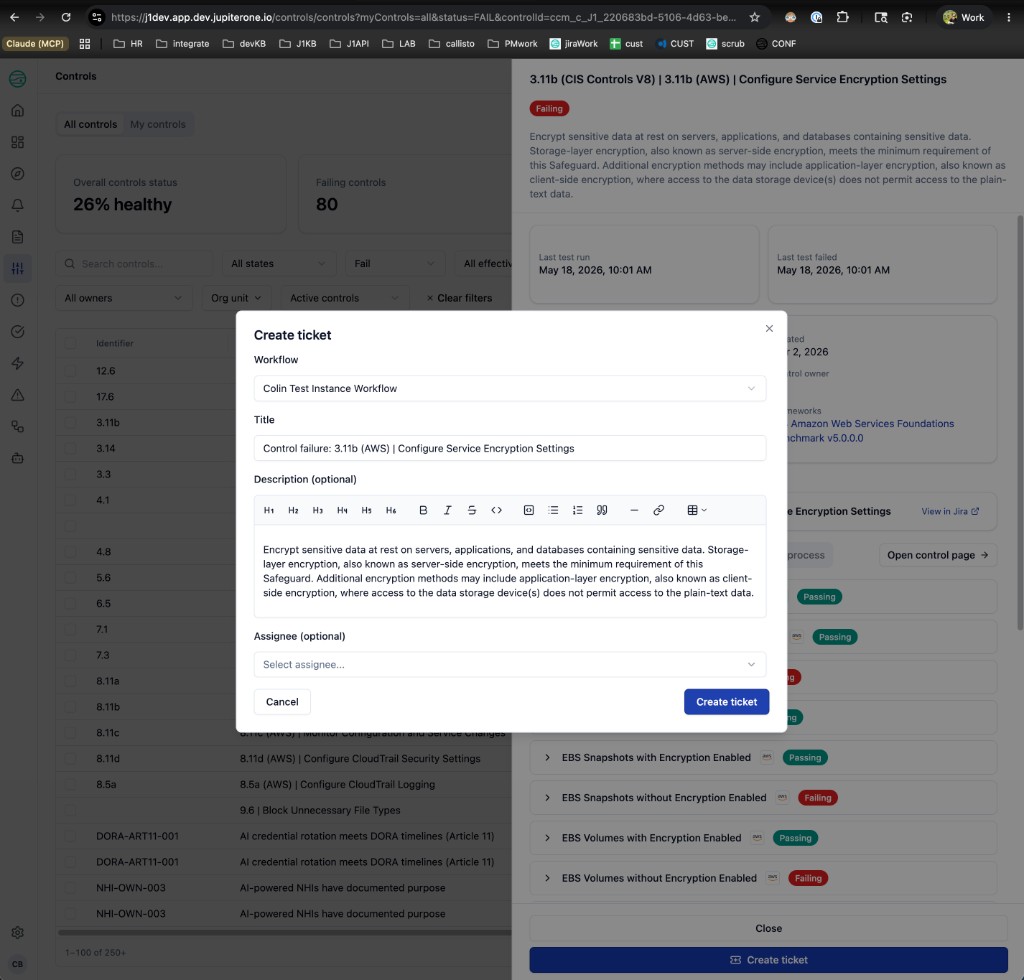
| # | Field | Behavior |
|---|---|---|
| 1 | Workflow | Required. Dropdown of every Active Jira workflow (instance) in your workspace. If exactly one exists, it is preselected. The Workflow you pick determines the Jira project, issue type, and connection that will receive the ticket. |
| 2 | Title | Required. Single-line text input. Prefilled with Control failure: {control name} - for example, `Control failure: 8.11a (AWS) |
| 3 | Description | Optional. Rich-markdown editor with a toolbar covering H1-H4, bold, italic, strike, inline code, code blocks, blockquotes, ordered and bullet lists, horizontal rules, links, and tables. Prefilled from the control's description text plus a list of failing tests. The markdown is converted to Jira wiki markup on submit so headings, lists, and links render natively in Jira. |
| 4 | Assignee | Optional. Searchable dropdown of Jira users resolved from the selected Workflow's connection. Until you pick a Workflow, the placeholder reads "Select a workflow to see list of assignees". Leave empty to file the ticket unassigned. |
Step 4: Click Create ticket
When the four fields are filled in to your liking, click Create ticket at the bottom-right of the modal. JupiterOne POSTs the payload to the Workflow's underlying webhook and the modal closes when the call completes. A confirmation toast surfaces on success; on failure, the modal stays open with the error so you can correct and retry.
What is not in this modal in 1.0 - intentionally:
- Project picker - determined by the Workflow's
Data in Jira integrationfield - Issue type picker - determined by the Workflow's
Issue typefield - Priority, Labels, Severity, and other Jira fields - not exposed in 1.0
If you need to change which project or issue type a ticket files under, switch which Workflow you pick from the dropdown - or have an admin create a new instance targeting the project + issue type you need.
Step 5: Confirm in CCM and jump to the Jira ticket
After Create ticket succeeds, two surfaces update.
Linked Jira issues on the control detail panel
The control detail panel that originated the modal now lists the new ticket in the Linked Jira issues section, along with any prior tickets created for the same control. Each row shows the ticket title and a View in Jira external-link button.
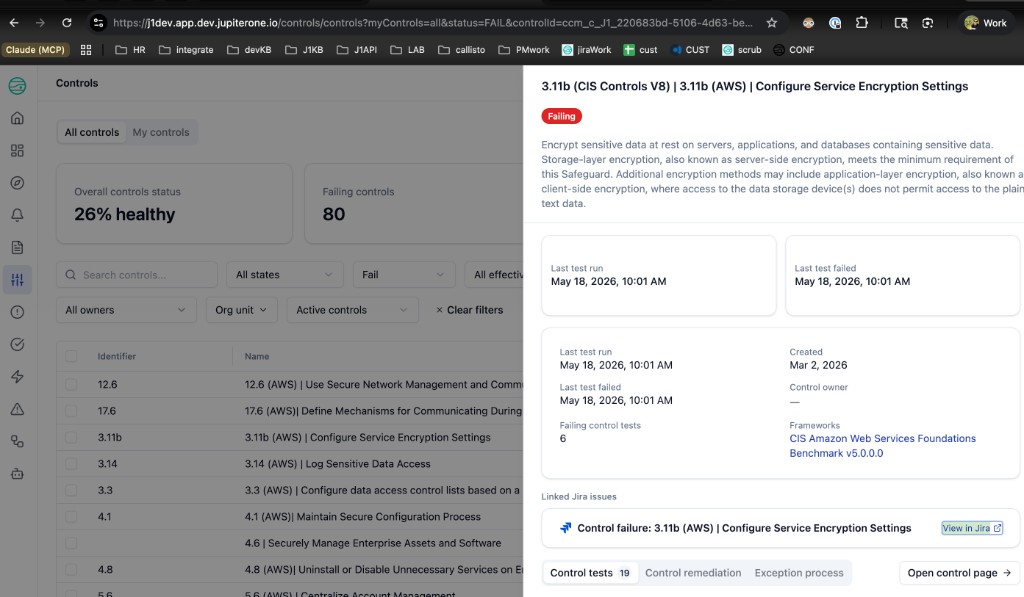
The list is reverse-chronological - the most recent ticket is at the top. Tickets are not deduplicated automatically; if your team only wants one open ticket per control at a time, encourage the team to check this section before clicking Create ticket again.
View in Jira
Click View in Jira on any row to open that ticket directly in Atlassian. You should see:
- Title prefixed with
Control failure: - Description rendered with a Failing control tests heading and a bulleted list of the specific failing tests with entity counts (the markdown from the modal converts cleanly to Jira wiki markup)
- Reporter set to the JupiterOne user who clicked Create ticket
- Assignee, if you picked one in the modal
- Priority and Issue Type populated from the Workflow's underlying configuration
For the underlying outbound delivery record (status, timing, error message), open the originating Workflow's instance detail page (Data out > Instances > {Workflow name}) - the call you just made appears at the top of the per-instance Jobs table. See Per-instance Jobs table.
Empty states
If you click Create ticket but no Active Jira workflow exists, the modal renders an empty state instead of the four-field form. The message changes based on your role.
| Role | What you see | What to do |
|---|---|---|
| Full admin | "No data-out ticketing workflow configured yet" + a Go to connections CTA pointing at Data out > Connections | Click the CTA. Follow Configure a Jira connection end-to-end. Once a workflow is Active, return to the failing control and click Create ticket again. |
| Non-admin | "Ask an admin to set up a data-out ticketing workflow." | Notify a workspace admin. They can use the link above to set up the first workflow. |
The same empty state appears when every Jira workflow in the workspace has been Stopped - the Workflow dropdown only lists Active instances.
Failure handling
If Jira rejects the ticket (for example, the project requires a custom field not provided, or the API token expired between when the workflow was created and when you clicked Create ticket), the modal surfaces the error inline and stays open. Your typed values are preserved. Common follow-ups:
- API token expired - have an admin re-authorize the connection, then retry
- Required custom field missing - put the missing context into the Description field and retry
- Project archived - have an admin edit the instance to point at a current project, or pick a different Workflow
For a fuller list, see Troubleshooting.