Jira
- Setup guide
- Privacy Policy
- Terms & Conditions
- Security Policy
Setup Guide
Overview
The application facilitates seamless integration with JupiterOne and Jira, enhancing the ability to manage and respond to cybersecurity alerts. This integration empowers users to automatically generate Jira tickets from JupiterOne alerts and create alerts within the system, ensuring that critical vulnerabilities are promptly addressed. The application fetches data from JupiterOne, maps fields to Jira issues, and allows for customization of these mappings. With automated alert creation, ticket generation, and updates, the application streamlines workflows and improves the efficiency of incident response processes. The user-friendly setup and real-time synchronization between JupiterOne and Jira ensure that cybersecurity efforts are both comprehensive and up-to-date, ultimately strengthening your organization’s security posture.
Prerequisites
Ensure the JupiterOne account must have the following permissions:
- Full Admin Privileges
- API Key Management (Read and Write)
- Alerts (Read and Write)
Ensure the Jira account must have the following permission:
- Admin Privileges
Configuration in JupiterOne
Generating JupiterOne API Token
- Log in to the JupiterOne portal using your Administrator privileges.
- Go to Settings > API Tokens
- Click on New Token
- Provide the following details
- Token Name Assign a name to the token.
- Days before Expiration Set the token's expiry date.
- Copy the API Token and save it securely as it can only be viewed once.
Get JupiterOne Account ID
- Log in to the JupiterOne portal using your Administrator privileges.
- Go to Settings > Account Management
- Copy the Account ID
Configuration in Jira
Before beginning the configuration, ensure that you have a JIRA project created
-
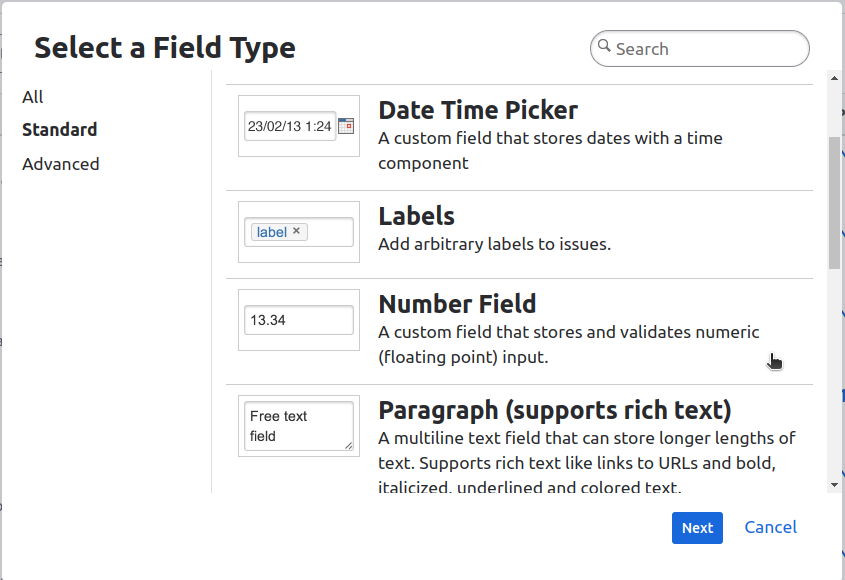
Go to your project and click on the Project Settings. Navigate to Issues, open any issue type, click on Go to Custom fields at bottom right, and click on the Create Custom Field button

-
Select required field type
- To map specific field types, create custom fields in Jira as follows:
- Number Field: For mapping number-type fields.
- Labels: For mapping array-type fields.
- Datetime Picker: For mapping datetime-type fields.
- To map specific field types, create custom fields in Jira as follows:
-
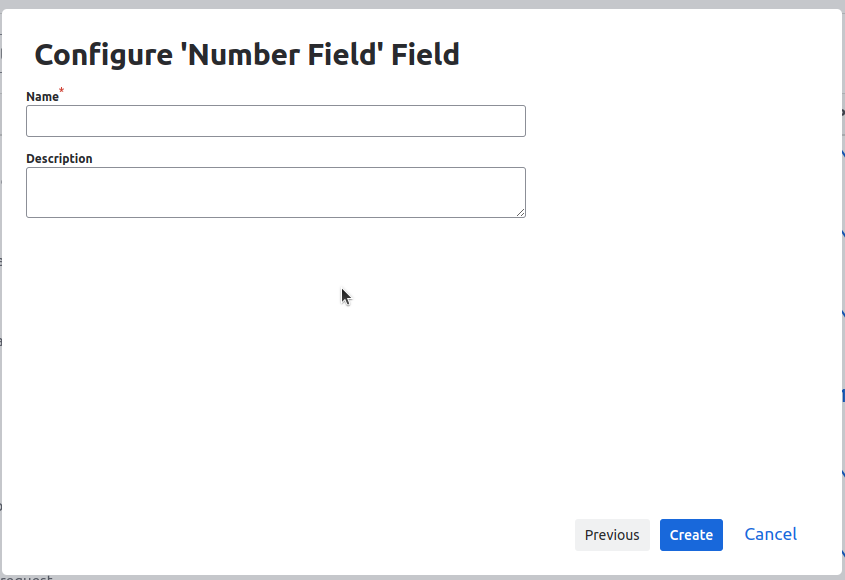
Enter the field name, description and click on the Create button.
-
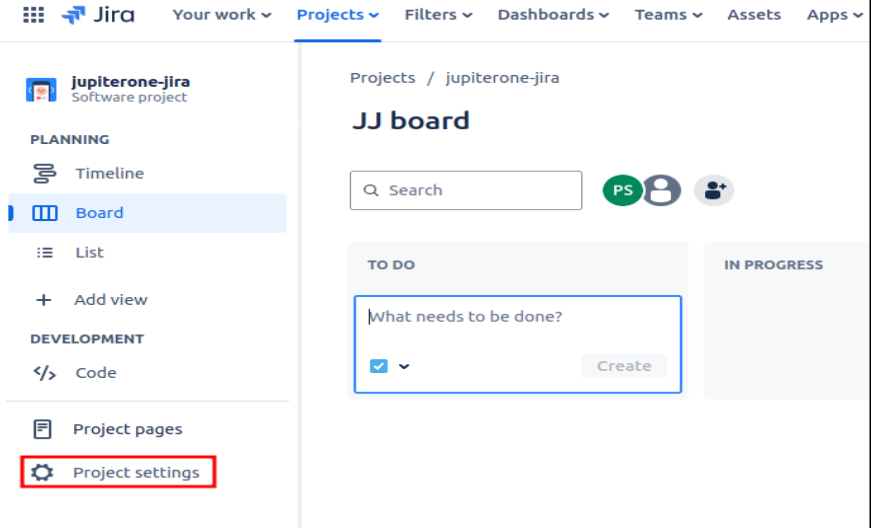
Go to your project and click on the Project Settings
-
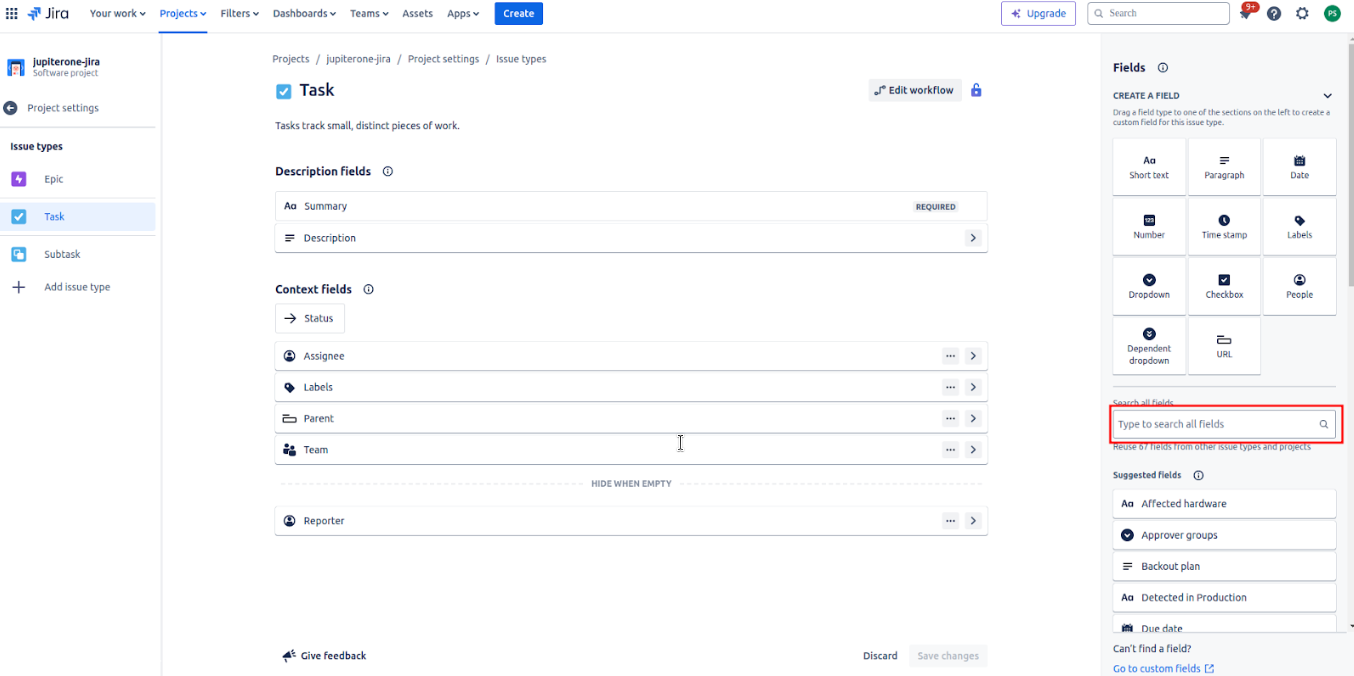
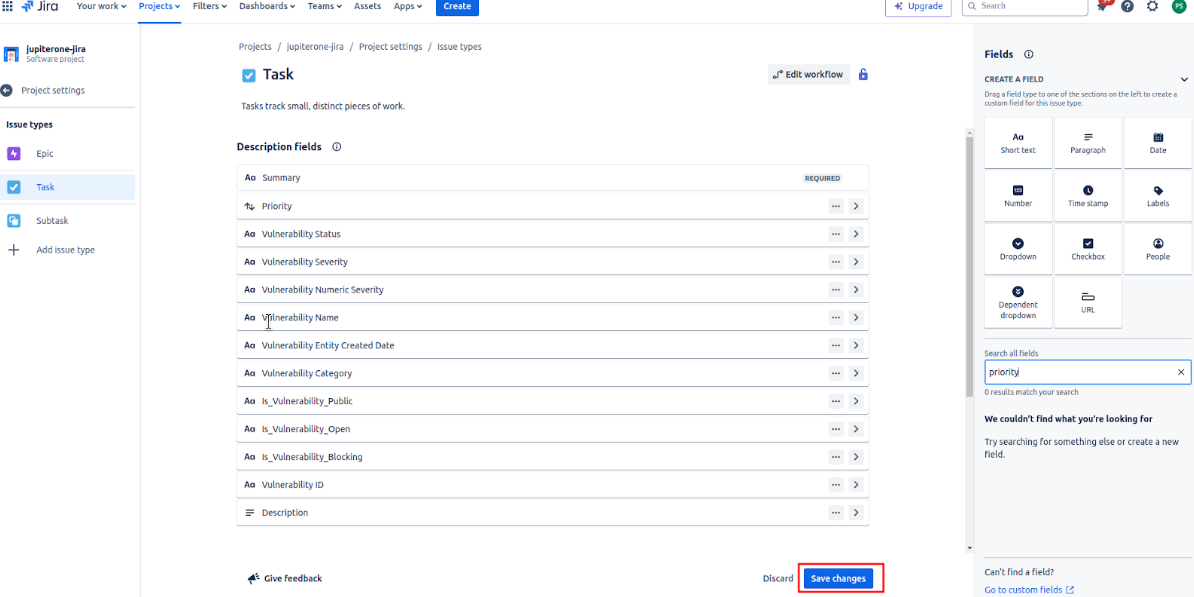
Go to Issue Types, select an issue, and search for the required custom fields
-
The custom fields will be visible under the Description fields tab. Once you have added all the custom fields, click on the Save changes button.
Using the Application
The integration enables you to use the following functionalities within the JIRA dashboard
- You can create JupiterOne alerts.
- You can map JIRA fields with JupiterOne fields to create Issues for vulnerabilities.
Creating Alerts
-
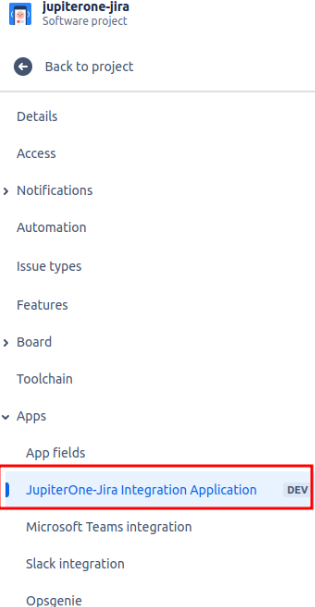
Go to your project > Project Settings > Apps and select the JupiterOne-Jira Integration Application
-
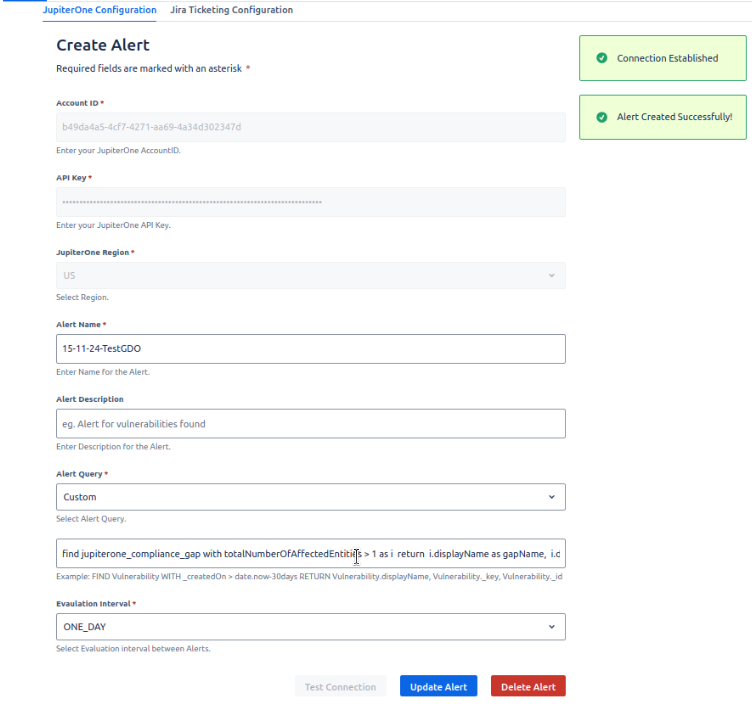
Go to the JupiterOne Configuration tab.
-
The application will prompt you to enter the following details
- JupiterOne account ID
- JupiterOne API Key
- JupiterOne instance region
- Name of the Alert
- Alert query
- Evaluation Interval
-
After entering the details, click on the test connection button. This will authenticate your credentials and create the alert. After successful authentication and alert creation, Status will be shown
Mapping JIRA fields with JupiterOne fields
-
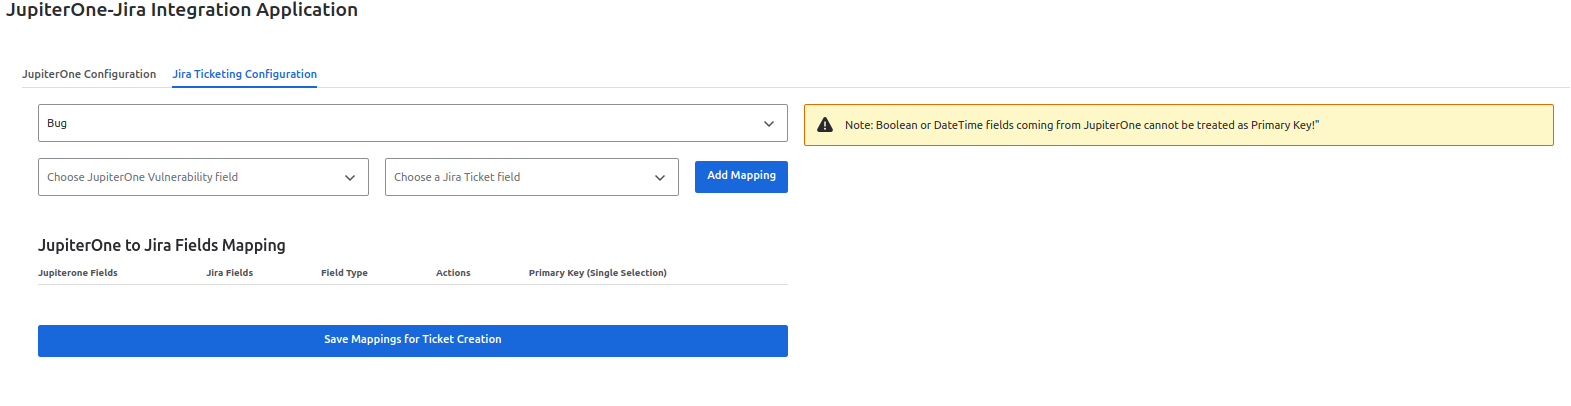
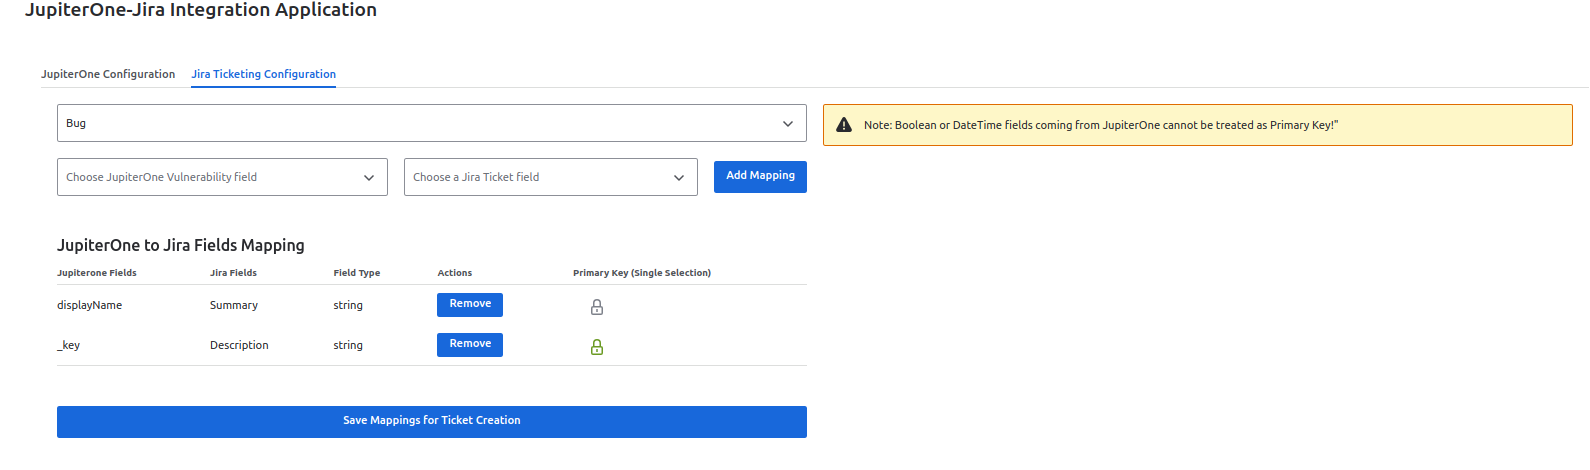
Go to the JIRA ticketing configuration tab
-
Select Issue type
-
Select the JIRA field and JupiterOne field that you want to map and click on the Add Mapping button
- Summary and Description JIRA fields are required to be mapped.
- Boolean or DateTime fields coming from JupiterOne cannot be selected as Primary Key
-
Your mappings will be shown under the JupiterOne to Jira Fields Mapping table. You can remove a mapping by clicking on the Remove button under Actions.
-
Click on the lock icon next to the mapping you want to select as the primary key.
-
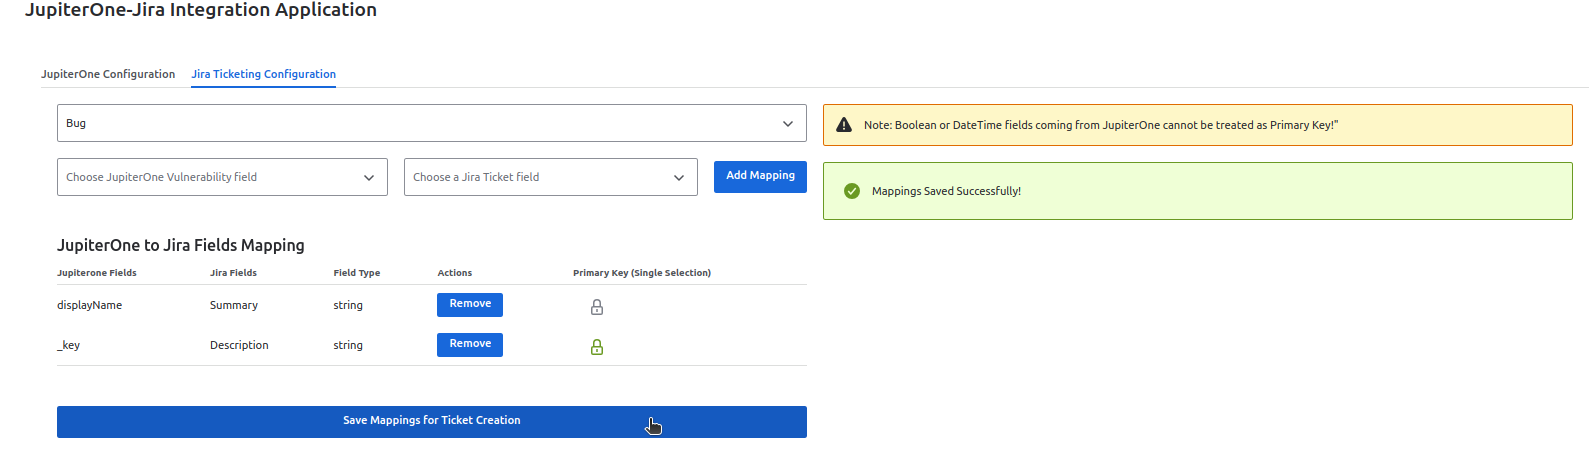
After adding the mappings, click on the Save Mappings button to save the mappings. Upon successful completion, a status box indicating “Mappings saved successfully” will be shown
Updating Alerts
-
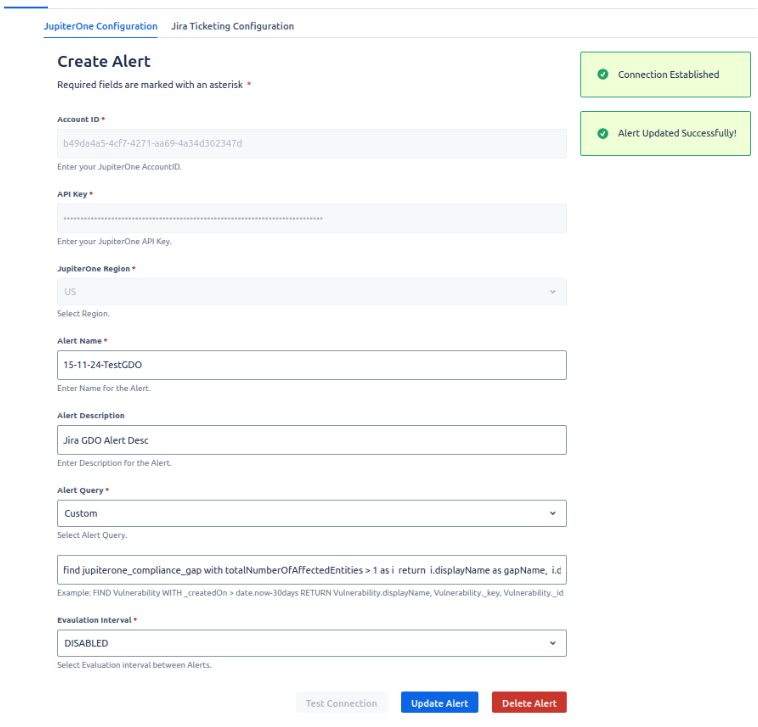
Go to the JupiterOne Configuration tab.
-
The application will prompt you with the configured page where JupiterOne account ID, JupiterOne API Key, the JupiterOne instance region fields and Test connection button will be disabled.
-
Modify Alert Name, alert query, and the evaluation interval of the alert as per requirement.
-
After entering the data, click on the Update Alert button. This will authenticate your credentials and update the alert. After successful authentication and alert creation, Status will be shown
Note:
After Alert Updation, the fields of JupiterOne Fields dropdown will also be updated according to the change in query and mappings can be done accordingly
Deleting Alerts
-
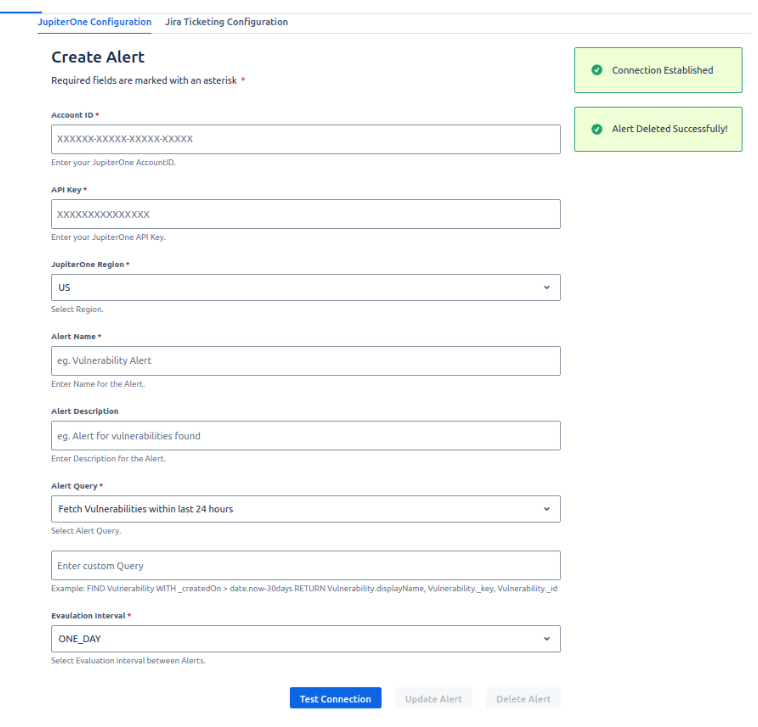
Go to the JupiterOne Configuration tab.
-
The application will prompt you with the configured page where JupiterOne account ID, JupiterOne API Key, the JupiterOne instance region fields and Test connection button will be disabled.
-
Click on the Delete Alert button. This will authenticate your credentials and update the alert. After successful authentication and alert creation, Status will be shown
Limitations
Duplicate issues
In Jira duplication of issues arises when the primary key value of the data is empty or the string acting as primary key has some special characters.
- The supported special characters are @, #, $, %, &, and -
Numeric data
When few math operations are used on return properties of custom query Numeric data may come as undefined.
-
Supported Math Operations for custom query are +, -, *. Math Operations can be used as mentioned in the below example.
FIND jupiterone_compliance_gap with totalNumberOfAffectedEntities > 1 as i return i.displayName, i.description, i.ref, i.totalNumberOfAffectedEntities+5, i.framework
-
For other Math operations alias should be used as mentioned in the below example
FIND jupiterone_compliance_gap with totalNumberOfAffectedEntities > 1 as i return i.displayName, i.description, i.ref, i.totalNumberOfAffectedEntities/5 as gapAffected, i.framework
Troubleshooting
This section aims to guide users about the possible problems they might encounter while using the app. Please follow the instructions if you come across any of the following scenarios
Alert creation failure
- The alert name should be unique.
- Make sure your account has the required permissions to create alerts.
JIRA field names not visible
If the JIRA field names are not appearing in the "Choose a JIRA Ticket Field" dropdown, please refresh the page.
Debugging
If you encounter issues while using the app, you can use your browser's developer console to help diagnose problems. Follow these steps:
- Open the Browser Console:
- Press F12 or Ctrl+Shift+I (Windows/Linux) or Cmd+Option+I (Mac) to open the developer tools.
- Navigate to the "Console" tab to view logs, errors, and warnings.
Conclusion
In conclusion, this document has provided a detailed guide to using the JupiterOne and Jira integration app. By integrating these platforms, users can enhance their workflow efficiency and vulnerability management capabilities. The app facilitates the automatic creation of alerts and seamless synchronization of vulnerability data, ensuring that critical issues are tracked and resolved in Jira. Additionally, users can leverage this integration to gain real-time insights and maintain a comprehensive view of their security posture within the Jira environment.
Privacy Policy
Updated: January 2025
JupiterOne ("we," "our," or "us") is committed to protecting your privacy. This Privacy Policy explains how we collect, use, disclose, and safeguard your information when you use our website, products, or services.
Information We Collect
When you interact with our services, we may collect various types of personal data, including but not limited to:
Account Information
We may collect JupiterOne Account identifiable information, such as your Account ID, Region, and API key of the account. We may keep a record of your communications with us and other information you share during the course of the communications.
Usage Data
We may collect information about how you interact with JupiterOne's website, products, or services.
Purpose of Processing
We may use your information for the following purposes:
- Personalize User Experience: To personalize user experience and provide requested services.
- Service Provision: To provide and maintain our services, process transactions, and fulfill your requests.
- Analytics: To analyze user behavior, improve our offerings, and enhance the user experience. To enhance existing user profiles, verify and update information, and enrich the understanding of user preferences and behaviors.
- Security: To protect against unauthorized access, detect and prevent fraudulent activities.
We process your Account data based on one or more of the following legal grounds:
- Consent: When you provide explicit consent for specific processing activities, such as opting out of our marketing communications.
- Contractual Necessity: When processing is necessary for the performance of a contract with you.
- Legal Obligations: When processing is required to comply with legal obligations.
- Legitimate Interests: When processing is based on our legitimate interests and does not override your rights and freedoms.
- Other Purposes: We will process your personal information for other purposes about which we notify you in advance, or for which we receive your consent. In general, we collect and process personal information about you as necessary to provide the products you use, operate our sites and business, meet our contractual and legal obligations, protect the security of our systems and our customers, or fulfill other legitimate interests as described in this Privacy Policy and in our notices to you.
Information Sharing
We do not sell, trade, or rent your personal information to third parties. However, we may share your information with trusted third parties who assist us in operating our website, conducting our business, or servicing you.
Cookies and Similar Technologies
We may use cookies and similar technologies to collect information and enhance your experience.
Security
We implement reasonable security measures to protect your information from unauthorized access, disclosure, alteration, or destruction.
Changes to This Privacy Policy
We may modify or update this Privacy Policy from time to time to reflect changes in our business and practices. Please review this page periodically. Any changes to this Privacy Policy will be indicated by updating the 'Last Updated' date above. For significant modifications, we will provide additional notice or obtain consent as required by applicable law.
Contact Us
If you have questions about this Privacy Policy, please contact us at privacy@jupiterone.com.
Terms and Conditions
Effective Date: 13/01/2025
These Customer Terms of Service (“Terms”) govern the use of the JupiterOne Jira Integration application ("App") provided by JupiterOne ("we", "our", or "us") on the Atlassian Marketplace for integration with Jira. By installing, accessing, or using the App, you agree to be bound by these Terms. If you do not agree to these Terms, you may not use the App.
1. License Grant
1.1 License
We grant you a non-exclusive, non-transferable, revocable license to install and use the App solely for internal business purposes within your organization, subject to the terms of this agreement.
1.2 Usage Restrictions
You shall not:
- Sublicense, lease, distribute, transfer, or assign the App.
- Reverse-engineer, decompile, or disassemble the App.
- Use the App in any manner that violates applicable laws or regulations.
2. Pricing and Payments
2.1 Pricing��
The pricing for the App is as stated on the Atlassian Marketplace listing. Pricing may vary depending on the number of users or features selected.
2.2 Payment
Payments for the App are processed via the Atlassian Marketplace, and you agree to pay the applicable subscription fees in accordance with Atlassian’s payment terms.
2.3 Subscription Term and Renewal
Subscriptions may be charged on a monthly or annual basis, as selected at the time of purchase. Subscriptions automatically renew unless canceled prior to the renewal date.
2.4 Refund Policy
Unless required by law, we do not offer refunds for subscription fees, except in cases where the App is found to be non-functional or fails to meet the agreed-upon specifications.
3. Trial Period
3.1 Trial Period
If a trial period is offered, you may use the App free of charge for the trial duration specified in the Marketplace listing. After the trial period ends, you will be charged according to the pricing plan selected unless you cancel the subscription before the trial expires.
4. Support and Maintenance
4.1 Support
We provide support for the App as specified in the Atlassian Marketplace listing. Support requests can be made by sending an email to support@jupiterone.com, and we will respond to such requests within a reasonable timeframe.
4.2 Updates
We may provide updates, bug fixes, or new versions of the App. You are responsible for keeping the App up to date, and updates will be made available to you as part of your subscription.
5. Data Privacy and Security
5.1 Data Collection
The App may collect certain data, including but not limited to usage statistics, error logs, and other information necessary for support and improvement purposes. We will handle all customer data in accordance with our Privacy Policy.
5.2 Data Security
We implement reasonable security measures to protect your data. However, we do not guarantee that your data will be completely secure.
5.3 Data Usage
We will not sell or rent your personal data to third parties. We may use aggregated, non-personally identifiable data to improve the App and provide better services.
6. Intellectual Property
6.1 Ownership
We retain all rights, titles, and interest in and to the App, including all intellectual property rights. You do not acquire any ownership rights in the App, other than the limited rights expressly granted in these Terms.
6.2 User Content
You retain ownership of any content you input into the App but grant us a license to use such content to provide the services described in these Terms.
7. Termination
7.1 Termination by You
You may terminate your subscription at any time by canceling through the Atlassian Marketplace. Your access to the App will continue until the end of your current billing cycle.
7.2 Termination by Us
We may terminate or suspend your access to the App at any time if you breach these Terms, fail to make payment, or otherwise engage in conduct that we deem inappropriate.
7.3 Effect of Termination
Upon termination of this agreement, you must cease using the App and remove it from your Jira instance. Any fees paid up to the date of termination are non-refundable.
8. Limitation of Liability
8.1 No Warranty
The App is provided "as-is" without warranty of any kind, either express or implied, including but not limited to implied warranties of merchantability or fitness for a particular purpose.
8.2 Limitation of Liability
To the maximum extent permitted by law, we are not liable for any indirect, incidental, special, consequential, or punitive damages, or loss of profits, data, or goodwill, arising from or related to your use of the App.
9. Governing Law and Dispute Resolution
9.1 Governing Law
These Terms shall be governed by and construed in accordance with the laws of [Your Jurisdiction].
9.2 Dispute Resolution
Any disputes arising out of or in connection with these Terms shall be resolved through [arbitration/mediation] in [Location], in accordance with the rules of [Arbitration Organization].
10. Changes to These Terms
10.1 Amendments
We may update these Terms from time to time by posting a new version on the Atlassian Marketplace. You will be notified of significant changes through the App or via email.
10.2 Effective Date
Any updates to these Terms will become effective on the date they are posted.
11. Miscellaneous
11.1 Entire Agreement
These Terms constitute the entire agreement between you and us with respect to the App and supersede all prior agreements, whether written or oral.
11.2 Severability
If any provision of these Terms is found to be unenforceable, the remaining provisions shall remain in full effect.
Security and Compliance Policy
Updated: January 2025
Overview
This document outlines the security and compliance policies for the JupiterOne-Jira Integration Application, ensuring that all customer data and system operations are protected and meet standard compliance requirements.
Security Governance
We maintain a robust security governance framework that includes regular risk assessments, monitoring, and continuous improvement efforts to mitigate threats to the JupiterOne-Jira Integration Application.
Access Control
- User Authentication: Access to the Jira JupiterOne Application is done via the JIRA Authentication.
- Role-Based Access Control (RBAC): All users with Jira admin access to the project are granted access to the application based on their roles.
- Session Management: By default, session timeout is the same as Jira session timeout
Data Protection
- Data Encryption: All sensitive data is encrypted using in-built methods of JIRA Storage
- Data Minimization: We adhere to the data minimization principle, collecting only the necessary information required for Jira integration and compliance monitoring.
- Backup and Recovery: Customers are responsible for backing up state data on the JupiterOne-Jira Integration Application Platform. The Application provides a reflection of Customer Data from Jupiterone and should not serve as the system of record for any novel Customer Data.
Continuous Improvement
We are committed to continuous improvement and the adaptation of new security measures in line with evolving industry best practices. Periodic security reviews and internal audits are conducted to ensure compliance with current standards.
Data Subject Rights
Data Access: Customers can request a copy of all data stored within the Jira JupiterOne Application at any time. Since the app is hosted in JIRA Server itself, this data can be obtained with the collaboration of JIRA Support
Training and Awareness
We conduct regular security and compliance training for all employees and contractors involved in the development, deployment, and maintenance of the Jira JupiterOne Application. Security best practices and compliance obligations are embedded into the onboarding and ongoing training programs.
Review and Updates
This policy is reviewed annually or whenever there are significant changes in regulations, technology, or organizational structure. Updates to the policy will be communicated to all users.
Contact Us
If you have questions about this Policy, please contact us at support@jupiterone.com.